Here is a set of Smoke brushes that I think you should download and install in Photoshop. They are marvellous and you can effortlessly add an absolutely realistic smoke effect on any image instead having to spend a long time creating the smoke yourself. And, that too if you are an expert. Even I am not one.
Download the Brushes here. They are totally free.

You will see this when you click the link .

These are the Brushes that you get absolutely free. There is no catch.

This is an effect you can create with the brushes.

Here is another effect that can be created with these brushes. You will find all these examples when you click the
link.

Step 1 : Now to use the Smoke Brushes. I have opened this free stock image in Photoshop. You can download it
here.
Step 2 : Look in the Layers pallette. You will find only the background Layer. Press CTRL+J. You will find that the Background duplicates into Layer1. Note that Layer 1 is highlighted. When it is highlighted it means that you are on this layer.

Step 3 : Go to Filter>Blur>Radial Blur.

Step 4 : The Radial Blur dialogue box opens. Drag the Amount slider all the way to the right or till 100 shows in the box. Change the Blur Method to Zoom and the Quality to Good or even Best it just takes a bit more time. Click ok.

Here is what my photo looks like after applying the Radial Filter.

Step 5 : Click the Add Layer Mask button and a Layer Mask forms next to the layer thumbnail on Layer1.

Step 6 : Make sure that the Background Color is set to White and Foreground to Black. This is the deafult setting. If it is not press 'x' and then 'd' on your keyboard.

Step 7 : Now click on the Brush Tool. You can make the brush tip soft by pressing [+Shift key. You can make it hard by press]+Shift key.To make the brush tip big press ] . To make it small press [. You should remember these shortcuts. They are very helpful.

Step 8 : Now bwgin brushing with a suitable brush tip. You can make it large or small as you paint.

Step 9 : Should accidentally brush away a part you do not wish to be seen, change the Foreground Color to white by clicking on the small bent arrow above it. Paint away the mistake, then change the Foreground Color to Black and continue painting till the skull is exposed adequately.

I have finished exposing the skull from the blur that hid it.

Step 10 : Click the New Layer icon and a new layer -- Layer 2 forms. Note that it is highlighted. It means you are on this layer.

Step 11 : Click on the Brush Tool.

Step 12 : Click on this icon on the top right of the panel. It will reveal all the Brushes that you have. Perhaps you have only been using the default brush set. You may never have tried the other brushes that exist in your version of Photoshop.

Step 13 : As soon as you click the icon, the Brushes dialogue box opens. This is the default set that you normally access. There are many other sets available. Click on the tiny black arrow onthe extreme top right (where the red arow points to). Now click that tiny black arrow.

Step 14 : The entire sets of brushes are now revealed. I have quite a lot of downloaded brushes here too. That does not matter. You will find plenty of sets on your own version. Since the set I will be using is not found in Photoshop, I have asked you to download it.

Step 15 : This is the Brush set I asked you to download. Click on it. It will show the brushes that are available in this set.

Step 16 : As soon as you click this dialogue box opens. It will open every time you click a brush set. Click ok.

Step 17 : The Smoke Brush set has opened. Click on the Brush Tip Shape. You will find the above dialogue box. At the bottom you will find the Spacing slider. Drag it till you are able to see the brushes as above, otherwise it appears as a thick black line. I have chosen Brush 2500. All brushes have a number and name. Hover your cursor over the brush and you will be able to read its name.
Step 18 : Before using the Brush change the Foreground Color to White. Then make the brush large enough and click just once. This is the effect that I have got.

Sometimes a high resolution brush is so large that you will not be able to see it on your screen. In that case click where the red arrow points to reveal the brushes that have now become the default and reduce the Master Diameter by dragging the slider to the left.

Step 19 : Now click on the top right of the pane and bring up the Brushes dialogue box. Click on the tiny black arrow on the top right to bring up the brush sets.

Step 20 : The brush sets dialogue opens. From it click on ' reset Brushes'. Always remember to do it. Otherwise the current brush will become your default brush.

Step 21 : This dialogue box again pops up. Click ok.

You will that the brushes pallette reset to the default.
 Step 22 : Go to the Layers pallette and click the Add Layer Mask button.
 Step 23 : A Layer Mask has formed next to the layer thumbnail on Layer 2, which was the layer you were working on.
 Step 24 : Make sure the Foreground is set to Black and Background to White.
 Step 25 : Click on the Zoom Tool and zoom into the image.

Step 26 : Click on the Brush Tool.
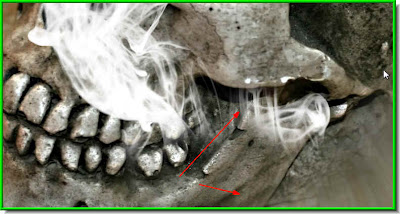
Step 27 : Now with the Brush Tool begin painting away portions of the smoke to reveal the bones. I have painted away some of the smoke from around the jaws.
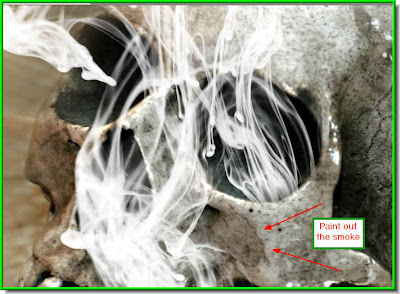
Step 28 : I have painted a portion of the smoke near the eye socket to make it seem as if it was coming from inside the skull.
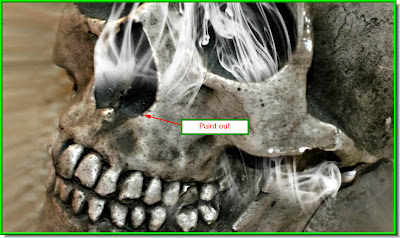
Step 29 : I have painted away a portion of the smoke from near the nostrils.
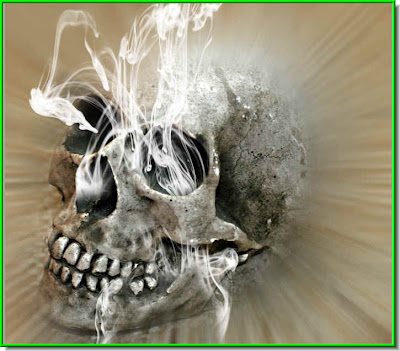
Step 30 : Zoom out and add the final touches, paint with Back as Foreground Color to reveal more of the bones or paint with Foreground set to White to cover portions that you do not wish to expose.

Step 31 : Reduce the Opacity of the layer by dragging the slider as shown. I have reduced the opacity to 86 per cent. There is nothing hard and fast about it.

Step 32 : Now click on Layer 1 that contains the skull image. It means you are now on this layer.
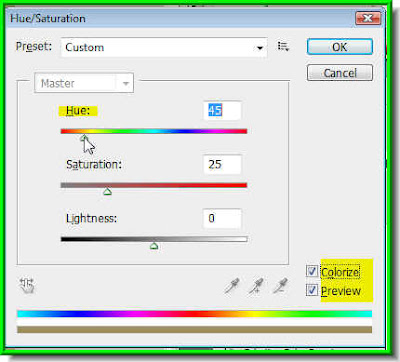
Step 33 : Press CTRL+U. The Hue/Saturation dialogue box opens. Check the Colorize. Preview will be checked by default. Now drag the Hue slider either to the left or the right slowly. As you drag the image will change color. Stop when you are satisfied. Then click ok.
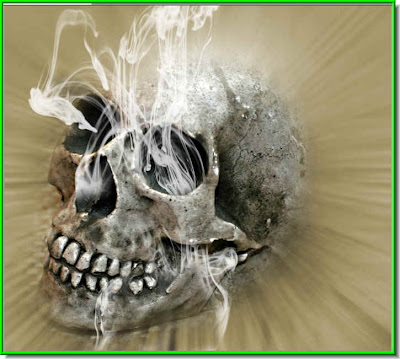
This is the final image. Try it out. It should not be difficult at all. You can always contact me at pradip.chowdhury@gmail.com
You will find other tutorials here.
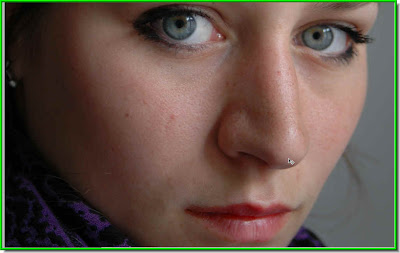
 Step 1 : I have opened this free stock photo in Photoshop to which I will apply the Vibrance.
  Step 2 : The Vibrance adjustment is found where the red arrow points to.
 Step 3 : When you click on Vibrance you will see this dialogue box opening. Click on Masks.
 Step 4 : Click on Masks and then on Invert. You will see that the White Pixel Mask change to Black.
 Step 5 : Click back on Adjustments and drag the Saturation slider to -100.
  Note : This is how your Layers pallette looks like. The Background photo is not affected when we use the Vibrance, because we are working on an adjustment layer.
 Step 6 : The Foreground Color should be White.
 Step 7 : I have zoomed into the image with the Zoom Tool so I can see the eyes more clearly.
 Step 8 : Now click on the Brush Tool.
 Step 9 : In the top panel change the opacity to 100% or you will not be able to make out what you are doing.
 Step 10 : Now paint with the Brush Tool and all color information disappears.
 I have done the same with the other eye. Both are now Black and White. The rest of the colors in the image are unaffected.
 Step 11 : Now click the circle like arrow which sets the adjustments back to default or zero.
 The Vibrance and Saturation sliders are back to zero.
 Step 12 : I have now dragged the Vibrance slider +100 and the Saturation slider to +20. There is nothing hard and fast about these figures. It will depend on your image. It may be more, it may be less.
 The picture op top is the one with Vibrance added and the one at the bottom is the original photo. You can easily make out the difference in the eyes.
 Step 13 : I have now zoomed in on the lips. Let's add some color to it.
 Step 14 : Click on Vibrance and a new adjustment layer Vibrance2 forms in the Layers pallette.
 Step 15 : Go to Masks and click on invert.
 Step 16 : The Pixel mask changes to Black and the Foreground changes to White.
 Step 18 : Click on the Brush Tool.
 Step 19 : Carefully paint out the color with the Brush Tool. They will become grey.
 Step 20 : Now reset the Adjustments to default by clicking on the button shown.
 The color returns to the lips.
 Step 21 : Now keeping an eye on your image first drag the Vibrance slider to the right, then the Saturation slider. These are my settings, but need not be yours. It will depend on your image. By the way, note the arrow at the bottom left. This is to take you back to the Adjustment pallette.


 Step 1 : Now to use the Smoke Brushes. I have opened this free stock image in Photoshop. You can download it
  Step 2 : Look in the Layers pallette. You will find only the background Layer. Press CTRL+J. You will find that the Background duplicates into Layer1. Note that Layer 1 is highlighted. When it is highlighted it means that you are on this layer.
 Step 4 : The Radial Blur dialogue box opens. Drag the Amount slider all the way to the right or till 100 shows in the box. Change the Blur Method to Zoom and the Quality to Good or even Best it just takes a bit more time. Click ok.
 Step 5 : Click the Add Layer Mask button and a Layer Mask forms next to the layer thumbnail on Layer1.
 Step 6 : Make sure that the Background Color is set to White and Foreground to Black. This is the deafult setting. If it is not press 'x' and then 'd' on your keyboard.
 Step 7 : Now click on the Brush Tool. You can make the brush tip soft by pressing [+Shift key. You can make it hard by press]+Shift key.To make the brush tip big press ] . To make it small press [. You should remember these shortcuts. They are very helpful.
 Step 8 : Now bwgin brushing with a suitable brush tip. You can make it large or small as you paint.
 Step 9 : Should accidentally brush away a part you do not wish to be seen, change the Foreground Color to white by clicking on the small bent arrow above it. Paint away the mistake, then change the Foreground Color to Black and continue painting till the skull is exposed adequately.
 I have finished exposing the skull from the blur that hid it.
 Step 10 : Click the New Layer icon and a new layer -- Layer 2 forms. Note that it is highlighted. It means you are on this layer.
 Step 11 : Click on the Brush Tool.
 Step 12 : Click on this icon on the top right of the panel. It will reveal all the Brushes that you have. Perhaps you have only been using the default brush set. You may never have tried the other brushes that exist in your version of Photoshop.
 Step 13 : As soon as you click the icon, the Brushes dialogue box opens. This is the default set that you normally access. There are many other sets available. Click on the tiny black arrow onthe extreme top right (where the red arow points to). Now click that tiny black arrow.
 Step 14 : The entire sets of brushes are now revealed. I have quite a lot of downloaded brushes here too. That does not matter. You will find plenty of sets on your own version. Since the set I will be using is not found in Photoshop, I have asked you to download it.
 Step 15 : This is the Brush set I asked you to download. Click on it. It will show the brushes that are available in this set.


 Step 22 : Go to the Layers pallette and click the Add Layer Mask button.
 Step 23 : A Layer Mask has formed next to the layer thumbnail on Layer 2, which was the layer you were working on.
 Step 24 : Make sure the Foreground is set to Black and Background to White.
 Step 25 : Click on the Zoom Tool and zoom into the image.


