Sunday, February 28, 2010

Conte Crayon Filter in Photoshop

There are many Filters built into Photoshop, whatever version you may have. One of  them is Conte Crayon. You can get some good effects with it. Let me show you how you where it is found and how to use it.

This is where you find it in Photoshop. Let me show you how to use it.

Step 1 : I have opened this free stock image in Photoshop.

Step 2 : Press Ctrl+J. Look in the Layers palette. The Background layer duplicates into Layer1.

Step 3 : Press CTRL+SHIFT+U to saturate the image.

Step 4 : Go to Filter>Sketch>Conte Crayon.
Step 5 : The Conte Crayon dialogue box opens.
Step 6 : On the top right you will find the controls. Note that you can apply a variety of Textures which are built into Photoshop. I have selected  the default 'Canvas'. Click OK.
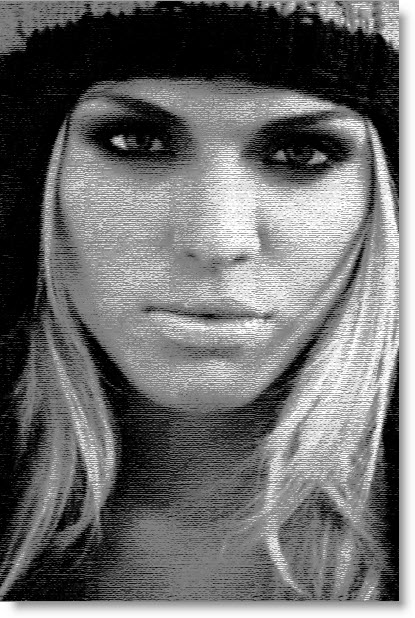
Step 7 : The Filter has been applied.
But please note that this Filter works best where the image is very prominent.
It also works well with this face.
Also with an image like this.
In an image with a Black Background or with a plain one set the Background Color to Black. Click on the Brush Tool.
Paint the white streaks.
The image looks like this after painting with Black.
The Conte Crayon Filter does not work well with images like these.
Or an image like this. You will have to apply this image only to suitable images. That is all.
Other photoshop tutorials are here.


Thursday, February 25, 2010

Phototoshop Resources 4

I have given links for download of FREE photoshop resources. See here. Here is a free photoshop filter which you can use.
Let me show you how it works. Here is a free stock photo I have opened in Photoshop.

Here is one effect I have got with the filter.

Here is another effect. The posibilities are endless.
You can download  the Filter from here.
Other photoshop Tutorials are here.

Sunday, February 21, 2010

Photoshop Resources 3


I had posted links to free Photoshop resources which are available here. These resources -- brushes, custom shapes, gradients, patterns are available at http://www.deviantart.com/#
You only need to register to download them.
Download the brushes, links to which are given below, to make something simple and attractive.
Download and install this Brush. It is found here.

Download and install this brush. It is found here.

And this brush. It is found here.
To install a brush, create a folder and download it. Extract it in the folder. Then right click the abr file (brushes are in abr files), go to C drive>Programme Files>Adobe>Photoshop>Presets>Brushes. Paste it into Brushes.
Step 1 : Open a New White Layer in Photoshop.

Step 2 : Click on the Foreground Color. In the highlighted box of Color Picker that opens type 232ca4. This will select the same color that I have chosen. Click OK in the Color Picker.

Step 3 : Press ALT+BACKSPACE. It will fill the White Layer with this Blue shade.
Step 4 : In the Layers palette click on the New Layer icon. A new Layer 1 forms above the Background layer.

Step 5 : Use the small two headed arrow to switch the Foreground Color to White. If it is set to any other color press 'x' and then 'd' on your keyboard to restore the default colors.
Step 6 : Click the Brush Tool.
Step 7 : Click the icon in the top panel at right. The Brush Presets dialogue box opens. This is your default set. There are many other sets that Photoshop provides. You can also install and use other Photoshop Brushes.
Step 8 : Click the tiny black arrow.
Step 9 : The Brushes available are displayed. I have an enormous amount of downloaded brushes, that's why there are so many of them. If you download and install interesting brushes, yours may look similar. There is no problem in installing extras brushes. It also is very useful to have a large number and variety of Brushes.

Step 10 : This is the Building Brush I asked you to download. Click to select it.
Step 11 : As soon as you click this dialogue box appears. Click OK.
Step 12 : Click on the Brush Tip Shape. Click on any Brush to select. I have selected the first one.
Step 13 : Now drag the Spacing slider at the bottom to make the Brush Tip separate as I have done.

Step 14 : You can see how the Brush looks like. To make the Brush Tip bigger press ] (right bracket key) and to make it smaller [ (left bracket key).

Step 15 : I have clicked once with the Brush after making the tip a bit large. You can notice that a portion of the Brush goes below the canvas. That does not matter.
Step 16 : To name the layer on which I have clicked with the Brush, double click the layer and give it a name. I have named it Building. Now click the New layer icon and a new Layer 2 forms.
Step 17 : Again click the tiny black arrow to bring up the Brushes.
Step 18 : Now click on this Brush which I asked you to download. It is the lightning brush. The name of the brush is 'beneaththestorm.com_lightning'. All brushes have a name.

Step 19 : Again this dialogue box opens. Click OK.
Step 20 : I have clicked on Brush 361, then clicked on Brush Tip Shape and dragged the Spacing slider at the bottom till the tip separates as I did earlier.
Step 21 : I have made the brush tip bigger by pressing on ] (right bracket key) and clicked once with the Brush. And, there is the lightning.

Step 22 : Name Layer 2 as Lightning. Click on the New Layer icon and a new Layer forms at the top.

Step 23 : Again bring up the Brushes by clicking on the tiny black arrow and click on 'Flash_shine_by_peterplastic.
Step 24 : When this dialogue box opens click OK.
Step 25 : I have clicked once with the brush to the right side of the building. The lights appear.
The purpose of this tutorial was to demonstrate that you should make a new layer for each brush that you apply. The advantage of this is that if you do not like something, you can just remove the particular layer. Your composition remains in place. That is all.
Other Photoshop tutorials are here.

Thursday, February 18, 2010

Page Curl in all versions of Photoshop


If you are using Photoshop CS you can create a page curl very easily. That tutorial is here.  But if you are using an earlier version, you can do it too. Even if you are using Photoshop CS 4 it is more interesting to do it this way.
Step 1 : Open a White Layer in Photoshop.
Step 2 : Make sure that the Foreground is set to Black. If it is not, press x and then d on your keyboard. Click on the Rectangle Tool.

Step 3 : Draw out a rectangle. It automatically fills with Black.

This is how the Layers palette looks. The Shape 1 layer sit above the Background White layer.

Step 4 : Click the Pen Tool.

Step 5 : In the top panel click on Shape layers icon, if it is not already selected.

Step 6 : Click on the Subtract from shape area icon in the top panel.
Step 7 : Click the first point as shown and then the second point. A line connects the first and second points immediately.

Step 8 : Click a third point and then click on the first point from where you started out. The path closes automatically. You can see that I have not been very accurate. I just need to cut off the top.
Step 9 : Click the Vector Mask thumbnail.
As soon as you click the upper portion disappears.
Step 10 : Again click the Pen Tool.
Step 11 : Click the first point with the Pen Tool which is already selected. Click a second point as shown and without letting go off the mouse button, begin dragging. Two handles will appear. With these handles you will be able to rotate the line between the first point and second.
Step 12 : Click a 3rd point as shown.
Step 13 : Click on the first point you began. You will want a small circle forms below the Pen Tool icon.
Step 14 : This is how the image looks.
Step 15 : This is how the Layers palette looks. The curl created just now is on Shape 2 Layer.

Step 16 : Click on Shape 1 Layer.
Step 17 : CTRL+Click directly on the Shape 1.
Step 18 : As soon as you click a selection of marching ants selects the Black portion.
Step 19 : Go to Layer>Layer Style>Gradient Overlay.
Step 20 : The Layer Style dialogue box opens. Click where the arrow points to bring up the Gradient Editor.

Step 21 : This is how the image looks.
Step 22 : Click on the  White Color Stop at the extreme right shown by the arrow. The 'Color' changes to White.
Step 23 : Now type 20 into the Location box. The White slider moves to 20% from the left margin.
Step 24 : Press ALT and click on the White Stop. Without releasing ALT drag the top. A new White Stop forms.
Step 25 : Type 100 in the Location. The new White Stop moves to the extreme right.
Step 26 : Click the White Stop at the extreme right. Click on the Color.
Step 27 : When you click on  Color, the Select Stop Color dialogue box opens. In the bottom type in 000000. This stands for Black. Click OK in the Stop Color dialogue box.

Step 28 : Press ALT and click on the White Stop at the left. You will be able to drag a new White stop.
Step 29 : Type 60 in Location and the new White Stop moves 60 % from the left margin.
Step 30 :Click OK in the Gradient Editor.
Step 31 : Click OK in the layer Style dialogue box.
This is how the image looks now.
Step 32 : Right click  the Shape 1 Layer. Click on Copy Layer Style from the pop up menu.
Step 33 : CTRL+Click directly on the Shape 2.

Step 34 : As soon as you CTRL+Click the flap is selected by marching ants.
Step 35 : Right click Shape 2. From the pop-up click on Paste Layer Style.
Step 36 : This is how the image looks.
Step 37 : Right click the Drop shadow in Shape 2. Copy the Layer Style and Paste in on Shape 1 below it.
This is how the image looks.
Add Text and a Texture if you want and the page curl is complete.
Other Photoshop tutorials  are here.

Share

Twitter Delicious Facebook Digg Stumbleupon Favorites