Creating a clear glass sphere is not difficult in
Photoshop
. It will be a realistic sphere which you can create from nothing. You do not need to be highly skilled in Photoshop to follow along. You will find the steps easy to understand. You will need two images. It will be good if you use high resolution ones. You can download the ones I will be using. They are free stock images and of high resolution.
Step 1 : I have opened this image in Photoshop. You can download it
here. It belongs to
http://dying-soul-stock.deviantart.com/Step 2 : I have also opened this image in Photoshop. You will find it
here. It belongs to
http://amliel.deviantart.com/ We will use this later. First the sphere has to be created.Step 3 : Press CTRL+J. This will duplicate the Background Layer to Layer1.
Step 4 : Click the New Layer icon and a new Layer 2 forms.
Step 5 : Double click where the arrow points to and type in Circle. This is to name the layer making it easy to identify.
Step 6 : Click the Elliptical Marquee Tool.
Step 7 : Press SHIFT and drag out with the Circular Marquee. You will be able to draw a perfect circle. Place the cursor in the middle of the circular selection and you will be able to move it wherever you want to.
Step 8 : Click on the Foreground Color. This will bring up the Color Picker. Click on a light Grey shade. Click OK in the Color Picker.
Step 9 : Press ALT+BACKSPACE. The circle will fill with the color you picked.
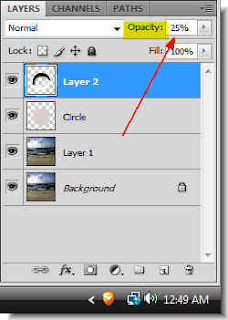
Step 10 : Drop the Opacity of the Layer named Circle to 25%.
This is how the Image looks after lowering the opacity.
Step 11 : Position the sphere in the middle or wherever you want it in the image.
Use the Move Tool to reposition the sphere.
Step 12 : Click on the New layer icon and a new Layer 2 forms above the Circle layer.
Step 13 : Note that Layer 2 is highlighted. This means that you on Layer 2. Now, CTRL+CLICK on the layer thumbnail of the Circle layer.
Step 14 : As soon as you CTRL+CLICK a selection of marching ants appears.
Step 15 : Press x and then d on your keyboard. The Foreground Color will change to the default Black and Background to White.
Step 16 : Click on the BRUSH TOOL.
Step 17 : Click where the arrow points to open up the Brush dialogue box. I have clicked on a soft 200 pixel Brush by clicking on it. You can also increase the size of the Brush by pressing ] (right bracket key next to the letter P on your keyboard) and decrease it by pressing [ (left bracket key).
Step 18 : Use the ] (right bracket key) if needed to make your Brush size bigger (I have made it bigger) and paint with Black which is the Foreground Color. Paint a bit thickly.
Step 19 : Press x on the keyboard and the Foreground Color switches to White.
Step 20 : Now paint with White as shown. You need not have to be too careful.
Step 21 : Decrease the Opacity of Layer 2 to 25%.
This is how the image looks after lowering the Opacity.
Step 22 : Click on the New Layer icon and a new Layer 3 forms above Layer 2.
Step 23 : CTRL+CLICK on the layer thumbnail of the Circle layer.
Step 24 : The sphere is again surrounded by marching ants.
Step 25 : Remember that your Foreground Color is now White. Press [ (left bracket) to make the brush small and paint along the edge of the circle as shown with White. Note that this is a considerably thinner brush stroke than the thick brush stroke used earlier. The press x which will change the Foreground color to Black. Paint with Black on the top half of the circle similarly.
Step 26 : Drop the Opacity of Layer 3 to 25%.
This is how the image looks.
Step 27 : Click on the New layer icon and a new Layer 4 forms.
Step 28 : Press x to change the Foreground Color to White.
Step 29 : Make the Brush really big by pressing ] (right bracket) and click just once in the middle of the circle.
Step 30 : Drop the Opacity of Layer 4 to 50%.
This is how the image looks after decreasing the opacity.
Step 31 : Click on the New layer icon. A new layer 5 forms.
Step 32 : Now press the [ (left bracket) to make the Brush very small. Remember that White is still your Foreground Color. Click twice in one place with the Brush, then click once next to it as shown.
Step 33 : Press CTRL+T. A selection will appear around the white spots.
Step 34 : Hover the cursor on the left top edge of the selection and a small bent two-headed arrow will appear. Use it to rotate the selection as shown.
Step 35 : Right click in the middle of the selection. From the pop up menu click on Warp.
Step 36 : As soon as you click on Warp a grid appears as shown.
Step 37 : Drag the corner handles on top upwards and squeeze in the corner handles at bottom as shown. When it is done press ENTER.
Step 38 : Click on the New Layer icon and a new Layer 6 forms.
Step 39 : CTRL+CLICK on the layer thumbnail of Circle layer.
Step 40 : The selection of marching ants reappear around the sphere.
Step 41 : First press x to change the Foreground Color to Black. Click on the Gradient Tool. Click in top panel to bring up the Gradient Editor.
Step 42 : Before bringing up the Gradient Editor, click on the icon shown by the arrow. It is the Radial Gradient. Now bring up the Gradient Editor as shown in the Step 41.
Step 43 : Click the second Preset in the top row. Click Ok.
Step 44 : Drag with the Gradient Tool from the centre to the edge of the sphere.
This is how the image looks.
Step 45 : Press CTRL+D to deselect. Then press CTRL+T and use the Move Tool to squash the circle by dragging down the middle handle downwards as shown. It becomes the shadow.
Step 46 : Use the Move Tool to move the shadow to the right.
Step 47 : I have reduced the Opacity of the layer to 35%.
This is how the image looks.
Step 48 : Go to Edit>Transform>Flip Horizontal.
This is how the shadow looks now.
Step 49 : Go to Filter>Blur>Gaussian Blur.
Step 50 : The Gaussian Blur dialogue box comes up. I have set the Radius at 20. It depends on taste.
This is how the image looks after applying Gaussian Blur.
Step 51 : Go to Filter>Render>Lens Flare.
Step 52: The Lens Flare dialogue box comes up. I have clicked on 105mm Prime. Use the cursor to nudge the flare into the middle of the shadow in the preiew window. Click OK.
This is how the image looks with the Lens Flare.
Step 53 : Now click on Layer 1 which is image of the beach. Then CTRL+CLICK on the Circle layer.
Step 54 : The circular selection of marching ants reappears.
Step 55 : Go to Filter>Distort>Spherize.
Step 56 : The Spherize dialogue box comes up. The Amount should be set at 100% and Mode to Normal. Click OK.
Step 57 : Press CTRL+D to deselect and this is how your image looks.
Step 58 : Click on the Circle layer. Reduce the Opacity to 0%
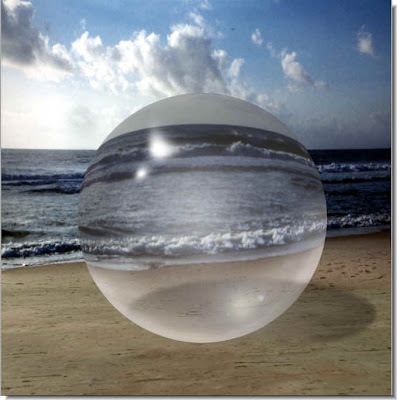
And here is the completed Clear Glass Sphere.
Step 59 : These are optional steps. I have cut out the image of the girl from the Background. You can use the Pen Tool which I personally prefer and is easy to use. If you do not know how to use the Pen Tool see the tutorial
here and I guarantee that you will be able to master it. You can otherwise use the Magnetic Lasso. You will find the tutorial
here and
how to use it accurately.
Step 60 : Use the Move Tool to drag the image of the girl onto the sphere.
The picture of the girl is now within the sphere.
Step 61 : Look in the Layers palette. Since I was on the Cirlce layer, Layer 7 which is the image of the girl has come just on top of it.
Step 62 : Press CTRL+J. A new layer Layer 7 copy forms above Layer7.
Step 63 : Click back on Layer 7. Now CTRL+CLICK on the layer thumbnail of Layer 7.
Step 64 : A selection of marching ants selects the image of the girl.
Step 65 : Make sure that the Foreground Color is Black. Press ALT+BACKSPACE. You wil not notice any change in the image. The reason is that it is below Layer 7 copy. What I have done is filled the selection on Layer 7 with Black. We will be able to see it in a moment.
Step 66 : Press CTRL+T. A selection forms around the image.
Step 67 : Hover the cursor on a corner and you will be able to rotate it.
Step 68 : Push the Shadow inwards. Press ENTER. Then press CTRL+D to deselect.
Step 69 : Use the Move Tool to position the shadow correcly. It will be as large as the image. Press CTRL+T. A selection appears. Drag the top middle point down and the middle point at the right inwards as shown.
Step 70 : Drag the Opacity of layer 7 to 25%.
Step 71 : Press ENTER. The Clear Glass Sphere is complete.
Other Photoshop tutorials are
here


