Tuesday, May 31, 2011

Image as a Layer Mask

You must know about creating a Layer Mask. It is simple enough. But can you use an image as a Mask? You can and this is all what this tutorial is about. You will need two free stock images.
This is the effect I intend to create.
Step 1 : I will be using this free stock image. You will find it here
It belongs to xKarexBearx
And this free stock image of Chicago. You will find it here
It belongs to Grouper
Step 2 : We will first work on the head shot. Go to the Channels palette.
Step 3 : In the Channels palette, CTRL+CLICK the thumbnail of the RGB channel.
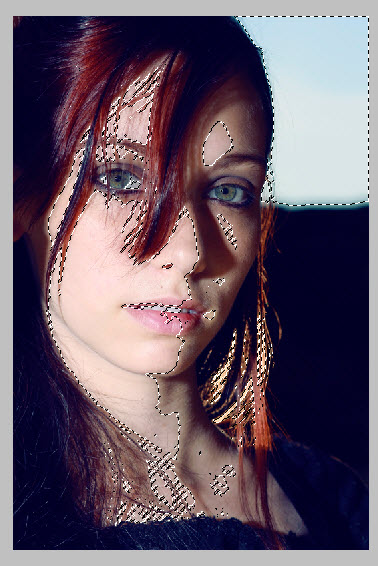
Step 4 : As soon as you CTRL+CLICK a selection forms on the image.
Step 5 : Click the New Channel button and an Alpha 1 channel forms at the bottom.
Step 6 : The image looks like this.
Step 7 : Make sure the Foreground/Background is set to the default Black/White. If it is not press x and d on the keyboard to restore the default.
Step 8 : Press CTRL+BACKSPACE to fill with the Background Color which is White. Press CTRL+D to deselect.
Step 9 : Go to Edit>Fill.
Step 10 : In the Fill dialogue box set the Use to Foreground Color (which is Black) and Mode to Overlay instead of the default Normal.
Click OK.
Step 11 : This makes the image darker.
Step 12 : Click the Brush Tool.
Step 13 : Click in the top panel where the arrow points to bring up the Brush Controls. Set the Hardness to around 75%. You can set the set size or you can use the shortcuts. Press [ (left square bracket) to make the Brush smaller and ] (right bracket key) to make it larger.
Step 14 : Paint the lower part of the image Black.
Step 15 : Press CTRL+L to bring up the Levels dialogue box.
Step 16 : Nudge the Black slider at left and the middle slider slightly towards the right to slightly darken the image a bit more. Click OK.
Step 17 : The image looks like this.
Step 18 : Return to the Layers palette by clicking on it. Click the New Layer icon. A new layer 1 forms. Press CTRL+Backspace. Layer 1 fills with White.
The image looks like this after filling with White.
Step 19 : Press v (shortcut for Move Tool) and drag and drop the city image on the other one. Close the city image. You no longer need it.
Step 20 : Press CTRL+T for free selection. A selection forms.
Step 21 : Drag the middle handles all around the image to resize it properly.
Step 22 : Press ENTER to apply the selection.
The Layer palette looks like this.
Step 23 : Go to Select>Load Selection.
Step 24 : In the Load selection dialogue box select Alpha 1 as the Channel.
Step 25 : Check the Invert. Click OK.
Step 26 : The selection is loaded
Step 27 : Click the Add Layer Mask button. A Layer Mask forms next to the Layer thumbnail on Layer 2.
This is how the image looks like. The image has been masked by an image.
Step 28 : Click the New Fill or Adjustment layer button.
Step 29 : Click on Hue/Saturation.
Step 30 : In Hue/Saturation, check Colorize. Drag the Hue slider to taste.
The finished image. I think that was easy. Other Photoshop tutorials are here


Friday, May 27, 2011

Split toning with Gradient Map

Split toning can also be done with the Gradient Map. You can use Gradient to make the split toning. Split Toning essentially means using just a couple of colors or three. It is very easy to do.
This is the effect I will be creating.
I will be using this free stock image. You will find it here
It belongs to mjranum-stock

to cut out the image from the Background.
Or the Pen Tool
You can click the links for the Quick Selection, Magnetic Lasso or the Pen Tool to be taken to the tutorials if you do not know how to use these tools. Personally I refer the the Quick Selection Tool. After completing the selection put the cut out image on its own layer.
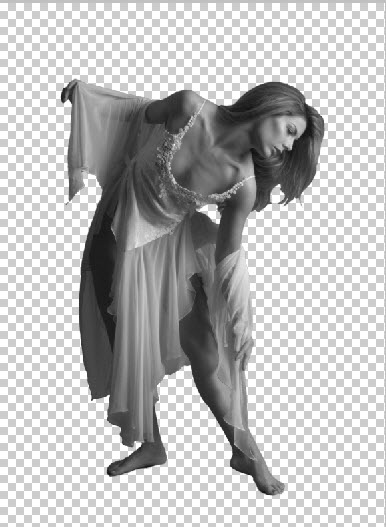
Step 2 : The image has been extracted from the Background.
Step 3 : My Layers palette looks like this. I have used the Quick Selection Tool. 
Step 4 : Press CTRL+SHIFT+U to desaturate the image.
Step 5 : CTRL+CLICK the Layer thumbnail on the cutout image layer. (Background Copy)
A selection forms around the image of the subject.
Step 6 : Click the New Fill or New Adjustment button.
Step 7 : Click on Gradient Map from the popup.
The Gradient Map 1 Layer forms above the cutout image of the subject.
Step 8 : Click on the Gradient Editor to bring up the Gradients. But before you do let us look at what the image looks like now.
The image looks like this.
Step 9 : Now click on the Gradient Editor. It opens you can see the Gradient Presets.
Step 10 : I have clicked on the Red Green Gradient. Click OK in the Gradient Editor.
The image looks like this.
Step 11 : Change the Blend Mode to Color and reduce the Opacity to 60%.
The image looks like this.
Step 12 : Click on the Background copy layer. CTRL+CLICK the new Layer icon.
Step 13 : A new Layer 1 forms under Background copy layer.
Step 14 : Click the Gradient Tool. Click the Gradient Editor at the top.
Step 15 : In the Gradient Editor change the Gradient type to Noise. Click the Randomize button twice.
I have clicked the Randomize button twice. You can click it any number of times. You will get a different effect every time you click. Click OK in the Gradient editor.
Step 16 : The Gradient is set to Linear which is the default. If it is not click the button.
Step 17 : Press Shift and drag straight across with the Gradient Tool.
This is the effect I have got.
Step 18 : With Layer 1 still selected, turn on the eye icon of the Background Layer.
Step 19 : Change the Blend Mode to Linear Light and reduce the Opacity to 25%. If you are using a different image see which blend mode suits the image.
Step 20 : Click the New Layer icon. A new layer 2 forms above Layer 1.
Step 21 : Change the Foreground/Background Color to White/Black by clicking the small bent arrow.
Step 22 : Click on the Gradient Editor. Click the Foreground to Background Preset.
Step 23 : In the Gradient editor change the Gradient Type to Solid. Click OK.
Step 24 : Click the Radial Gradient.
Step 25 : Drag with the Gradient Tool  diagonally from the middle for a slight distance as shown.
The image looks like this.
Step 26 : Change the Blend Moe to Overlay.
The image looks like this.
Step 27 : Press CTRL+J. Layer 2 duplicates into Layer 2 copy.
Step 28 : Press CTRL+T for free selection. A selection forms.
Step 29 : Press SHIFT+ALT and drag middle handle down.
Step 30 : Drag selection down to the bottom.
Press ENTER.
Step 31 : Change the Blend Mode to Screen. Lower the Opacity to 55%.
The finished image.
Other photoshop tutorials are here


Share

Twitter Delicious Facebook Digg Stumbleupon Favorites