This is a simple yet very good special effect which can be done in any version of Photoshop. This will work with most images and should be quite easy to do. Some of the steps are repetitive and may take time, but they are worth it. You don't have to follow word for word of this tutorial. The settings are given for the image used. You could easily experiment if you use another image. The general guidelines should be followed.
I will be using this free stock image. You will find it
hereThis is the effect you will be able to make.
Step 1 : Click the New Layer icon. A new Layer 1 forms above the Background Layer.
Step 2 : Click the Rectangular Marquee tool.
Step 3 : Press SHIFT and draw out a selection as shown.
Step 4 : Keep SHIFT pressed. You will be able to draw additional selections like this.
Step 5 : Go to Windows>Swatches.
Step 6 : In the Swatches click on 10% Gray.
The Foreground Color changes to the color picked.
Step 7 : Press ALT+BACKSPACE to fill with the Foreground Color.
Press CTRL+D to deselect.
Step 8 : Click the New Layer icon. A new Layer 2 forms above Layer 1.
Step 9 : Click the Rectangular Marquee Tool. Press SHIFT and draw a second set of selections as shown.
Step 10 : In the Swatches click on 25% Gray. The Foreground Color will change to the color picked.
Step 11 : Press ALT+BACKSPACE to fill the second set of selections with the chosen color. Press CTRL+D to deselect.
Step 12 : Click the New Layer icon. A new Layer 3 forms.
Step 13 : With the Rectangular Marquee make further selections keeping SHIFT pressed.
Step 14 : Click 40% Gray in Swatches. The foreground Color changes to the color picked.
Step 15 : Press ALT+BACKSPACE to fill the selections with the chosen color. Press CTRL+D to deselect.
Step 16 : Click the New Layer icon. A new layer 4 forms.
Step 17 : Click the Rectangular Marquee Tool to make further selections like this.
Step 18 : Click 50% Gray in the Swatches.
Step 19 : Press ALT+BACKSPACE to fill the selections with the chosen color. Press CTRL+D to deselect. The model has been covered with the square shapes.
Step 20 : Click where the arrow points to change the Blend Mode. Note that Layer 4 is highlighted. This is the Layer you are on.
Step 21 : Change the Blend Mode of Layer 4 to Soft Light.
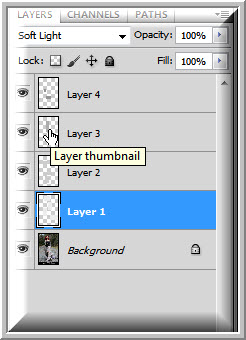
Step 22 : Now click on Layer3, 2 and 1 in turn. Change the Blend modes so that the Blend Mode of each is Soft Light. I am currently on Layer1.
The image should look like this after changing the Blend Mode of Layers 4 to 1 to Soft Light.
Step 23 : CTRL+CLICK the thumbnail of Layer 1.
A selection reappears.
Step 24 : Press CTRL+SHIFT and click on the thumbnail of Layer2.
The selection looks like this.
Step 25 : Press CTRL+SHIFT and click on the thumbnail of Layer 3.
The selection looks like this.
Step 26 : Press CTRL+SHIFT and click on Layer4.
The selection looks like this.
Step 27 : With the selection in place click on the Background Layer.
Step 28 : Press CTRL+J. The selection is cut out and pasted on Layer5.
Step 29 : Click on Layer1.
Step 30 : Either click the FX button at the bottom of Layers palette or double click Layer 4 where shown to bring up the Blending Options.
Step 31 : Click on drop Shadow and click OK.
The Drop Shadow has been added to a part of the selection.
Step 32 : Press ALT and drag up the FX icon to Layer2.
The Drop Shadow has been added to the selection on Layer2.
Step 33 : Keeping ALT pressed, drag the FX icon to Layer 3 and Layer 4.
The Drop Shadow has been added to all parts of the selections i.e. all the rectangular selections.
Step 34 : Click on the Background Layer.
Step 35 : Click the New Layer icon. A New Layer 6 forms above the Background Layer.
Step 36 : Click the Foreground Color.
The Color Picker opens.
Step 37 : Click on a color in the background. The color is selected in the Color Picker. The Foreground Color changes to the color picked. Click OK in the Color Picker.
Step 38 : Click the Gradient Tool. In the top panel click on the tiny arrow at right to bring up the Gradient Editor.
Step 39 : Clicking on the tiny arrow brings up the Gradient Editor.
Click on the second Gradient in the top row -- Foreground to Transparent.
Step 40 : Check the Reverse in the top panel.
Step 41 : Drag the Gradient Tool diagonally as shown.
The image looks like this depending on how you have drawn the diagonal.
Step 42 : Download this cracked glass texture
hereStep 43 : Open the Texture in Photoshop. Go to Image>Image Rotation>90 degree CCW.
Step 44 : Press CTRL+A (Select All) then CTRL+C (Copy).
Step 45 : Go to this image and press CTRL+V (Paste). The texture is pasted.
Step 46 : If you look in the Layers palette, you will see in on Layer7 (the Texture) above Layer 6 in which we added the Gradient.
Step 47 : Press CTRL+T. A selection forms. Press SHIFT+ALT and drag a corner handle to resize the Texture. Press ENTER.
The image looks like this.
Step 48 : Change the Blend Mode of Layer 7 to Overlay.
And here is the completed image. Try it out.
Other photoshop tutorials are
here


