Monday, October 29, 2012

Levels and Curves in correcting Light in image

The Levels and the Curves should be used together in correcting light in an image. It is not a trial and error bit of work, but a well defined way to do it. First the Levels command should be tried. If you cannot correct the light of an image in its entirety try Curves. Both Levels and Curves can be used in a different number of ways. But without going into the details, here is the simplest way to use the Levels and Curves together in an image.
This image has been corrected using Levels and then Curves. The original image is just below.
I will be using this photo that I took over a year ago. The light makes the colors different from the ones I shot with.
Step 1 : It's best to always duplicate the Background layer by pressing CTRL+J. I am working on the Layer1 image which is copy of the Background Layer.
Step 2 : Click the Add New Fill or Adjustment Layer button. You can use the Levels and Curves without an Adjustment Layer, but it is better to use as an adjustment layer as you are not making any change to the photo.
Step 3 : From the pop up click on Levels, later we will be using Curves. They are one below the other because they are meant to be used together.
Step 4 : The Levels 1 Layer forms over Layer1.
The Levels dialogue box opens. Under the white histogram there are three sliders -- Black, Grey and White. The white is for brightening and the black for darkening. The midpoint slider is for correcting areas that are in between light and shadow. It is the gray slider. In this image you can see that the histogram at the right ends much before the white slider. This means that the light is insufficient.
Step 5 : I have moved the white slider below where the histogram ends.
The light immediately improves with a basic adjustment of  Levels.
Step 6 : Now click on the Curves Adjustment Layer.
Step 7 : The Curves Adjustment Layer forms above the Levels1 layer.
This is the Curves dialogue box.
Note there are three eyedroppers on the left. They are the Black, Gray and White eyedroppers. We will use the three eyedroppers to correct the image.
Step 8 : Click the Black eyedropper to select it.
Step 9 : Choose a part of the image that is black or the darkest to set the Black Point. Here the obvious choice is the black hair.
Step 10 : Click the White eye dropper.
Step 11 : I have clicked on the white vest with the white eye dropper. If you don't have white choose the lightest portion of the image.
Step 12 : Click the grey eye dropper.
Step 13 : When there is no obvious Gray point in an image, click on the white of the eye.
Step 14 : Each time I clicked with the Black, White and Gray eye droppers the image has changed. The blue, green and red diagonals corresponding to the three channels are also visible in the Curves. Each of these three diagonals have changed position bringing change in the light in the image. The white diagonal represents the RGB channel.
Step 15 : The top of the diagonal represents light and the bottom shadow. The image here has a lot of shadows. I am therefore dragging the lower potion of the RGB diagonal upwards to lighten the image. While dragging keep watch on the image.
Step 16 : I have lightened the shadows on the RGB channel and look at the change now. This is how the Levels and Curves are used together to correct an image. There is no guesswork involved. You are following well defined rules to correct an image.
Other photoshop tutorials are here


Monday, October 22, 2012

Field Blur in Photoshop CS6

The Field Blur, one of the new blur filters in Photoshop CS6 is the simplest to use in comparison to the
Field Blur keeps an area in sharp focus and blurs out the remaining portion. This is particularly useful in blurring out the background or distracting elements.
The created effect. The girl and the steps are in sharp focus, while the statue in the background is blurred. The original is below.
Step 1 : I will be using this stock photo. This photo has a good balance between the girl at the right and the statue in the background. Attention is divided between the girl and the statue. I will blur the statue in the background to shift the focus directly to the girl.with Field Blur.
Step 2 : Go to Filter>Blur>Field Blur.
Step 3 : The Field Blur is applied. The pin in the middle controls the blur. Here everything is blurred.
Step 4 : You can drag the pin to any part of the image. I have dragged it to the face.
Reduce the Blur by dragging the white portion in the pin with the cursor.
I have reduced the blur to 2 pixels.
Step 5 : Alternately you can use the Blur slider at the panel on the right.
Step 6 : I have reduced the Blur to 0.
The girl should not be blurred at all.
Step 7 : If you move the cursor it will change into a Pin. I have clicking the statue with the cursor.
Step 8 : The blur is applied to the statue and the left side of the image.
Step 9 : I am reducing the Blur to 8 by dragging on the outer circle of the pin. The blur lessens.
Step 10 : I am clicking on the steps and another Pin forms. Notice the the lower part of the image immediately blurs.
Step 11 : Reduce the Blur to 0 by dragging the white portion on the ring.
This is how the image looks with the 3 pins. The steps are now back in sharp focus.
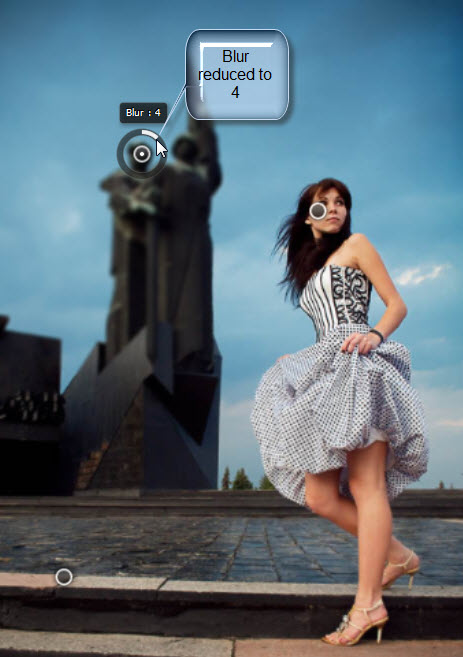
Step 12 : I am reducing the blur on the statue to 4. You can always adjust the blur of the different pins any time you want to.
Step 13 : Go to the top panel and click the OK button
The finished image. The girl and the steps are in sharp focus, while the statue is blurred.
Other photoshop tutorials are here


Saturday, October 20, 2012

Tilt Shift Blur in Photoshop CS6

The Tile Shift Blur is a new Blur in Photoshop CS6. The Tilt Shift Blur enables, just as the Iris Blur to keep an area in an image in sharp focus and blurs the rest of the image. There are some differences though which this tutorial will clear.
This is the effect. The top of the image has blurred and so has the bottom slightly. Some bokeh is visible among the trees. You can add bokeh if your image does not have it.
I will be using this stock image. This is the original image.
Step 1 : Go to Filter>Blur>Tilt Shift Blur.
Step 2 : The Tilt Shift Blur with the default settings open, There is a pin in the middle. You can increase or decrease the blur by dragging around the circle. 
The gap between the upper line and the dotted line is where the blur fades naturally. 
Step 3 : You can rotate the entire selection. Hover the cursor over the pin and you will be able to see a double headed arrow. Use it to rotate the blur.
Step 4 : I do not need to rotate the selection for this image. I will leave it horizontal.
Step 5 : I am moving the pin onto the girl. The pin can be moved anywhere.
Step 6 : Drag on the outer circle of the pin. You can increase or decrease the blur by dragging. I have increased the Blur to 15.
Step 7 : Alternatively you can drag the Blur slider to the right. The Blur has been increased to 15.
Step 8 : I am dragging the white line down so that the area between the two lines increase. This is the are which will stay in sharp focus.
Step 9 : I am dragging the dotted line up. This increase the area where the blur fades. The area above the dotted line blurs. The area between the solid line and dotted lines fades into a blur. I am placing the cursor on the pin in the middle and decreasing the blur to 6. You can also do it from the panel at right by adjusting the blur slider.
Step 10 : I am dragging the dotted line at the bottom below the canvas which blurs the bottom slightly.
Step 11 : Look at the bottom of the Blur Tools at the panel at the right. There is Bokeh, Bokeh Color and Light Range.
Step 12 : Drag the Light Bokeh slider tot the right and keep watch on the image, then drag the Light Range slider to the right.
Step 13 : Look at the top of the image. The bokeh forms. But it does not work very satisfactorily at times. You have to work with the two sliders till you get it right.
Step 14 : You can also try lessening the blur. I have decreased the blur to 4.
The bokeh looks a bit better.
Step 15 : Drag the Bokeh Color slider slowly. The bokeh picks up the color from the surroundings. But be careful with this as sometimes the results do not turn out well.
Step 16 : Lastly click the OK button in the top panel.
The completed image.
Other photoshop tutorials are here

Share

Twitter Delicious Facebook Digg Stumbleupon Favorites