


This is a tutorial on converting a real life figure into a puppet in Photoshop. You can do it in any version of Photoshop. You need a suitable photo for this. You will also need a lot of Layers. Just follow the steps and you will be able to do it.

Step 1 : I have opened this free stock image in Photoshop.

Step 2 : Press CTRL+J to duplicate the Background Layer. The duplicate is on Layer 1 after duplication.

Step 3 : Click the New Layer icon at the bottom of the Layers palette and a new Layer 2 forms.

Step 4 : Click on the Elliptical Marquee Tool.

Step 5 : Draw an elliptical selection with the Elliptical Marquee Tool. You need not be too accurate.

Step 6 : Click the Eyedropper Tool.

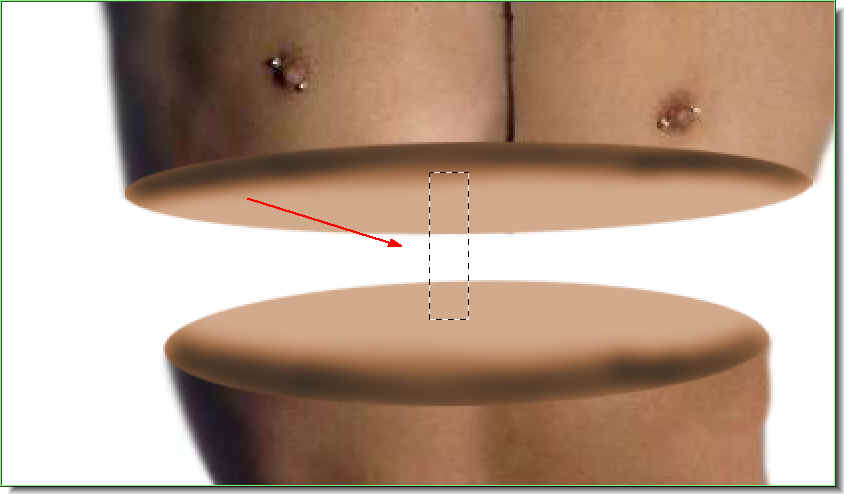
Step 7 : I have clicked with the Eyedropper Tool on a portion of the skin. The arrow points to where I have clicked with the Eyedropper Tool.

Step 8 : As soon as I click with the Eyedropper Tool, the Foreground Color changes to the same color.

Step 9 : Press ALT+BACKSPACE. The section will fill with the chosen Color. Press CTRL+D to deselect. The section of marching ants go away.

Step 10 : Press CTRL+T. A selection forms as shown.

Step 11 : With the cursor, pull down the top middle handle.

Step 12 : Drag the middle handles at the left and right sides so that the selection aligns with the body. Press Enter. The selection disappears.

Step 13 : Click the Burn Tool.

Step 14 : In the top panel set the Range to Midtones and Exposure to 50%. The Burn Tool behaves just as a Brush does.

Step 15 : Click where the arrow points in the top panel at left. It will open a dropdown menu. Set the Hardness at 0 and Master diameter at 25%. You can increase the size of the Brush by pressing ] (right bracket) and decrease it by pressing ] (left bracket).

Step 16 : You can see the size of the Brush in relation to the selection.

Step 17 : Go over the lower edge of the selection with the Burn Tool or Brush. It darkens the portion considerably.

Step 18 : Go to Edit>Fade Burn Tool.

Step 19 : The Fade dialogue box appears. Lower the Opacity to 50% by dragging the slider.

Step 20 : Double Click Layer 2. A small rectangle appears. Type in stomach. I am naming the layer.

Step 21 : Press CTRL+J. The 'stomach' copy duplicates into 'stomach copy'.

Step 22 : Click on the Move Tool.

Step 23 : Use the Move Tool to drag up the layer as shown.

Step 24 : Go to Edit>Transform>Flip Vertical.

The selection has flipped vertical.

Step 25 : Drag the middle corner handles at the sides to resize the selection so that it fits within the body. Press ENTER.

Step 26 : Click on Layer 1.

Step 27 : Click on the Clone Stamp Tool.

Step 28 : Set the Hardeness to 80% and the Master Diamter suitably.

Step 29 : ALT+CLICK on a White area beside the figure.

Step 30 : Alt+CLICK on a White area and click between the two selections. The body disappears as you clone.

Step 31 : I have cloned away the body.

Step 32 : Click on the Stomach layer. Press CTRL+T.

Step 33 : After pressing CRL+T a selection appears. Hover your cursor on a corner and a small bent double headed arrow appears. You can use it to rotate the selection. Also drag the corner handle up slightly as a tiny portion of the body is showing through. After you have finished resizing press ENTER.

Step 34 : This is how the lower half looks.

Step 35 : Click on Stomach copy. Press CTRL+T.

Step 36 : After pressing CTRL+T the selection reappears. Again hover your cursor near the corner handles and a small bent arrow appears. Use it to reposition the selection correctly. Drag the middle corner handles if necessary. Lastly press ENTER.

This is how the image looks now.

Step 37 : Press CTRL+J. The stomach copy layer duplicates into stomach copy layer 2.

Step 38 : Rename it Arm.

Step 39 : Use the Move Tool to move the selection to the arm.

Step 40 : Press CTRL+T. A selection appears. Use the cursor to drag the middle size handles to resize the selection on the arm.

Step 41 : Press CTRL+J. The Arm layer duplicates into Arm copy.

Step 42 : Go to Edit>Transform>Flip Vertical.

Step 43 : Press CTRL+T. A selection appears. Resize it and then press Enter.

Step 44 : Click on Layer 1 again.

Step 45 : Click the Clone Stamp Tool again.

Step 46 : ALT+CLICK a White area.

Step 47 : Clone away the body.

The portion between the arm has been cloned away.

Step 48 : Click on the Arm layer.

Step 49 : Press CTRL+T. A selection appears. Resize the selection as earlier. Press ENTER.

Step 50 : Click on the Arm copy layer.

Step 51 : Press CTRL+T. A selection appears. Resize the selectionsuitably. Press ENTER when satisfied.

This is how the image looks so far.

Step 52 : Press CTRL+J. The Arm copy layer duplicates into Arm copy 2.

Step 53 : Rename the Layer Arm Right.

Step 54 : Press CTRL+T. Drag the selection from the left to the right as shown with the Move Tool. . Resize it as earlier. Press ENTER after resizing.

Step 55 : Press CTRL+J. The Arm Right Layer duplicates into Arm Right copy. Go to Edit>Transform>Flip Vetical as in Step 42.

Step 56 : After Flipping vertical, Press CTRL+T. Aselection appears. Resize the selection so that it fits the arm. Press ENTER when satisfied.

Step 57 : Click on Layer 1 again.

Step 58 : Click on the Clone Stamp Tool.

Step 59 : Clone away the body between the two selections.

Step 60 : Click on Arm Right Layer. Press CTRL+T.

Step 61 : Pressing CTRL+T makes a selection appear. Resize the selection.
Press ENTER after resizing.

Step 62 : Click on Arm Right copy.

Step 63 : Press CTRL+T. Resize the selection to fit the arm. Press ENTER when finished.

This is how the image looks so far.

Step 64 : Click on the New layer icon and a new Layer 2 forms.

 Step 66 : Draw a narrow selection with the Rectangular Marquee.

Step 65 : Click the Rectangular Marquee.

Step 67 : Press ALT+BACKSPACE. The selection fills with the color last selected. Press CTRL+D to deselect.

Step 68 : Click the Burn Tool. The settings have already been set earlier.

Step 69 : Since the Burn Tool acts like a brush, just paint the sides of the rectangle.

Step 70 : Press CTRL+T. A selection appears. Hover your cursor. You will be able to rotate the selection. Just tilt a little. Press ENTER.

Step 71 : Press CTRL+J. A new Layer 2 copy forms.

Step 72 : Press CTRL+T. Move the selection with the Move Tool to the left arm. Resize it.Press ENTER.

Step 73 : Press CTRL+J. A new Layer 2 copy 2 forms.

Step 74 : Use the Move Tool to move the layer to the right arm. Press CTRL+T. Resize it. Press ENTER.

The completed puppet. Go ahead try it.


