A photoshop trick is to blend the background to the floor or the lower front portion of the image. This is to make the image more prominent. You will need a free stock image or any that you have. You will be able to do this in any version of Photoshop. We will also be using a Black Layer Mask. If you have never used a Black Layer Mask before, you can see how this is done in this tutorial.
Step 1 : I have opened this free stock image in Photoshop. There is a distinct 'floor' i.e. the fence in the background and the pavement in the foreground.
You can download the image here
Step 2 : Press CTRL+J. The Background duplicates into Layer 1.
Step 3 : Go to Filter>Blur>Gaussian Blur.
Step 4 : The Gaussian Blur dialogue box opens. Drag the Radius slider to the extreme right. Click OK.
Step 6 : This how the image looks. It is totally blurred.
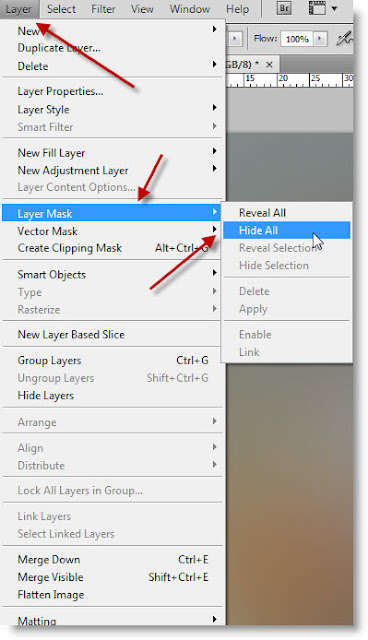
Step 7 : Go to Layer>Layer Mask>Hide All.
Step 8 : The image is revealed again.
Step 9 : Look in the Layers palette. A black layer mask has formed next to the layer thumbnail on Layer 1.
Step 10 : The Foreground Color should be set to White.
Step 11 : Click the Brush Tool.
Step 12 : Click where the arrow points to reveal the Brushes palette. Set the Hardness to 0%. Let the Master Diameter alone. To increase the size of the Brush press ] (right bracket next to the letter P on your keyboard). To make it smaller press [ (left bracket). You will constantly need to switch between a large brush tip and small brush tip. This shortcut helps immensely.
Step 13 : With a fairly large brush begin painting. The blur returns.
Step 14 : Zoom into the image to be able to see clearly what you are doing.
Step 15 : Make the Brush tip small by pressing the [ (left bracket) as you get near the image.
Step 15 : You can see here that I have accidentally painted into the boy's knee. That's not a problem.
Step 16 : Press 'x' on the keyboard. The Foreground Color changes to Black.
Step 17 : I have painted over the knee with the Foreground set to Black to correct it.
Step 18 : Zoom further into the image, otherwise you will not notice parts that were accidentally brushed away.
And here is the finished image. You can paint away the entire background if you want to.
Other photoshop tutorials are here


