I have demonstrated the Displacement Map in photoshop earlier. I will will be doing it again.
A Displacement Map takes the 256 greyscale values of an existing Photoshop image, and applies them to the target layer. Greyscale values less than 128 result in a negative shift, greater values a positive shift. You can control the degree of horizontal and vertical shifting. If you find that difficult to understand, don't worry just continue with the tutorial. You will be able to understand it.
A Displacement Map takes the 256 greyscale values of an existing Photoshop image, and applies them to the target layer. Greyscale values less than 128 result in a negative shift, greater values a positive shift. You can control the degree of horizontal and vertical shifting. If you find that difficult to understand, don't worry just continue with the tutorial. You will be able to understand it.
Step 2 : Press CTRL+J to duplicate the Background Layer to Layer1.
Step 3 : Click on the Type Tool and click on Horizontal Type Mask Tool.
Step 4 : Click in the top panel to bring up the Fonts available. I have chosen Impact, which is found in all versions. Or you can choose any thick font. Set the Size of the Font by typing in a value. I have set the size to 75. The size will depend on the image.
Step 5 : Draw out a Text box, then type you text in it. You will find a reddish hue on the image. It is a Mask.
Step 6 : Click the Tick Mark in the top panel.
Step 7: As soon as you click the tick mark in the top panel the mask disappears. Only the outline of the text remains.
Step 8 : With the selection in place press CTRL+J. The selection is cut and pasted on Layer2. Double click Layer2. Type in 'this'. It is the text. I am renaming the layer to avoid confusion.
Step 9 : This is how the Layers palette looks.
Step 10 : Click the Move Tool.
I have moved the Text with the Move Tool to show where it is. Press CTRL+Z to put it back where it was.
Step 11 : Click again on Layer 1.
Step 12 : Click the Horizontal Type Mask Tool again.
Step 13 : Type out the second word. Mine is 'private'.
Step 14 : Click the Tick Mark.
Step 15 : The Mask disappears. The outline of the letters remain.\
Step 16 : Press CTRL+J. The selection is cut and pasted on Layer2. (It is named Layer 2 again because the earlier one was renamed). Double click to rename the layer.
Step 17 : Click once after renaming. This is how the Layers palette looks. This is how you will have to add the text with a single layer for each word, then rename the layer.
Step 18 : This is my entire Text.
Step 19 : This is how the Layers palette looks. Each word is on its own layer.
Step 20 : Switch off the eye icons in Layers and Background layer.
This reveals the text, with each word on its own layer.
Step 21 : I am clicking on the 'private' layer.
Step 22 : Press CTRL+T. A selection forms.
Step 23 : Press SHIFT+ALT. Drag the middle handle at left outwards The word increases in size proportionately.
Step 24 : Hover the cursor on a corner. A small bent two headed arrow will appear. You will be able to rotate the selection with it. Press ENTER.
Step 25 : Click on the 'me' layer.
Step 26 : Press SHIFT+ALT. Drag the top middle handle up. The word will increase in size proportionately.
Press ENTER.
Step 27 : Rotate, increase the size of the words (in each layer) as you want to.
Step 28 : Turn on the eye icons on Background and Layer 1.
Step 29 : Click on the topmost layer. It is 'this' layer.
Step 30 : Press SHIFT. Click on the layer just above Layer 1. All the layers above are highlighted.
Step 31 : Press CTRL+E. All the layers are compressed into one.
Step 32 : Click on the Add a Layer Style Button. Then click on Drop Shadow.
Step 33 : The Drop Shadow is ticked in the Layer Styles dialogue box. Use the cursor to drag the Drop Shadow. You will be able to move the drop shadow to any position with the cursor.

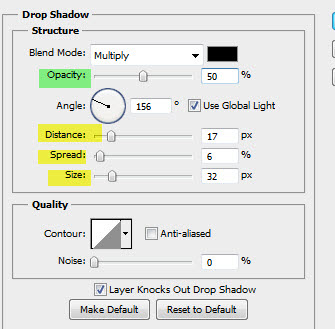
Step 34 : Since the Distance has already been set by dragging with the cursor, give the settings for the Spread and Size. I have given my settings. Lastly lower the Opacity to 50%.
Click OK.
This is how the image looks.
Step 35 : Now to do the Displacement Map. Click on Layer1.
Step 36 : Press Shift+ALT+S. This will open a folder where your file will be saved as a psd. Click Save.
Step 37 : Click on the topmost layer which contains all the Text.
Step 38 : Click on Filter>Distort>Displace.
Step 39 : The Displace dialogue box opens. Put 25 in both Horizontal and Vertical Scales. Click OK.
Step 40 : As soon as you click OK, Photoshop opens the place where the psd was saved. Click it.
The words are displaced. It follows the contours of the sand.
Step 41 : Click on Layer1.
Step 42 : Press CTRL+L to bring up the Levels dialogue box.
Step 43 : Drag the Black and White sliders to just below the histogram.
Click OK.
This is how the image looks.
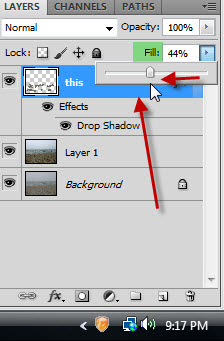
Step 44 : Click on the topmost layer containing the Text and lower the Fill suitably. I have reduced it to 44%. It will depend on your image.
The finished image.
Other Photoshop tutorials are here
Step 29 : Click on the topmost layer. It is 'this' layer.
Step 30 : Press SHIFT. Click on the layer just above Layer 1. All the layers above are highlighted.
Step 31 : Press CTRL+E. All the layers are compressed into one.
Step 32 : Click on the Add a Layer Style Button. Then click on Drop Shadow.
Step 33 : The Drop Shadow is ticked in the Layer Styles dialogue box. Use the cursor to drag the Drop Shadow. You will be able to move the drop shadow to any position with the cursor.

Step 34 : Since the Distance has already been set by dragging with the cursor, give the settings for the Spread and Size. I have given my settings. Lastly lower the Opacity to 50%.
Click OK.
This is how the image looks.
Step 35 : Now to do the Displacement Map. Click on Layer1.
Step 36 : Press Shift+ALT+S. This will open a folder where your file will be saved as a psd. Click Save.
Step 37 : Click on the topmost layer which contains all the Text.
Step 38 : Click on Filter>Distort>Displace.
Step 39 : The Displace dialogue box opens. Put 25 in both Horizontal and Vertical Scales. Click OK.
Step 40 : As soon as you click OK, Photoshop opens the place where the psd was saved. Click it.
The words are displaced. It follows the contours of the sand.
Step 41 : Click on Layer1.
Step 42 : Press CTRL+L to bring up the Levels dialogue box.
Step 43 : Drag the Black and White sliders to just below the histogram.
Click OK.
This is how the image looks.
Step 44 : Click on the topmost layer containing the Text and lower the Fill suitably. I have reduced it to 44%. It will depend on your image.
The finished image.
Other Photoshop tutorials are here


