When Brightness and Contrast does not work, turn to Levels. When Levels does not work try Curves. This is about Curves Adjustment Layers and how to do it correctly. We also know of the classic S curve, but sometimes this may not work. How do do you lighten and darken small parts of an image? Turn to Curves. Here we will use Curves Adjustment Layers which are non-destructive as opposed to Curves. Here we will unlock the secrets of using it.
I will be using this free stock image. You will find it here
It belongs to skydancer-stock
Using the secrets of Curves Adjustment Layers I have brightened the lights without making it look unnatural. Just follow along to be able to do the same.

Using the secrets of Curves Adjustment Layers I have brightened the lights without making it look unnatural. Just follow along to be able to do the same.

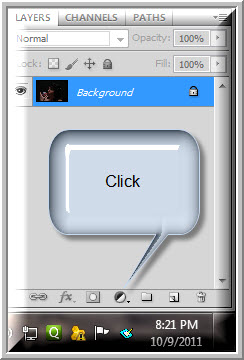
Step 1 : Click the Adjustment Layer Button.
Step 2 : Click Curves from the pop up.
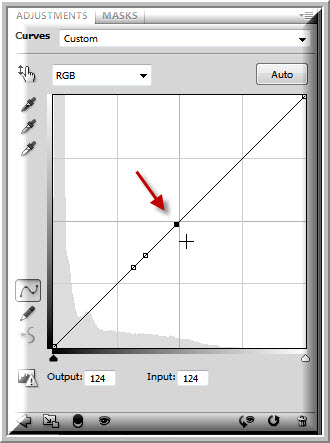
Step 3 : The Curves 1 Layer and the Curves dialogue box appears.
Step 4 : Click the tiny arrow and click on Expanded View. You should always use the Expanded View.
The Expanded View.
Step 5 : ALT+CLICK inside the Curves and it will switch between the small squares and large squares. Always use the large squares view.
Step 6 : Click the Eye Dropper Tool.
Step 7 : I have CTRL+CLICKED on a light portion of the image.
Step 8 : As you CTRL+CLICK different parts of the image a bouncing ball will appear on the diagonal in the middle.
Step 9 : A black dot appears on the diagonal when you CTRL+CLICK.
Step 10 : I have CTRL+CLICKED at three places on the bridge of the nose where the light falls.
Step 11 : The last point clicked appears as a Black dot and the two earlier as White.
Step 12 : Press the + (plus) sign on the keyboard to cycle upwards till the topmost point.
Step 13 : Press the - (minus) sign on the keyboard to cycle downwards through the dots.
Step 14 : Press SHIFT and click on the points and all are selected. Press minus to deselect.
Step 15 : I have clicked on the midpoint.
Step 16 : I have pressed the Up Arrow key 5 times which moves the middle dot up a little at a time.
Step 17 : Press SHIFT and Press UP arrow to move the point up in larger quantum. Use the arrow keys to move the dots up, down, left and right when needed.
Step 18 : Use the Reset button at the bottom if you want to clear the points and begin again.
Step 19 : I am CTRL+CLICKING a point on the forehead.
Step 20 : A black dot appears on the diagonal.
Step 21 : I am CTRL+CLICKING a second point on the nose.
Step 22 : The second point clicked appears as a Black dot, while the other point turns White. It means the Black dot is selected and the White dot is unselected.
Step 23 : I have clicked on the top of the lips.
Step 24 : The point appears as a black dot between the two other points, which are now unselected.
Step 25 : I have pressed Shift and clicked on all three points to select them all.
Step 26 : I have not moved the points as yet. The image looks like this.
Step 27 : With all the three dots selected I am pressing SHIFT and UP ARROW twice. All three points move upwards together. I could have moved them downwards too. But here it needs to be moved up. I could have moved them in small amounts with only the UP arrow key without pressing SHIFT.
The light on the nose increases. The eyes which were in shadow can be made out now.
Step 28 : I have CTRL+CLICKED on the eye.
Step 29 : A fourth Black point appears near the end of the diagonal.
Step 30 : I am pressing SHIFT+UP ARROW. I could have used the ARROW key without the SHIFT also.
Look at the eye now. It is fully visible. The lighting has increased but in a very controlled way and without looking unnatural.
Step 31 : I have CTRL+CLICKED on just above the eye.
Step 32 : A fifth black dot forms.
Step 33 : I have press the + sign to select the dot immediately above.
Step 34 : Press SHIFT+UP ARROW. You can also press the arrow key without pressing SHIFT to move the dot up (or down) in smaller increments.
Look at the image. The image has more light without looking unnatural.
This is how the image looks. This is how you should use Curves. I have unlocked its secrets. Have fun
Other Photoshop tutorials are here


