Monday, October 4, 2010

Rembrandt Style of Lighting with Photoshop

There is a style of Photography called the Rembrant Style. Rembrandt Harmenszoon van Rijn  was a Dutch painter and etcher. He is generally considered one of the greatest painters and printmakers in European art history and the most important in Dutch history. His contributions to art came in a period that historians call the Dutch Golden Age.He had a certain style for painting the light in his images. 
This is a self portrait. You can see that his lighting is special. Photographers have replicated his style calling it the Rembrant Style. The secret of this is to keep half of the face lighted. Added to this is a triangular shape of light on the side which is in shadow.
This is a free stock image that I will be using for this tutorial. It belongs to AngellofFyre
 In photoshop you do not have a model or able to set the lights for the effect. All you have is a 2D image.
Let us see if we can give this image a Rembrant Style of lighting.
Step 1 : Unlock the Background Layer by pressing ALT and double clicking the layer. The Background Layer will change to Layer 0.
Step 2 : Click the Lasso Tool.
Step 3 : In the top panel I have set the Feather to 25 pixels. 
 
Step 4 : With the Lasso Tool draw a selection taking care to see that the selection passes through the middle of the face.
Step 5 : Click the Add New Fill or Adjustment Layer icon and select Levels from the pop up.
Step 6 : In the Levels dialogue, drag the White slider at left and the Gray slider in the middle towards the left
gradually. This portion of the image brightens.
This is how the image looks.
Step 7 : CTRL+Click the Mask on Levels 1 Layer.
Step 8 : The selection of marching ants reappears.
Step 9 : Press CTRL+SHIFT+I. This will inverse the selection.
Step 10 : Click back on Layer 0.
 Step 11 : Click on the Add New Fill or Adjustment Layer. Click on Levels from the pop up.
 Step 12 : In the Levels dialogue, drag the Black slider at the left and the Gray slider in the middle towards the right which will darken the right portion of the image.
 This is how the image looks.
Step 13 : Make sure that the Foreground/Background Colors are set to the default Black/White. Press b to bring up the Brush Tool and brush over the pupil and the whites of the eyes.
 This is how the image looks.
Step 14 : Click on Layer 0.
Step 15 : Click on the Lasso Tool
 Step 16 : Draw a rough triangle with the Lasso Tool on the right cheek.
 Step 17 : Click the the New Fill or Adjustment Layer Button and click on Levels.
 Step 18 : Drag the White slider at right towards the left as also the Gray slider in the middle till a glow appears on the cheek. Tweak all the Levels Adjustments layers till you are satisfied.
 And here is my Rembrant Style of lighting in Photoshop.
Other photoshop tutorials are here 


Behind Glass Photoshop tutorial

I will be creating an effect of an image behind a glass. By this I mean I will make the girl appear inside the glass jar. If you use Blend Modes such as Overlay or Soft Light or Screen or whatever here you may not get the exact effect you want. So let me try something different.
I will be using this free stock image. It belongs to *LunaNYXstock Elisabeth
I will also be using this free stock image. It belongs to ~dollcity-stock tylee
Step 1 : The first thing to do is to cut out both images from their background. You may use the Pen Tool 
or the Magnetic Lasso, whichever you prefer to use. (Click the hightlighted words to go to the relevant tutorials.)
Step 2 : I have cut out the girl's image.
 Step 3 : I have cut out the jug image.
Step 4 : Click off the eye icon in the Background layer of the girl's image.
Step 5 : Click off the eye icon in the Back ground layer of the jug.
 The jug image  looks like this.
 The girl's image looks like this.
 Step 6 : Click on the girl's image. Press CTRL+A (Select All). Then press CTRL+C (Copy).
 Step 7 : Click on the jug image and press CTRL+V (Paste). The girl's image is pasted onto the jug.
The resolution of the girl's image is low compared to the jug. Therefore the girl's image is small. We will fix that.
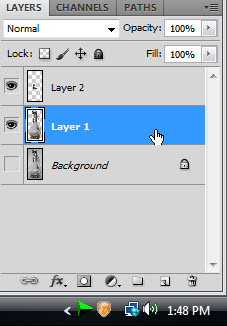
Step 8 : The Layers palette looks like this. Layer 2 is the image of the girl and Layer 1 the jug. The Background layer is switched off.
Step 9 : Click on Layer 1.
Step 10 : With Layer 1 highlighted, press CTRL and click the New Layer icon. A new Layer 3 forms under Layer 1.
Step 11 : The Foreground/Background Colors should be set to the default Black/White respectively. 
If not press x and then d on the keyboard.
Step 12 : Press CTRL+BACKSPACE. This will fill with the Background Color which in this case is White.
 This is how the image looks with the background filled with White.
 Step 13 : Click on Layer 2. This contains the image of the girl.
Step 14 : You can also rename the layers. Double click where the small white hand points to and you can then type in a name. 
Click once after typing. I have renamed the layers  'girl' and 'jug'. 
Step 15 : Click on the Girl Layer.
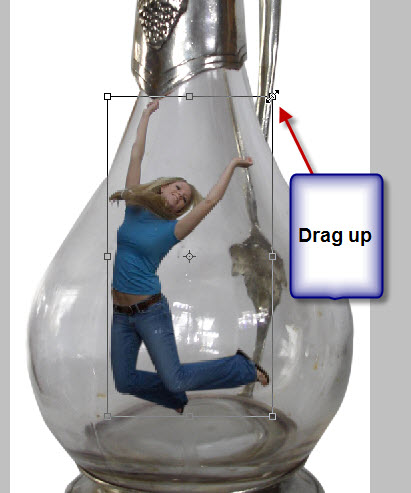
 Step 16 : Press CTRL+T. A selection forms around the image of the girl.
 Step 17 : After pressing CTRL+T. Press SHIFT+ALT and you will be able to resize the image of the girl
proportionately.
 Step 18 : Once you are satisfied, press ENTER to apply the selection.
Step 19 : Click on the jug layer. Press ALT and drag up. A copy of the jug layer will be placed on top of the girl layer.

 This is how the image looks. The girl's image is hidden.
Step 20 : Click on the girl layer.
 Step 21 : Click on the New Fill or Adjustment Layer button. Click Brightness/Contrast from the pop up. 
A Brightness/Contrast Adjustment Layer will form.
Step 22 : Click on the jug copy layer.
Step 23 : Press CTRL+ALT+G. This creates a Clipping Layer. 
You will find a small bent arrow beside the layer thumbnail on the jug copy layer. 
Step 24 : Ctrl+Click the layer thumbnail on the jug copy layer.
 Step 25 : A selection of marching ants surround the jug. Press CTRL+C (Copy).
Step 26 : Press ALT and click directly on the Mask of the Brightness/Contrast layer. 
 The image looks like this.
Step 27 : Press CTRL+V. The selection made in Step 25 is pasted into the Mask.
 The image looks like this. It is in black and white.
Step 28 : Click on the jug copy layer.
 As soon as you click the jug copy layer, the girl becomes visible behind the glass. Press CTRL+D to deselect. 
 Step 29 : Lower the Opacity of the Jug copy layer to 75%.

This is how the image looks.
Step 30 : Click on the Girl Layer.
Step 31 : Press ALT and drag the girl layer to the top. It will form a duplicate girl copy layer.
Step 32 : Lower the Opacity of the girl copy layer suitably. It will depend on your image.
I have lowered it to 55%.

The image looks like this.
Step 33 : Click the New Fill or Adjustment layer button. Click on Levels.
Step 34 : In the Levels dialogue box drag the Gray Slider in the middle slightly towards the left. This of course will also depend on the image you use.
Here is my finished image.
Other photoshop tutorials are here

Share

Twitter Delicious Facebook Digg Stumbleupon Favorites