This is a tutorial on creating a soft pink effect in images no matter what their color. Some people seem to like this particular effect which is easily done in Photoshop.
This the effect I mean.
This the effect I mean.
Step 1 : I will be using this free stock image. You will find it here
It belongs to night-fate-stock
Step 2 : Click the New Layer icon. A new Layer 1 forms.
Step 3 : Click on the Foreground Color to bring up the Color Picker.
Step 4 : Type in eeb395 in the highlighted box. The Pink is selected automatically. See New at the top. That is the shade selected. Click OK.
The Foreground Color changes to the shade picked.
Step 5 : Press ALT+BACKSPACE to fill with the Foreground Color.
The image is covered totally with the Foreground Color.
Step 6 : Change the Blend Mode to Overlay.
The image looks like this.
Step 7 : Click the New Layer icon. A new Layer 2 forms above Layer 1.
Step 8 : Click the foreground Color. The Color Picker comes up. Type in eeb395 in the highlighted box and click OK.
The Foreground Color changes to the shade picked.
Step 9 : Press ALT+BACKSPACE to fill Layer 2 with the chosen Color.
The image is filled with solid color.
Step 10 : Change the Blend Mode to Screen. Lower the Opacity to 50%.
The image looks like this.
Step 11 : Click the New Layer icon and a new Layer 3 forms over Layer 2.
Step 12 : Click the Foreground Color one last time and the Color Picker comes up again. Type in eeb395 in the highlighted box. Click OK.
Step : 13 Press ALT+BACKSPACE to fill Layer 3 with the selected color.
The image is again filled with color.
Step 14 : Change the Blend Mode of Layer 3 to Screen and lower the Opacity to 50%
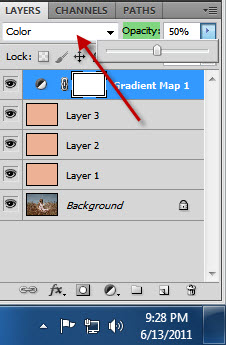
Step 15 : Click on Gradient Map from the pop up.
Step 16 : Change the Blend Mode to Color. Lower the Opacity to 50%.
The image looks like this. So far I have followed the steps by The Coffee Shop Blog
If you like this effect, it's fine. But personally I would like to add one more step.
Step 17 : Click the Add New Fill or Adjustment Layer button. Click on Levels.
The Levels 1 Adjustment Layer forms over the Gradient Map 1 layer.
Step 18 : Drag the Black slider halfway the bottom of Histogram. If you you drag it all the way you will get another effect. Not the dreamy kind intended here.
The finished image.
Other photoshop tutorials are here


