Sunday, October 10, 2010

Auto Blend in Photoshop

You can ask Photoshop to blend two or three similar images seamlessly with the Auto Blend function. 
I will use three free stock images of  *mjranum-stock Marcus J. Ranum to demonstrate it. 


These are the three free stock images.
Step 1 : Go to File>New
Step 2 : I have set the size of the document fairly high at 11 inches wide and 9 inches high.
I have set the resolution at 300 pixels to make it suitable for printing. I have set the Background Contents to Transparent.
Step 3 : Click the Move Tool.
Step 4 : Keep SHIFT pressed while moving the images to the Transparent Document.
Step 5 : The  image is quite large. It moves to the centre of the Transparent Layer. It will have to be resized. Press CTRL+T. A selection will form around the image.
Step 6 : Keep SHIFT+ALT. You will find corner handles at the corners and the middle. Grab the top left corner handle and drag down keeping SHIFT+ALT pressed. This will resize the image proportionately. Press ENTER to apply the resizing.
Step 7 : Click the Move Tool and drag the second image to the Transparent Layer.
Step 8 : Press SHIFT+ALT and resize. Press ENTER after resizing.
Step 9 : Drag the third image to the Transparent Layer, press SHIFT+ALT to resize. Place it appropriately.
It may be possible that your images may not align perfectly. It should not matter.
Step 10 : There are now four layers in the Layers palette. Layer 1 is the Transparent layer at the bottom. The three others obove it on Layer 2, 3 and 4 are the three images. Click on Layer 2, press SHIFT and click on Layer 4.
All the layers are selected as soon as you click.
Step 11 : Click on the Rectangular Marquee Tool.
Step 12 : Drag out a selection keeping out the portions, like in the middle image, that are sticking out.
Step 13 : Go to Image>Crop.
Step 14 : The images are cropped. Press CTRL+D to deselect.
Step 15 : Go to Image>Auto Blend layers.
Step 16 : The Auto-Blend dialogue box pops up. Panorama is selected by default. click OK.
Photoshop begins blending the three images as soon as you click OK.
The three images have been blended by Photoshop. But it has not done a perfect job. The borders between the images have not been blended perfectly.
Step 17 : The Layers palette looks like this.
Step 18 : Press CTRL+E. All the three layers will merge into one.
Step 19 : Select the Patch Tool.
Step 20 : In the top panel there are two settings -- Source and Destination. Source is set by default. We will be using Source.
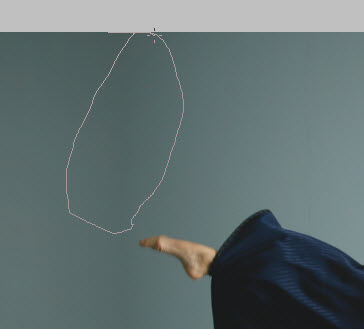
Step 21 : Draw a rough selection like this.
Step 22 : Place the cursor in the middle of the cursor and drag (in any direction).
Step 23 : After dragging click the left mouse button once. The selection goes away.
Step 24 : Select another area with the Patch Tool. Draw a selection. Drag the selection. 
Step 25 : You can also set Destination in the top panel.
Step 26 : Draw a selection with the Patch Tool. Place your cursor in the middle.
Step 27 : Drag it to the portion you wish to cover.
The three images have been blended seamlessly. Try it
Other Photoshop tutorials are here

Friday, October 8, 2010

Partial Desaturation with Mask in Photoshop

You can use a Mask in Photoshop to desaturate half of a photo, while keeping the remaining in color. It is quite simple to do. I learnt this from a Photoshop expert, Tennessee_Gator who runs a Photoshop group in Flickr. 
Step 1 : I have opened this image in Photoshop. This is a free stock image belonging to *fa-stockFay
You can use any image.
Step 2 : Click on the Create New Fill or Adjustment Layer button. From the pop up click on Black & White.
Step 3 : The Black & White Adjustment Layer has been added.
 The image has been desaturated.
Step 4 : Press g on the keyboard. The Gradient Editor comes up when you click where the arrow points to.
 Step 5 : The Gradient Editor is revealed. Click on the third Preset in the top row.
 Step 6 : Press SHIFT and drag to the left. You can of course drag from the other direction too. It will give you a different effect.
 This is the effect.
 Another free stock image with the same effect. It belongs to ~Eden-stockEden Dawn
 Other Photoshop tutorials are here


Tuesday, October 5, 2010

Dark to Light, Light to Dark in Photoshop

Suppose you have a dark image, you can change the tone with Levels in Photoshop, but you can do it another way too. Similalry, if you have an image which is light in tone, you can always darken it. 
Here is a free stock photo. It belongs to *FullBodyShotsHelping manipulators everywhere
The image has dark tones and may be purposefully so.
 Step 1 : Go to the Channels palette.
Step 2 : Rotate through the Red, Green and Blue channels. See which is the lightest. Here the Red channel is the lightest.
 Step 3 : Press CTRL+A (Select All), then press CTRL+C (Copy).
Step 4 : Click on the RGB channel.
 Step 5 : Go over to the Layers palette.
 Step 6 : Press CTRL+V (Paste). The selection is pasted into a new Layer1.
 Step 7 : Click on the Blend Modes and change it to Screen from Normal.
 And here is the effect that I wanted. It works all the time and is very simple to do.
 Step 8 : You can lower the Opacity a tad. I have reduced it to 90%. This is optional.
 This is how the image looks after lowering the Opacity to 90%.
 Now let us take an image like this, where there is excess of light. This is a free stock image. It belongs to =Falln-Stock
Step 9 : Go over to the Channels palette. Click on the channel with most contrast or the darkest by clicking each in turn. Here I have chosen the Green channel.
 This is how the image looks after selecting the Green channel.
 Step 10 : Press CTRL+A (Select ALL), then CTRL+C (Copy).
 Step 11 : Click on the RGB channel.
 Step 12 : Click on the Layers palette.
 Step 13 : Press CTRL+V (Paste). The selection is pasted on a new Layer 1.
 Step 14 : Change the Blend Mode to Multiply.
And here is the image.
 Step 15 : Lower the Opacity. I have decreased it to 90%.
 The finished image.
Other photoshop tutorials are here 

Share

Twitter Delicious Facebook Digg Stumbleupon Favorites