


In Lomography the colors are vibrant, with deep saturation and vignettes that frame the shot . It is said to have begun in the early 1990s when two students in Vienna, Austria, used a Lomo Kompakt Automat – a Russian camera. They were surprised at the results they got. Photoshop can simulate Lomography.

I will be using this free stock image to demonstrate the lomo effect. It belongs to
~Katanaz-Stock

Step 1 : Select the Elliptical Marquee Tool.

Step 2 : In the top panel set the Feather at 90 pixels. Anti-alias is checked.

Step 3 : Draw an eclipse with the Marquee. After drawing it position it correctly with the cursor.

Step 4 : Press+SHIFT+I to inverse the selection.

Step 5 : Click the Adjustment Layer button and click on Levels.

Step 6 : In the Levels adjustment drag the Black slider to the right till the sides darken perceptibly.


Step 8 : Click the Adjustment Layer button and click on Curves.

Step 9 : In the Curves dialogue box make an S curve as shown in the RGB Channel.

Step 10 : Click on the Green Channel.

Step 11 : In the Green Channel make a similar S curve.

Step 12 : Now click the Blue Channel.

Step 13 : In the Blue Channel make the S Curve opposite to the RGB and Green Channels.

This is how the image looks so far.

Step 14 : Change the Blend Mode to Hue and decrease the Opacity to 50%.

Step 15 : Click on the Adjustment Layer button and click on Gradient Map.

Step 16 : The Gradient Map comes up.

Step 17 : Change the Blend Mode to Hue. Decrease the Opacity to 70%.

Step 18 : PRESS CTRL+SHIFT+ALT+E to make a Composite Layer 2.

Step 19 : Click the Adjustment Layer button and Click on Levels.

Step 20 : In the Levels Adjustment drag the middle slider slightly to ards the left to brighten the image a bit.

This is how the image looks.

Step 21 : Press CTRL+SHIFT+ALT+E to make a Composite Layer 3.

Step 22 : Click on the Adjustment Layer button and click on Gradient Map.

Step 23 : Click where the arrow points to bring up the Gradient Editor.

Step 24 : In the Gradient Editor click on the Transparent Rainbow Gradient. Click OK in the Gradient Editor.

This is how the image looks.

Step 25 : Change the Blend Mode to Color and drop the Opacity down to 25%.

Step 26 : Click in the Channels palette. Click on the Red, Green and Blue channel to see which is the lightest. Here the Green Channel is the lightest. Press CTRL+A (Select All, then CTRL+C (Copy)

The image looks like this when I clicked the Green Channel.

Step 27 : Click on the RGB Channel in the Channels palette.

Step 28 : Click back on the Layers palette and press CTRL+V. A new Layer 4 forms with the Green Channel selected in the Channels palette.
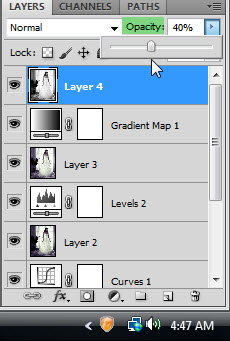
Step 29 : Drop the Opacity of the Layer to 40%.

This is how the image looks.

Step 30 : Ctrl+Click the layer Mask on the Levels 1 Layer.

Step 31 : A selection becomes visible.

Step 32 : Click on the topmost layer which is Layer 4.

Step 33 : Click the new Layer icon. A blank Layer 5 forms.

Step 34 : Press SHIFT+F5. The Fill dialogue box appears. Change the Use to 50% Gray. Click Ok.

The image looks like this.

Step 35 : Change the Blend Mode to Multiply and drop the Opacity to 80%. Press CTRL+D to deselect.

The finished Lomo effect.
Other photoshop tutorials are here


