


This is a tutorial on creating a frame for any photo with an effect using Curves. This will work with any image and can be done in any version of Photoshop.

This is the effect I will create.

Step 1 : I have opened this free stock image. You will find this here
It belongs to foxartists

Step 2 : Drag the Lock on the Background Layer to the Trash Can.

The Layer changes to Layer 0.

Step 3 : Go to Image>Canvas Size.

Step 4 : The Image Size dialogue box opens.

Step 5 : Change both the Height and Width to 'Percent'.

Step 6 : Type in 120 for both Height and Width in the boxes. Click OK.

Step 7 : A transparent border forms around the image.

Step 8 : Click the Magic Wand Tool.

Step 9 : Click on the transparent area with the Magic Wand. A selection forms.

Step 10 : Press CTRL+SHIFT+I to inverse the selection.

Step 11 : Press CTRL+J to jump the selection to Layer 1.

Step 12 : Click on Layer 1.

Step 13 : The Foreground/Background Color should be set to the default Black/White. If it is not press x and then d on the keyboard.

Step 14 : Press CTRL+BACKSPACE to fill with the Background Color which is White in this case.

Filling Layer 0 with White makes the border form around the image.

Step 15 : Click the New Fill or adjustment layer button.

Step 16 : Click on Curves from the pop up menu.

Step 17 : The Curves dialogue box opens.

Step 18 : Drag the diagonal from top right side to a little above the bottom as shown.

Step 19 : The Layers palette looks like this.

Step 20 : The image looks like this.

Step 21 : Click the Brush Tool.
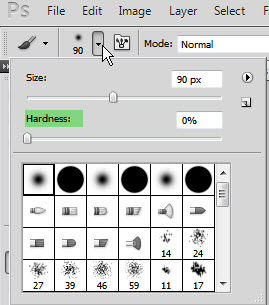
Step 22 : Click where the arrow points to open the Brush Controls. Set the Hardness to 0. You can the size here or press ] (right square bracket) to increase the size or [ (left square bracket) to decrease it.

Step 23 : Lower the Opacity and Flow of the Brush in the top panel to 50%.

The Foreground Color is already set to Black.

Step 24 : With the Brush begin to paint.

Step 25 : Paint around the frame of the image.

Step 26 : Paint around the inside edge of the frame for a second time.

Step 27 : Go to Filter>Noise>Add Noise.

Step 28 : I have set the Amount to 10 and checked Gaussian for Distribution for this image. You can vary the settings depending on the image you use.

Step 29 : The image looks like this.

Step 30 : Go to Filter>Blur>Motion Blur.

Step 31 : In the Motion Blur set the Angle at 90 and Distance at 999. Click OK.

The image looks like this.

Step 32 : Click on the Add to Fill or Adjustment button and click on Gradient Map. (This is not found in Photoshop7).

Step 33 : Click where the arrow points to reveal the Presets in the Gradient Editor. We will not use them. Click the tiny black arrow.

Step 34 : A list pops up. Click on Metals.

Step 35 : This dialogue box pops up. Click OK.

Step 36 : The Metal Gradients appear. I am clicking on Steel Blue.

Step 37 : As soon as you click he Preset it is applied to the frame.

Step 38 : Lower the Opacity of Gradient Map 1 layer to around 50%.

Step 39 : The image looks like this.

Step 40 : Click on Layer 1.

Step 41 : Click the Layer Style button

Step 42 : Click on Drop Shadow from the popup.

Step 43: The Drop Shadow dialogue box pops up.

Step 44 : With the Drop Shadow open click on the image and drag, you will be able to move the Drop Shadow to where you want it.

Step 45 : In the Drop Shadow, the Distance has already been set after I dragged it with the cursor. Drag the Size to blur the drop shadow and lastly the Spread a wee bit. Click OK.

The finished image.
Other photoshop tutorials are here


