Friday, November 26, 2010

Color to single tone in photoshop

You must know that desaturating an image in Photoshop is very simple. Just press CTRL+SHIFT+U.
But should you want it to change it into a mono color of your choice, what do you do? It is also quite simple.
I will use this free stock image. You will find it here
It belongs to =faestock
Step 1 : There is only a single Background Layer in Photoshop.
Step 2 : Click the New Fill or Adjustment Layer button. Click Solid Color from the popup.
Step 3 : As soon as you click the image turns Black. The Pick a Solid Color dialogue box opens.
Step 4 : Click on Color Libraries.
Step 5 : The Color Libraries open.
Step 6 : Click the Brown in the Spectrum in the middle.
Step 7 : I have clicked on  Pantone 448. Click OK.
Step 8 : The image is covered with the color as soon as you click OK.
Step 9 : Change the Blend Mode to Color.
And here is the mono color image. You can choose any color in the spectrum to pick a different color. The steps will be the same.
Other photoshop tutorials are here


Thursday, November 25, 2010

Mono Color in Photoshop

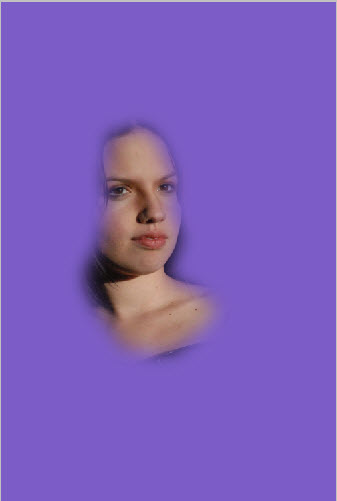
You can turn a color image in a parts to mono color while retaining color in parts that you want. It is very easy to do in any version of Photoshop in just a few steps.
I will be using a free stock image. You will find the image here
It belongs to ~LinzStock
Step 1 : You will find only a single Background Layer in the Layers palette.
Step 2 : Press ALT and double click the Background layer. It changes too Layer 0.
Step 3 : Click the Lasso Tool.
Step 4 : In the top panel set the Feather at between 25 to 50 pixel.
Step 5 : Draw a rough selection with the Lasso Tool of the portion you wish to keep in color.
Step 6 : Press CTRL+SHIFT+I. This reverses the selection.
Step 7 : Click the New Fill or Adjustment button. From the popup click on Solid Color.
Step 8 : The Pick a Solid Color dialogue box opens. Click on Color Libraries.
The image looks like this.
Step 9 : Click a color in the Spectrum at the middle. As soon as hover the cursor over the Spectrum, the cursor turns into an eye dropper. Click a color with it.
Step 10 : I have clicked on purple.
Step 11 : I have clicked on Pantone 2665 C.
The image looks like this as soon as click the color. Click OK in Color Libraries.
Step 12 : Click to change the Blend Mode to Color.
The image looks like this.
Step 13 : The Foreground Color/Background Color should be set to Black/White. If it is not press x and then d on the keyboard.
Step 14 : Use the Brush to paint away portions you do not wish to retain in mono color. To add the color, change the Foreground/Background Color to White/Black, by pressing the x on the keyboard and paint.
The finished image. That is all.
Another effect.
Other photoshop tutorials are here


Monday, November 22, 2010

Series of Images fading out

Create a series of faded images from a single image  in any version of Photoshop. First we need an image.
 fadding  This is the free stock image I will be using. You will find it here
It belongs to  *mjranum-stock
Step 1 : You can use the Magnetic Lasso Tool
Or the Pen Tool to cut out the image from the Background. You can use whichever tool you prefer. I prefer the Pen Tool.
Step 2 : The image has been cut out from the background.
Step 3 : Press CTRL+J to make the selection is copied and pasted onto Layer1. Click off the eye icon on the Background Layer.
Step 4 : Press CTRL+J again. Layer 1 copy forms.
Step 5 : Press CTRL+J again. Layer 1 copy 2 forms.
Step 6 : Click back on Layer 1 copy. Press CTRL+SHIFT+U to desaturate the layer. You will not notice anything as the desaturated layer is below Layer1 copy2.
Step 7 : Click the Move Tool.
Step 8 : Drag out the desaturated layer.
Step 9 : Press CTRL+T. A selection forms.
Step 10 : Press SHIFT+ALT and drag down the top left corner handle down diagonally. The image will decrease in size proportionately. Press ENTER.
Step 11 : Click on Layer 1. Press CTRL+SHIFT+U to desaturate the layer.
Step 12 Drag out the image by dragging.
Step 13 : Press CTRL+T. The selection forms. Press SHIFT+ALT to resize.
Press ENTER.
Find a free stock image of sky from http://www.deviantart.com/ You have to register. Registration is free. You can then download any number of images.
Step 14 : Click on the Background Layer.
Step 15 : Press CTRL+A (Select ALT), then CTRL+C (Copy) on the sky image.
Step 16 : Click back on this image. Press CTRL+V (Paste).
Step 17 : Press CTRL+V (Paste). The sky image is pasted above the Background layer.
Step 18 : The sky has been pasted. But the image is small. Press CTRL+T. A selection forms.
Step 19 : Press SHIFT+ALT and drag the top left corner handle up till the transparent background is covered.  Press ENTER.
Step 20 : Click on Layer 1.
Step 21 : Drop th Opacity of the Layer to 50%.
This is how the image looks.
Step 22 : Click on Layer 1 copy.
Step 23 : Drop the Opacity of the Layer 1 copy to 70%.
This is how the image looks.
Step 24 : Click on Layer 1.
Step 25 : Press CTRL and click the New Layer icon. (Second from the right at bottom). A new Layer 3 forms under Layer 1.
Step 26 : Press g to select the Gradient Tool. Click in the top panel.
Step 27 : Click the Blue, Red Yellow Gradient in the Gradient Editor. Click OK.
You can see the Gradient chosen in the top panel.
Step 28 : Drag diagonally with the Gradient Tool.
The image looks like this.
Step 29 : Click where the arrow points to bring up the Blend Modes. Change the Blend Mode to Color.
The image looks like this.
Step 30 : Drop the Opacity to 25%.
The finished image.
Other photoshop tutorials are here.


Share

Twitter Delicious Facebook Digg Stumbleupon Favorites