Friday, May 13, 2011

Bar Code making one

I have been asked to post a tutorial on making a bar code which you see on various products. It can be done in any version of photoshop and is very easy to do. It can also be done in Photoshop 7.
I will show you how to make the bar code as can be seen on this image.
Step 1 : Open a New Document. I have used the Default Photoshop Size Preset.
Step 2 : Click the New Layer icon. A new Layer 1 forms.
Step 3 : Make sure that Foreground/Background Colors are set to Black/White which is the default.
Step 4 : Press CTRL+BACKSPACE to fill with the Background Color which is White.
Step 5 : Click on Filter> Noise >Add Noise.
Step 6 : In the Add Noise dialogue box drag the Amount slider to the Maximum which is 400%. Click OK.
Step 7 : The image looks like this.
Step 8 : Go to Filter>Blur>Motion Blur.
Step 9 : In the Motion dialogue box set the the Angle at 90 and Distance to the Maximum. You can already see the Bar Code forming. Click OK.
Step 10 : The image looks like this.
Step 11 : Press CTRL+L. The Levels dialogue box comes up. Give the settings as shown in the highlighted boxes. Click OK.
The image looks like this.
Step 12 : Click the Crop Tool.
Step 13 : Draw a rectangular selection with the Crop Tool. 
Press ENTER.
And here is the Bar Code.
Add it to an image and type some numbers under it to make it look authentic.
Other photoshop tutorials are here


Wednesday, May 11, 2011

Blown highlights - quick fix

Sometimes after taking a photo you find that the highlights are blown. Here is a quick method to fix blown highlights in Photoshop. You can do it in Photoshop 7 also.
Step 1 : I have opened this free stock image. I don't remember where I got it from. But look in http://www.deviantart.com/ 
This is the source of most of the free stock images that I use in my tutorials. You can also look up
Anyway, you should get the general idea from this image.
Step 2 : Press CTRL+J to duplicate the background Layer. Press CTRL+SHIFT+N to open a new Layer 2 above Layer 1.
Step 3 : Click the Brush Tool.
Step 4 : Set the Hardness of the Brush to 0. Set Size to something moderate or use the [ (left bracket key) to make the brush small) or ] (right bracket key) to make it large.
Step 5 : Lower the Opacity of the Brush to 20% in the top panel.
Step 6 : ALT+CLICK with the Brush on a slightly deeper shade than the blown highlights.
Step 7 : The Foreground Color changes to the color picked by the Brush.
Step 8 : Gently paint over the highlights to conceal them.
Step 9 : Paint over the highlights.
Step 10 : Click the Add Layer Mask Icon. A Layer mask forms on Layer 1.
Step 11 : Ensure that the Foreground Color is set to Black.
Step 12 : With the Brush still set at 20% opacity paint away brush marks or portions where the paint has spilled over. That is all.
Other Photoshop tutorials are here


Layer Mask and Radial Blur Again

If you have been following the tutorials on Layer Masks, this is another special effect with the Radial Blur. It gives the effect of motion to a static image. It is very easy and can be done in all versions of Photoshop, including Photoshop 7.
This is the effect you can create.
Step 1 : I will be using this free stock image. You will find it here
It belongs to Dybcio
Step 2 : Press CTRL+J to duplicate the Background Layer. Photoshop 7 does not have this command, so drag the layer to the New Icon layer at the bottom to duplicate the layer.
Step 3 : Go to Filter>Blur>Radial Blur.
Step 4 : In the Radial Blur dialogue box set the Amount to between 45 and 75. It depends on the effect you want. If you want a subtle effect choose a low value. Click OK.
The image looks like this.
Step 5 : Make sure that the Foreground/Background Colors are set to the default Black/White. If it is not, press x and then d to restore the default.
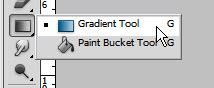
Step 6 : Click the Gradient Tool.
Step 7 : Click in the top panel to bring up the Gradient Editor. Click on Foreground to Background preset.
Step 8 : Click on the Linear Gradient. You can also try Radial Gradient, which is the next one, or Angle Gradient, or Reflected Gradient or Diamond Gradient which is the last one depending on the effect that you want. Try the Linear Gradient first. I will be using it.
Step 9 : Click the Add Layer Mask button. A Layer mask forms on Layer1 on which the Radial Blur has been applied.
Step 10 : Press SHIFT and you will be able to drag straight across roughly in the middle of the image with the Gradient Tool which is already selected.
And here is the effect. It is quite simple.
Here is another free stock image. You will find it here
It belongs to Makargina
I have followed the same steps -- duplicated the Background Layer, Used the Radial Blur with the same settings and used a Layer Mask.
The image looks like this.
Drag with the Gradient Tool only for a small portion horizontally from left to right.
And here is the finished image.
Other photoshop tutorials are here


Tuesday, May 10, 2011

Layer Mask and Radial Blur

The Layer Mask can be used in conjunction with Radial Blur to create a special effect in Photoshop, which can also be done in Photoshop7. It is also very simple to do.
This is the effect I will achieve.
Step 1 : I will be using this free stock image. You will find it here
It belongs to 
Step 2 : Duplicate the Background layer by pressing CTRL+J.
Step 3 : Go to Filter>Blur>Radial Blur.
 
Step 4 : In Radial Blur, set the Amount to 100, the Blur Method to Zoom and Quality to Good. You may also select Best. It will take a bit more time.
Click OK.
Step 5 : The image looks like this.
Step 6 : Click the Add Layer Mask button and a Layer Mask forms next to the layer thumbnail on Layer.
Step 7 : The Foreground/Background Colors should be set to the default Black/White. If it is not press x and d on the keyboard to restore the default.
Step 8 : Click the Gradient Tool.
Step 9 : In the Gradient Editor bring up the Presets by clicking where shown. Click on Foreground to Background preset.
Step 10 : Drag down for a short distance from a little below the top as shown with the Gradient Tool.
The image looks like this.
Step 11 : Click the Brush Tool.
Step 12 : Click in the top panel to reveal the Brush settings. Set the Hardness to 0 and set a fairly large Size.
Step 13 : Click once with the Brush at the right of the image.
Step 14 : Click once at left with the Brush.
The finished image.
Other photoshop tutorials are here


Share

Twitter Delicious Facebook Digg Stumbleupon Favorites