This is another tutorial on creating a Lomo effect. I had posted an earlier tutorial on it, It is here
The basic difference with the earlier tutorial is that we will first work on it in Camera Raw.Some of the steps are also going to be different.
This is the effect I will aim for.
This is the effect I will aim for.
I will be using this free stock image. You will find it here
It belongs to calamityjanne
Step 1 : Go to File>Browse in Mini Bridge.
Step 2 : In the Mini Bridge I am navigating to the image I want to open, right click and click on Open in Camera Raw.
Step 3 : The image is opened in Camera Raw.
Step 4 : The Basic Controls are at the right. You can see the Black slider is set to 6 and the specific settings for Vibrance and Saturation.
Step 5 : I have Lowered the Blacks to 0, increased the Vibrance to +25 and Saturation to +24, and the Temperature to +5. Click the Open Image button.
Step 6 : The image opens in Photoshop.
Step 7 : Press CTRL+J to duplicate the Background Layer. A new Layer 1 forms.
Step 8 : Click the Lasso Tool.
Step 9 : Draw a rough selection with the Lasso Tool.
Step 10 : The selection turns into a column of marching ants.
Step 11 : Go to Select>Modify>Feather.
Step 12 : I have set the Feather Radius at 100 pixels. Click OK.
Step 13 : Press CTRL+SHIFT+I to invert the selection.
Step 14 : Click the New Fill or Adjustment Layer button.
Step 15 : Click on Levels from the pop up menu.
Step 16 : The Levels 1 Layer is added.
Step 17 : Drag the Black slider underneath the Levels to the right, compensate for it by dragging the midtone slider to the left.
The image looks like this.
Step 17 : Drag the Black slider underneath the Levels to the right, compensate for it by dragging the midtone slider to the left.
The image looks like this.
Step 18 : Click the New Fill or Adjustment button again and click on Curves.
Step 19 : A Curves 1 Layer forms.
Step 20 : Io the Curves diagonal click three points as shown.
Step 21 : Drag the top point gently upwards and the bottom one slightly downwards. Drag the midpoint also slightly downwards.
Step 22 : The image looks like this after applying the Curves Adjustment Layer.
Step 21 : Drag the top point gently upwards and the bottom one slightly downwards. Drag the midpoint also slightly downwards.
Step 22 : The image looks like this after applying the Curves Adjustment Layer.
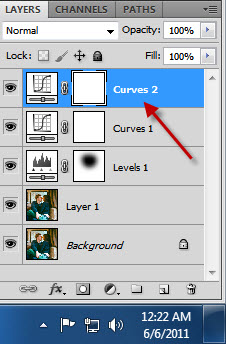
Step 23 : Make another Curves Adjustment Layer just as earlier. A Curves 2 Layer forms.
Step 24 : In the Curves dialogue click on the Red channel.
Step 25 : In the Red channel click three points again as earlier and form a gentle S curve.
Step 26 : Click on the Green channel.
Step 27 : Select the Green channel. Click three points as earlier. Drag the first point up gently and the lower one down. Now drag the mid point up gently.
Step 29 : Press CTRL+SHIFT+ALT+E and a composite Layer 2 forms.
Step 30 : Click the New Fill or Adjustment Layer button. Click on Gradient Map.
The image looks like this.
Step 32 : Lower the Opacity of the Layer. I have dragged it down to 62%.
Step 33 : The image has a muted color look after lowering the opacity.
Step 33 : The image has a muted color look after lowering the opacity.
Step 34 : Click the New Fill or Adjustment Layer button and click on Hue/Saturation.
Step 35 : A Hue Saturation Layer forms.
Step 37 : Press CTRL+SHIFT+ALT+E. A composite Layer 3 forms.
Step 38 : Press CTRL+J to duplicate Layer 3 to Layer 3 copy.
Step 39 : Go to Filter>Blur>Lens Blur.
Step 40 : The Lens Blur dialogue opens.
Step 42 : Click the Add Layer Mask button. A Layer Mask forms on Layer 3 copy.
Step 43 : Make sure the Foreground/Background Color is set to the default Black/White, if not press x and d on the keyboard to restore the default. Click The Brush Tool.
Step 44 : In the Brush Controls which you can access by clicking where the arrow points, set the Hardness to 0. You need not bother to set the Size slider. To increase the Brush size press ] (right square bracket) and to decrease it [ (left square bracket).
Step 45 : Set the Opacity and Flow of the Brush in the top panel to 50 each.
Step 46 : Click with the Brush on the face and the hand. The portions become clearer.
Step 46 : Click with the Brush on the face and the hand. The portions become clearer.
Step 47 : Click the New Layer icon and a new Layer 4 forms.
Step 48 : Click the Foreground Color. The Color Picker comes up.
Step 49 : Type in 666666 in the highlighted box at the bottom and click OK.
Step 50 : The Foreground Color changes to Gray.
Step 51 : Press ALT+BACKSPACE to fill with the Gray.
Step 52 : Go to Filter>Noise Add Noise.
Step 53 : Set the Amount to 6 Distribution to Gaussian and check the Monochromatic box. Click OK.
Step 54 : The Gray Layer fills with Noise.
Step 55 : Change the Blend Mode to Overlay.
Step 56 : The image looks like this. Zoom into the image. The Noise seems to be a bit too much.
Step 56 : The image looks like this. Zoom into the image. The Noise seems to be a bit too much.
Step 57 : Lower the Opacity. I have lowered it to 36%.
Other photoshop tutorials are here


