


Cube Wrap is a feature in Photoshop CS5. It is a totally new feature. If you wish to add Text o a cube, you would ordinarily add it to all six sides. But in CS5, you can add it to just one side and Photoshop does the rest of the work. So let's get down to see how it can be done. I expect you to know the Text Tool for this tutorial. We will make Text float in the air.

This is the effect we will create.

I will be using this free stock photo. You can download it from here
It belongs to StLadyBird
It is a pretty high resolution image measuring over 5 MB in size.

There is only the Background Layer in the Layers palette.

Step 1 : Click the New layer icon. A new Layer 1 forms.

Step 2 : Go to 3D>New Shape from Layer>Cube Wrap.

Step 3 : This is the default 3D cube that forms.

The Layers panel looks like this.

Step 4 : Click the 3D (Scene) icon on the right hand side panel.

The 3D (Scene) opens.

Step 5 : Click the Top Material (the small white hand points to it).

Step 6 : The Select Diffuse Color dialogue opens. It is the same as the Color Picker.

Step 7 : I have clicked with the cursor on the hand of the model to select the color. Note that the color of the Cube immediately changes. Click OK in the Select Diffuse Color.

Note that the Diffuse Color has change to the color picked.

Step 8 : Click the 3D Rotate Camera Tool from the fly out at left.

Step 9 : In the top panel change the View to Front from the drop down.

The Cube changes to the Front View.

Step 10 : Go to 3D>3D Paint Mode >Opacity.

Step 11 : Click the tiny arrow beside the Opacity in the 3D (Materials) in the right panel.

Step 12 : A fly out opens. Click on New Texture.

Step 13 : The New Texture dialogue opens. Just click OK without changing any of the settings.

Step 14 : Select the Type Tool.

Step 15 : Select your Font from the drop down in the top panel. I have chosen Arial Rounded.

Step 16 : I have typed out my Text.

Step 17 : Press CTRL+T. A selection appears. Rotate the Text and resize it as shown. Press Enter to apply the Text.

Step 18 : Click the tiny arrow shown at the right top of the Layers palette.
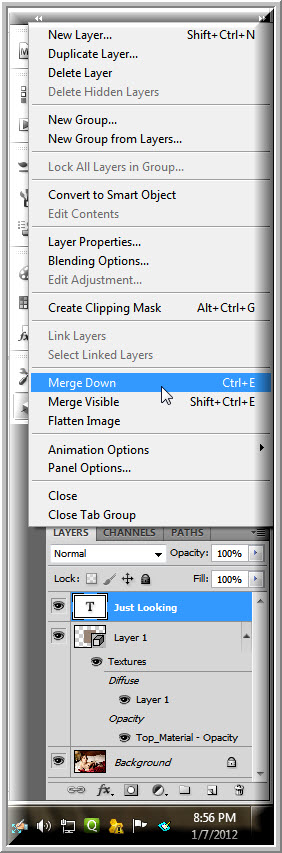
Step 19 : From the pop up menu click on Merge Down.

Step 20 : Photoshop will render the 3D.

My Cube looks like this now. It does not look like 3D at all.

Step 21 : Click the 3D Rotate Camera Tool.

By dragging the cursor you will be able to rotate the Cube. You can now see that Photoshop has placed the Text on all six sides of the Cube.

I have rotated the cube like this. You can always rotate it further.
But this is not the effect we are looking for.

Step 22 : Double click the Top Material in the Layers palette.

The image looks like this.

The Layers palette looks like this.

Step 23 : Press CTRL+I to invert. The image inverts.

Step 24 : Go to File>Close.

Step 25 : This dialogue box opens. Click Yes.

There you have the Text floating on thin air.

Step 26 : Zoom out.

Step 27 : Press CTRL+T. This dialogue box opens. Click on Convert.

Step 28 : Press SHIFT+ALT and drag out the middle handles till the Text is fully stretched out. Press ENTER.

Step 29 : Click the FX button.

Step 30 : Click on Stroke.

Step 31 : Click on Color.

Step 32 : The Select Stroke Color dialogue opens. It is the same as the Color Picker.

Step 33 : Type in ffffff (6fs) at the bottom (highlighted in green). Don't click OK.

Step 34 : Click on Drop Shadow. Leave the settings as it is.

Step 35 : Click on Bevel and Emboss and also on Contour. Click OK.

Step 36 : Lower the Fill to 0%.

The finished image.
Other photoshop tutorials are here


