Tuesday, June 5, 2012

Color Shading

This method can be used with any image to create some startling yet subtle color effects in Photoshop. What I will be using are commonplace -- Adjustment Layers, Hue/Saturation and Equalize etc. But the overall effect is pleasing. For want of a better name I am calling it Color Shading. I am just showing a method. Just follow the method and tinker with it if you want. Do not assume that the values that I use are final. 
This is the effect that I intend to create.
I will be using this free stock image. You will find it here
It belongs to Celoe
Step 1 : Duplicate the Background Layer by pressing CTRL+J. Press CTRL+SHIFT+U to desaturate.
The image is desaturated.
Step 2 : Click the Add Layer Mask button. A Layer Mask forms next to layer thumbnail on Layer 1.
Step 3 : Click the Gradient Tool. The Foreground/Background Colors are set to Black and White which is the default. If it is not press x and then d on the keyboard to restore the default.
Step 4 : Click where shown to open the Gradient Editor.
Click on the Foreground to Transparent Preset.
Step 5 : Click on the Reflected Gradient. By default the Linear Gradient, which is the first one, is checked.
Step 6 : Drag the Gradient Tool diagonally from top to bottom for a part of the way.
The Layer Mask looks like this.
The image looks like this. So far I think this is familiar territory.
 Step 7 : Click the New Fill Layer or Adjustment Layer button.
Step 8  : Click on Hue/Saturation.
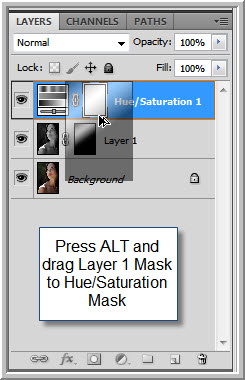
Step 9 : With the Hue/Saturation Layer highlighted drag the Mask from Layer 1 to the Mask of the Hue/Saturation Layer.
Step 10 : This dialogue box opens asking if Photoshop should replace the Layer Mask. Click Yes.
The Mask on Hue/Saturation 1 Layer is now the same as Layer 1 Mask.
Step 11 : Double click the Layer thumbnail.
Step 12 : The Hue/Saturation opens. Check Colorize. The value of the Saturation immediately changes to 25. Enter 45 in the Hue box for a greenish effect. 
The image looks like this.
Step 13 : Click on the Background Layer.
Step 14 : Press CTRL+J to duplicate the Background layer.
Click on the Channels Palette.
Step 15 : Click on the Green channel.
The image turns Black and White.
Step 16 : Go to Image>Adjustments>Equalize.
The channels palette looks like this after applying Equalize. Note the RGB channel.
The image looks like this.
Step 17 : Click on the RGB channel. Then click on the Layers palette.
The image looks like this.
Step 18 : Change the Blend Mode to Soft light.
This is the final result.
Other Photoshop tutorials are here


;


Monday, June 4, 2012

Blending with Layer Mask

One of the ways to blend two images together is to use the Blend Modes in Photoshop. Another is to use a Layer Mask. With  a Layer Mask and a Gradient you can get very beautiful results. You can blend photos with opposite content seamlessly. You will also need a few other skills like cutting out an image, but nothing difficult. I will also show you the Channel Mixer in passing.
This is the effect I intend to create.
I will be using this free stock image. You will find it here
It belongs to day-seriani
I will also use this free stock image. You will find it here
It belongs to mjranum-stock
For convenience I have extracted the dancer from the background. You can use the Quick Select Tool,
  Pen Tool,  or even the Magnetic Lasso
You can also use the entire image if you wish. But cutting this image from its background has its advantage.
Step 1 : Press CTRL+A, then CTRL+C (Select All, Copy). A line of marching ants appear.
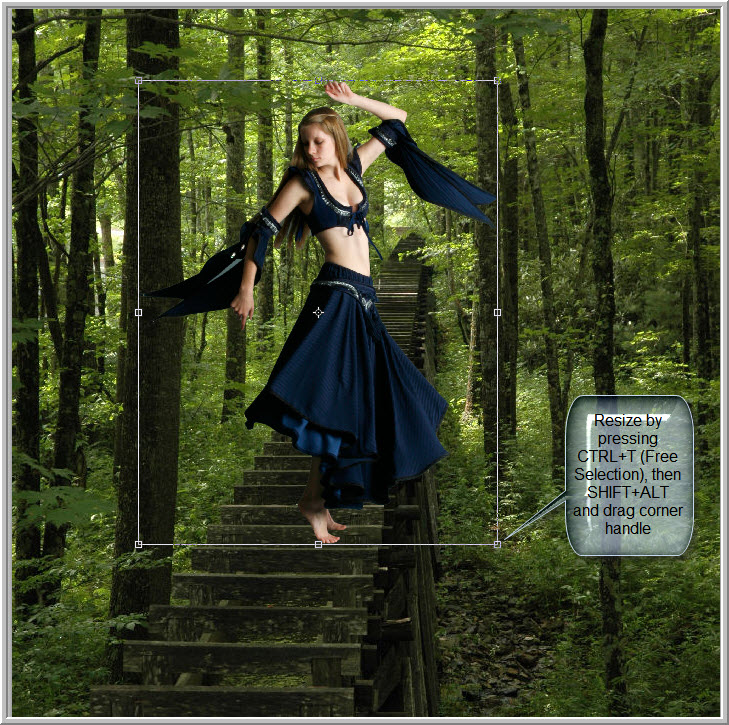
Step 2 : Press CTRL+V to paste the image into the forest path photo. Press CTRL+T for free transform. Then keeping SHIFT+ALT pressed drag a corner handle to resize. Press Enter when finished. If for some reason the selection persists press CTRL+H to hide it.
Step 3 : Click the Layer Mask button. A Layer Mask forms next to the layer thumbnail on Layer1. Layer 1 contains the cut out image of the dancer.
Step 4 : Click the Gradient Tool. The Foreground/Background colors are set to the default Black/White.
At the top is the Gradient Editor. Click the Radial Gradient. Linear Gradient, the first one, is set by default.
Step 5 : Click the small arrow to reveal the default presets in the Gradient Editor.
Click on Foreground to Transparent.
Step 6 : Drag the Gradient down just covering the image of the dancer.

This is how the image and the Layer Mask in the Layers palette looks like. It looks quite ok, but the complexion should be toned down a bit. It looks too pinkish. 
Step 7 : Click the New Fill or Adjustment Layer button.
Step 8 : Click on the Channel Mixer.
Step 9 : The Channel Mixer appears.
Step 10 : Change the Default setting to Black & White with Red Filter (RGB). I am choosing this because I wish to treat the Reds in the complexion.
The Output Channel changes to Gray. Note that the Red has a value of +100% while Green and Blue have 0%. Leave the Constant alone.
The image looks like this.
Step 11 : I have decreased the Red channel to +75 from 100 and increased the Green channel to +25 from 0. All the channels should add up to 100%.
Step 12 : Change the Blend Moe of the Channel Mixer Layer to Soft Light.
The finished image.
Other Photoshop tutorials are here


Saturday, June 2, 2012

Sketch Partial

Turning an image into a sketch is easy enough in Photoshop. But here I will not turn the entire image into a sketch -- just a part of it. First a photo has to be turned into  sketch. Then we will regain part of the image as it looks. This tutorial can be done in all versions of Photoshop including Photoshop7.
This is the effect I will create.
I will be using this free stock image. You will find it here
It belongs to Giorgiacosplay
Step 1 : Press CTRL+J twice. This will make two copies of the Background layer -- Layer 1 and Layer 1 copy.
Step 2 : Press CTRL+SHIFT+U. This will desaurate Layer copy.
The image is desatuared.
Step 3 : Press CTRL+J. This will duplicate Layer 1 copy to Layer 1 copy 2. Press CTRL+I to invert.
The image looks like a negative.
Step 4 : Change the Blend Mode to Color Dodge.
The image turns completely white. If you are using some other image you might notice some black spots, This is normal.
Step 5 : Go to Filter>Blur>Gaussian Blur.
Step 6 : In the Gaussian Blur I have put the Radius at 15. This is not the rule. Anything that pleases you should suffice. It will also vary from image to image.
The image looks like this. It has been turned into a sketch.
Step 7 : With Layer 1 copy 2 highlighted press SHIFT and click on Layer 1.
All three layers are highlighted.
Step 8 : Press CTRL+G. All three Layers are now in Group 1 layer. Click the Add Layer Mask button. A Layer Mask forms on Group 1 Layer. The Blend Mode is set to Pass Through.
Step 9 : Change the Blend Mode to Normal.
Step 10 : Click the Gradient Tool. The Foreground Colors are set to Black/White which is the default. It is not press x and then d on the keyboard. At the top is the Gradient Editor.
Step 11 : In the Gradient Editor click on the Foreground to Background.
Step 12 : Here is the tricky part. I have dragged the Gradient only slightly near the waist. You will have to experiment to see the effect you want.
This is how my image looks.
Other photoshop tutorials are here


Share

Twitter Delicious Facebook Digg Stumbleupon Favorites