I have posted a tutorial on adding a blown out effect selectively in photoshop in this tutorial.
This is another way of doing it. Perhaps a much more easier way. It can be done in all versions of photoshop and will work for most images.


These are the effects you can apply with Photoshop. The original image is below.

I will demonstrate the technique with this stock image. You will find it here
It belongs to Ziki37
Note that this image already has some blown out highlights.

Step 1 : Click the New Layer icon and a new Layer 1 forms above the Background Layer.

Step 2 : Switch the Foreground Color to White by pressing x on the keyboard or use the small bent double headed arrow above the Foreground/Background Colors.

Step 3 : Click the Gradient Tool. Click where shown in the top panel to open the Gradient Editor.

Step 4 : Click on the Foreground to Transparent.

Step 5 : Click on the Linear Gradient. It is checked by default.

Step 6 : In the top panel Mode is set to Normal. Reduce the Opacity to 60%. Reverse, Dither and Transparency are checked.

Step 7 : Drag up the Gradient Tool diagonally in the direction of the light from a point just above the hair,

The Gradient has been applied a teeny weeny bit.

Step 8 : Drag up from the nose diagonally as shown.

A bit more of the Gradient has been applied.

Step 9 : Drag sideways outwards with the Gradient Tool.

Step 10 : Drag down diagonally with the Gradient Tool as shown.

A bit more of the Gradient has been applied. Nothing looks out of place. Continue applying the Gradients in small increments as shown.

Step 11 : Continue applying the Gradient till you get something like this.

Step 12 : Click the Add New Fill or Adjustment Layer button.

Step 13 : Click on Curves from the pop up menu.

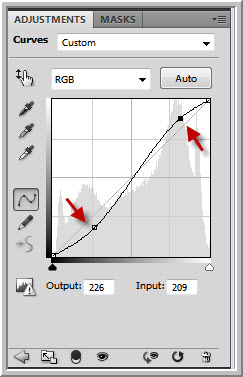
Step 14 : Click 2 points on the diagonal as shown in the Curves. The top of the diagonal represents the highlights and the lower the shadows.

Step 15 : Nudge the top point slightly up and the bottom one slightly down.

The image looks like this.

Step 16 : With Curves 1 Layer highlighted click on Layer 1 keeping SHIFT pressed. Both Layers are highlighted.

Step 17 : Press CTRL+G. The two layers are now in Group 1 Layer. The Blend Mode changes to Pass Through.

Step 18 : Lower the Opacity of the Layer to 85% or to taste.

The completed image.
Other Photoshop tutorials are here