Thursday, June 21, 2012

Brush Special Effect

I am sure must know how to paint in Photoshop with Brushes. This is a demonstration of how you can create a special effect with a number of Brushes and layer masks. You will learn to control Opacity and Flow. We will  be using a Gradient of our own choosing.  You will also be using white as well as black layer masks.
This is the effect to be created.
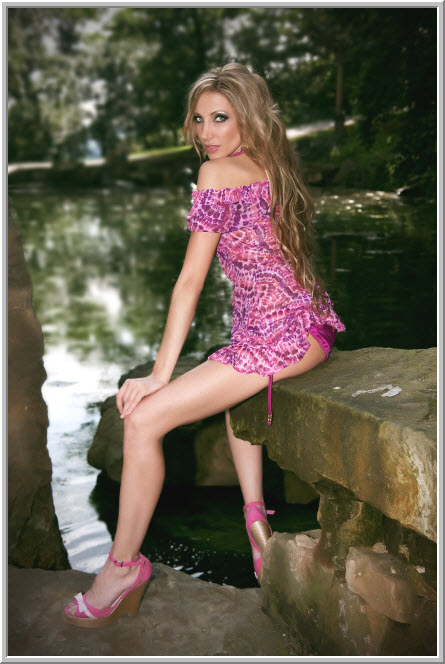
I will be using this image. You will find it here
It belongs to AngieStock
Step 1 : Click the Add New Layer button. A new Layer 1 forms.
Step 2 : Draw a rough selection like this close to the subject.
Step 3 : Go to Select>Modify>Feather.
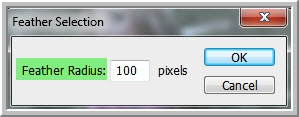
Step 4 : In this dialogue box that pops up set the Feather radius to 100 pixels. Click OK.
Step 5 : Press CTRL+SHIFT+I. The selection is inverted.
Step 6 : Click the Foreground Color which is Black by default.
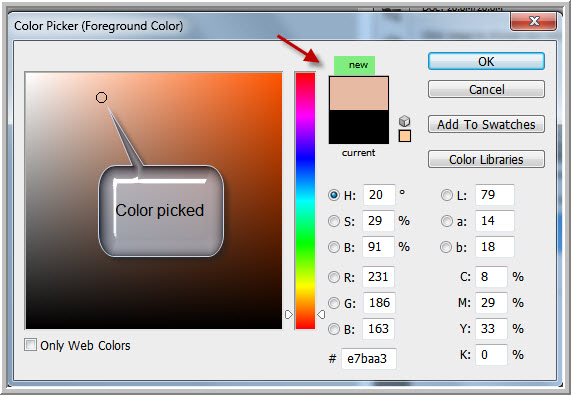
Step 7 : The Color Picker comes up.
Step 8 : I have clicked on the shoulder area to select the color.
Step 9 : The color is automatically picked in the Color Picker. The 'new' shows the shade chosen. Click OK.
The Foreground changes to the color picked.
Step 10 : Click on the Background Color.
The Color Picker appears again.
Step 11 : I have clicked on the Color of the dress.
The color is selected automatically in the Color Picker. The 'new' shows the shade picked. Click OK.
The Foreground/Background colors have changed to the colors picked.
Step 12 : Click the Gradient Tool. Click in the top panel where shown to open the Gradient Editor. By default the Linear Gradient is selected in the top panel at right.. If it is not click to select it.
Step 13 : Click the Foreground to Background Gradient preset.
Step 14 : Drag diagonally from top to bottom with the Gradient Tool as shown.
The image looks like this.
There are now the Background Layer and Layer 1 where the Gradient has been applied.
Step 15 : Press CTRL+E to merge the two layers into the Background layer.
Step 16 : Click the Add New Layer button. A new Layer 1 forms.
Step 17 : Click the Brush Tool and click the tiny black arrow in the top panel to open the Brush controls.
Step 18 : Click the Splatter 59 pixels Brush.
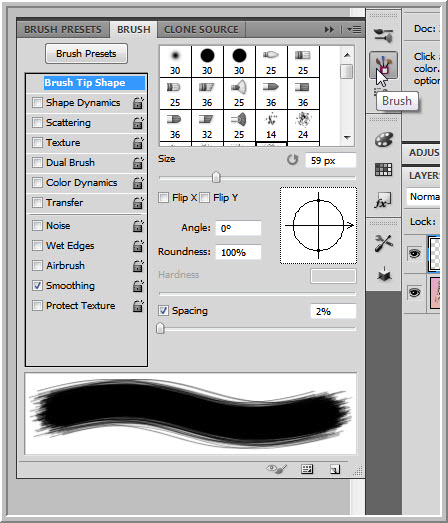
Step 19 : Go to Window>Brush or click the Brush icon at the right. The Brush Controls opens. Click on Brush Tip Shape.
Step 20 : Drag the Spacing slider to 100%.
Step 21 : Click on Scatter. Drag the slider to 100%. The Both Axes should be left unchecked. Leave the other controls alone. They are needed if you are using a Pen Tablet.
Step 22 : Click on the small double arrow to make the panel go away.
Step 23 : Decrease the Opacity and Flow in the top panel to 25%
Make sure that the Foreground Color is set to Black.
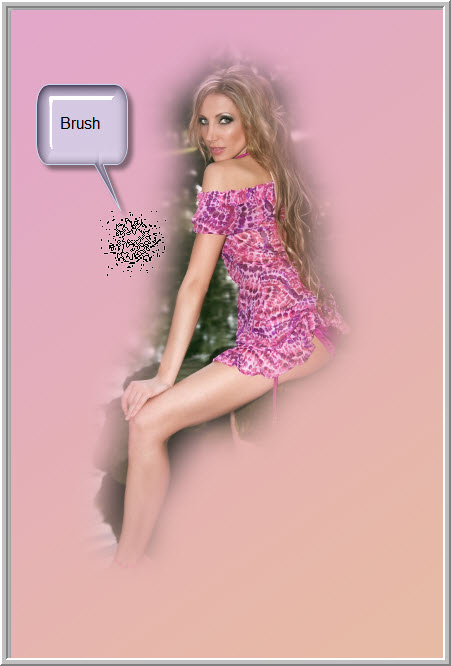
Step 24 : To make the Brush small press [ (left square bracket). To make it large press ] (right square bracket) Vary the size as you paint.
Vary the size of the Brush as you paint.
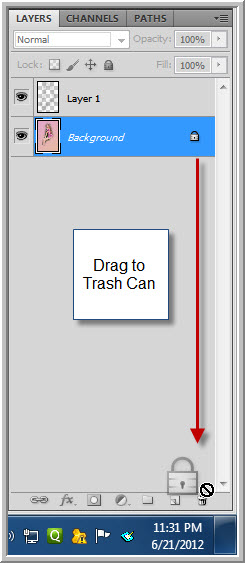

Step 25 : Click on the Background layer. Drag the lock on the layer to the Trash Can.
The Background Layer changes to Layer 0. It is now unlocked and can be edited.
Step 26 : I have opened this Texture in Photoshop. You will find this here
It belongs to MadamGrief-Stock
Step 27 : Press CTRL+A (Select All), then CTRL+C (Copy).
Step 28 : Go to the other image and press CTRL+V (Paste). You can see that the texture is smaller than the image. It has to be resized.
Step 29 : Press CTRL+T for free transform. A selection forms. Press SHIFT+ALT. Drag one of the corners to resize the image. Press ENTER after resizing.
Step 30 : The Texture layer (Layer2) is above Layer 0.
Step 31 : Press ALT+CLICK Add Layer Mask button. A Black layer Mask forms on Layer 2.
After adding the Texture layer, this image was hidden by it. After adding the Black Layer Mask, it is visible again.
Step 32 : Press b for the Brush Tool. The settings have been given earlier, so there is no need to change them. You can always use another brush. If you do change the settings as shown earlier before using it.
Step 33 : I have clicked on another Brush -- Flowing Stars.
Step 34 :Click the Brush Tip Shape. Drag the Spacing slider 100%.
Step 35 : Click on Scattering and drag the Scatter slider 100%. The new Brush is now ready to be used.
Step 36 : In the top panel increase the Opacity and Flow to 100%.
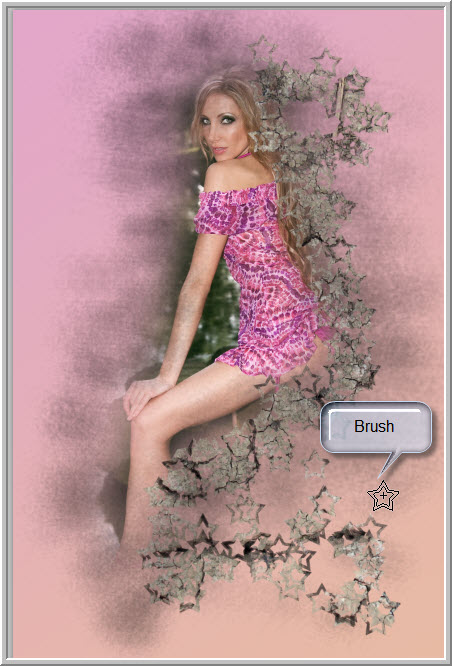
Step 37  : Begin painting with small strokes.
Step 38 : Vary the size of the Brush and paint or just click on some areas and you will get something like this.
Step 39 : Go over parts of the body, but sparingly. You should get an effect like this.
Step 40 : Click on Layer 1. Then click the New Layer icon. A new Layer 3 forms above Layer 1.
 Step 41 : Press b for the Brush Tool. In the top panel open  the Brush controls and click on Scattered Maple Leaf Brush.
Step 42 : In the Brush controls at the right click on Brush Tip Shape. Drag the Spacing slider to 100%.
Step 43 : Click on Scattering. Set the Scatter to 100%.
Step 44 : Click with the Brush or drag in small increments varying the size with the square brackets. You should end up with something like this. That is all.
Other Photoshop tutorials are here


Tuesday, June 12, 2012

Hue/Saturation Magic

Hue/Saturation in Photoshop can do wonders when it comes to removing predominant distracting colors and color casts in just a few simple steps. It only affects the targetted color. You need not be an expert to do it and the method will work with most images in any version of photoshop. Do not take the values provided as constant. They will vary from image to image. I am just showing you how to go about it.
A color cast has been removed from this image.
This colors in this image have been made more vibrant.
I will be using this free stock photo which you will find here
It belongs to GiardQatar
Step 1 : Click on the New Fill or Adjustment Layer button at the bottom of the Layers palette and click on Hue/Saturation from the pop up menu. It will be better to use a Hue/Saturation Adjustment layer as it is non-destructive instead of  Hue/Saturation which will work directly on the image and make it difficult to undo in case you do not like it. The Hue/Saturation adjustment layer also has a layer mask, which helps to adjust the color.
Step 2 : Hue/Saturation has a number of channels besides the Master channel. It also has the Hue, Saturation and Lightness sliders. The Hue slider as its name suggests is to change the Hue or Color. We will not be using it here. The second is the Saturation which affects how deep or light a color is. Lastly there is Lightness. This slider complements the Saturation slider.
Step 3 : Since from the image you can make out that the reds are very prominent and need to be lessened, let us select the Reds. We will only be using the Saturation slider.
Step 4 : I have decreased the Saturation in the Reds to -35. You should use a value that suits your image which will not be difficult since I am showing how to go about it. Decrease the slider till you are satisfied with the effect.
The Reds in the image have been reduced. Other colors have not been affected. The image looks more natural now. The Yellows also need a bit of fixing as you can see.
Step 5 : I have selected the Yellows and reduced the Saturation to -85. Again, you should use a value that you are satisfied with.
The yellows have been reduced. If you lower the saturation too much the color you are trying to fix will become gray. So be careful. This simple tweak with the Hue/Saturation Adjustment Layer has made the colors more tolerable.
The Hue/Saturation Adjustment Layer comes with a Layer Mask. How is this an advantage?
Step 6 : With the Foreground/Background Colors set to the default Black/White, click on the Brush Tool or just press b on the keyboard.
Step 7 : In the Brush controls in the top panel, click on a Soft Round Brush or the first one. Set the Hardness slider to 0. Leave the Size slider alone. Use [ (left square bracket) to decrease the size of the Brush and ] (right square bracket) to increase it.
Step 8 : In the top panel lower the Opacity to 25%and Flow to around 60%. Why have I done this? When I paint the change will be in small amounts instead of all at once if I set both to 100%.
Step 9 : Zoom into the image and paint with a small brush. You will need to make a number of passes over the eye. For the lips go over it just twice or thrice, no more.
Look at the Layer Mask. The faint specks of gray that you see are the places where you painted. If you had painted  with 100% opacity and Flow the specks would have looked black.
The finished image. Here the Reds and Yellows needed fixing. Use the same method to fix other colors.
I have opened this free stock image. You will find it here
It belongs to SliceStudio
Step 1 : Make a Hue/Saturation as earlier.
Step 2 : I have increased the Reds to +25.
Step 3 : I have decreased the Yellows to -45.
Step 4 : I have left the Greens untouched.
Step 5 : The Cyans have been increased to +35.
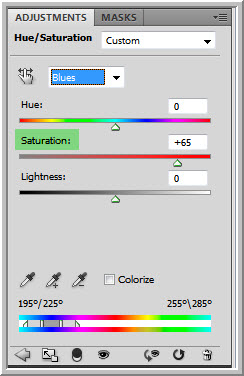
Step 6 : The Blues have been increased to +65.
Step 7 : I have increased the Magentas to +45.
The finished image looks more vibrant.
As I said do not go by the values here, but by the method shown and you will be able to work wonders.
Other photoshop tutorials are here


Friday, June 8, 2012

Desaturation and Contrast

It is quite possible that you have an image that lacks contrast. You can increase the contrast with a desaturated Layer and a Curves Adjustment Layer in Photoshop. This will work with most images and is quite easy to do. It only requires a few steps.
The high contrast image. The original is just below.
I will be using this free stock image. You will find it here
It belongs to NerySoul
Step 1 : Press CTRL+J to duplicate the Background Layer to Layer 1. Press CTRL+SHIFT+U to desaturate Layer 1.
Step 2 : Change the Blend Mode to Soft Light.
Step 3 : Click New Fill or Adjustment Layer button.
Step 4 : Click on Curves from the pop up.
Step 5 : The Curves dialogue box opens. Note the diagonal in the middle. The top part represent highlights and the bottom shadows.
Step 6 : Click two points on the diagonal at the bottom and top. Drag the top point up slightly and the bottom one down slightly so that a gentle S curve is formed.
Step 7 : Change the Blend Mode of Curves 1 to Multiply and drop the Opacity to between 70 to 85% and you are done.
The finished image.
Other photoshop tutorial are here


Share

Twitter Delicious Facebook Digg Stumbleupon Favorites