You can artificially create sunlight on a forest path in just a few steps in Photoshop. You can do it in any version.
Step 1 : I have opened this free stock photo in Photoshop. You will find it here
It belongs to ~Shobie-stock Elie
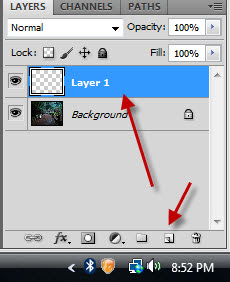
Step 2 : Click on the New layer icon and a new layer1 forms above the background layer.
Step 3 : Click the Polygon Lasso Tool.
Step 4 : Create a zigzag path like this.
Step 5 : When you let go of the cursor at the last point, a selection forms.
Step 6 : Ensure that the default colors are set to Black (Foreground) and White (background).
Step 7 : Press CTR+BACKSPACE. It fills the selection with the Background Color which is White.
Press CTRL+D to deselect.
Step 8 : Change the Blend Mode to Overlay.
Step 9 : This is how the image looks after changing the Blend Mode to Overlay.
Step 10 : Reduce the Opacity of Layer 1 to around 50%. It will depend on your image.
Step 11 : This is how the image looks.
Step 12 : Go to Filter>Blur>Gaussian Blur.
Step 13 : The Gaussian Blur dialogue box opens. Drag the Radius slider to the right while watching your image. Click OK when satisfied.
The 'sunlight' has been added to the forest path. That was easy.
Other photoshop tutorials are here


