You can make a hollow box with a single image in Photoshop. It can be done in any version.
First you need a suitable image.
Step 1 : I have opened this free stock photo in Photoshop. You will find it here
It belongs to ~raindroppe
Step 2 : Click the Crop Tool.
Step 3 : Press SHIFT and drag out. You will get a perfect square.
Step 4 : Move the selection on the part that you want to keep.
Step 5 : Click the Tick Mark in the top panel to apply the crop. Or press Enter.
The image has been cropped to a perfect square.
Step 6 : Press ALT+CLICK the Background Layer.
Step 7 : The Background Layer changes to Layer 0.
Step 8 : Press CTRL+J four times to get another four copies of Layer0.
Step 9 : Zoom out of the image.
Step 10 : Click on Layer 0.
Step 11 : Go to Image>Canvas Size.
Step 12 : In Canvas Size, change the Width and Height to per cent.
Step 13 : Change the Width and Height to 150% and click OK.
The image looks like this.
Step 14 : Click on Layer 0 copy.
Step 15 : Press V (Move Tool) on the keyboard. Press SHIFT and drag the layer to the right till it aligns perfectly with the the edge of Layer 0.
Step 16 : Press CTRL+T. A selection forms.
Step 17 : Drag the outer middle handle and drag inwards.
Step 18 : Go to Edit>Transform>Flip Horizontal.
The image flips horizontally.
Step 19 : Right click inside the selection. Click on Perspective from the pop up.
Step 20 : Drag up the right corner handle.
Press ENTER.
Step 21 : Click on Layer 0 copy 2.
Step 22 : Press SHIFT and drag the layer to the left till it aligns.
Step 23 : Press CTRL+T. A selection forms.
Step 24 : Drag in the middle handle.
Step 25 : Right click inside the selection. Click on Flip Horizontal.
Step 26 : The Layer has been flipped horizontally.
Step 27 : Again right click inside the selection. Click on Perspective from the pop up.
Step 28 : Drag up the corner handle.
Press ENTER.
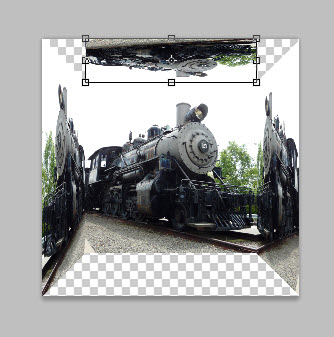
The image looks like this so far.
Step 29 : Click on Layer 0 copy 3.
Step 30 : Press SHIFT and drag the layer straight up.
Step 31 : Press CTRL+T. A selection form.
Step 32 : Press SHIFT and drag the middle handle straight down.
Step 33 : Right click inside the selection. Click on Flip Vertical from the popup.
The image has flipped vertically.
Step 34 : Click inside the selection. Click on Perspective from the pop up.
Step 35 : Drag the right corner handle out. Press ENTER.
The image looks like this.
Step 36 : Click on Layer 0 copy 4.
Step 37 : Press SHIFT. Drag the layer straight down.
Step 38 : Press CTRL+T. A selection forms.
Step 39 : Drag the bottom middle handle straight up keeping SHIFT pressed.
Step 40 : Right click inside the selection. Click on Flip Vertical from the pop up.
Step 41 : Right click again inside the selection. Click on Perspective from the popup.
Step 42 : Drag the right corner handle outwards. Press ENTER.
Zoom in. The image looks like this.
Step 43 : Click on Layer 0 copy 2.
Step 44 : Go to Image>Adjustments>Brightness/Contrast.
Step 45 : In the Brightness/Contrast type in -100 in the Brightness box. Click OK.
Step 46 : Click on Layer 0 copy 3.
Step 47 : Go to Image>Adjustments>Brightness/Contrast. In the dialogue box type in -100 in the Brightness box. Click OK.
Step 48 : Click on Layer 0 copy.
Step 49 : Bring up the Brightness/Contrast dialogue box. Type 100 in the Brightness box. Click OK.
The image looks like this.
Step 50 : Click on Layer 0 copy 4.
Step 51 : Click on the FX button. Click on Stroke from the pop up.
Step 52 : Change the Position of the Stroke to Inside. You can increase the Size depending on your image. In CS 5 the default Color of the Stroke is Black. In earlier versions it is Red. Click on the Color.
Clicking on The Color brings up the Stroke Color. Type in 000000 in the bottom as shown to get Black. If you want to select some other color drag the tiny sliders on the Spectrum in the middle and select a color, then a shade from the box at the left. Click OK.
Step 53 : Press ALT. Click on FX drag to the bottom layer i.e. Layer 0 copy 5.
Step 54 : Keeping ALT pressed drag the fx to all the layers. The Stroke will be applied to all the layers.
The alignment at the top right is not correct.
Step 55 : Click on the relevant layer. It is Layer 0 copy 3.
Step 56 : Press CTRL+T. A selection forms. Right click inside the selection. Click on Skew from the pop up.
Step 57 : With Skew selected nudge in the right bottom corner handle. You can also use the arrow keys for nudging in. Press ENTER. Use the same process if any of the other layers are not correctly aligned.
The finished image.
Other photoshop tutorials are here


