This is a very easy special effect that can be done in any version of photoshop, including Photoshop7. No special skills are needed either. All you will need is a free stock image or use one of your own. Here we will be using the Gradients found in Photoshop.
Select an image that has a lot of background beside the subject. This is necessary for the effect. I will be using this free stock image. You will find is here
It belong to lauranachman
Step 1 : Click the New Layer icon. A new Layer 1 forms.
Step 2 : Click the Gradient Tool.
Step 3 : Click where the arrow points to reveal the default set of Gradients.
Step 4 : I am selecting the Yellow, Violet, Orange, Blue Gradient by clicking on it.
Step 5 : Press SHIFT and drag from left to right or right. You will be able to drag in a straight line.
Step 6 : This is the effect you will get if you have followed along.
Step 7 : Change the Blend Mode to Overlay.
This is the effect I have got.
Step 8 : Lower the Opacity of Layer 1 to 50%. Nothing hard and fast about it though.
The image looks like this.
Step 9 : Click the New Layer icon. A new Layer 2 forms.
Step 10 : Click the Elliptical Marquee Tool.
Step 11 : Press SHIFT and you will be able to draw a perfect circle. Use the cursor to nudge it in place so that it appears around the figure.
Step 12 : Press CTRL+SHIFT+I to inverse the selection.
Step 13 : Go to Select>Modify>Feather.
Step 14 : Put the Feather Radius at 100. Click OK.
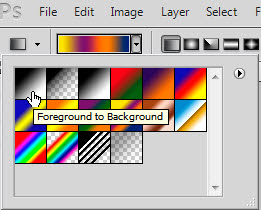
Step 15 : Click the Gradient Tool Click the Gradient Editor in the top panel. Click the Foreground to Background Preset.
Step 16 : Drag down diagonally from the top left to bottom right.
The image looks like this. Note that the selection of marching ants is still in place.
Step 17 : Go to Filter>Noise>Add Noise.
Step 18 : I have set the Amount to 8 (It will depend on your image). Set the Distribution to Gaussian and check Monochromatic or you will get multi-colored flecks. Click OK.
Step 19 : Reduce the Opacity just a tad to 95 or 90 per cent.
Step 20 : Change the Blend Mode of Layer 2 to Color.
Step 21 : Press CTRL+D to deselect/ The completed effect. Other photoshop tutorials are here


