This is another tutorial on using Smart Filters. Smart Filters are ordinary filters found in photoshop that you can use non-destructively. It is quite simple to do and works with most images.
I will be using this free stock image. You will find it here
It belongs to Katanaz-Stock
Step 1 : Right click the Background Layer and click on Convert to Smart Object.
The Layer turns into a Smart Object.
Step 2 : Click the Elliptical Marquee Tool.
Step 3 : Draw a selection with the Elliptical Marquee.
Step 4 : Go to Select>Modify>Feather.
Step 5 : Set the Feather radius at 100 pixels. Click OK.
Step 6 : Press CTRL+SHIFT+I to reverse the selection.
Step 7 : Now for the first Smart Filter. Go to Filter>Pixelete>Color Halftone.
Step 8 : Give the settings above. If you use a low resolution image set the Maximum Radius considerably less.
Click OK.
The image looks like this.
Step 9 : Double click the icons shown to bring up the Blending Options.
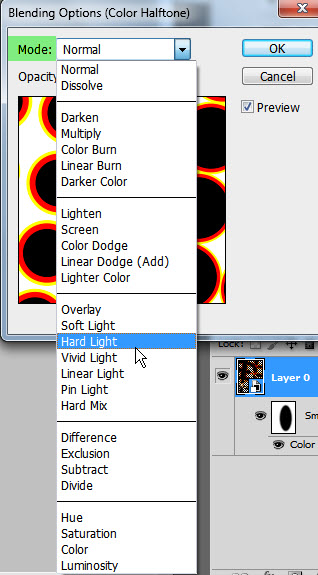
Step 10 : The Blending Options for the Smart Filter come up.
Step 11 : Change the Blend Mode from Normal to Hard Light. It does not mean that you cannot try the other Blend Modes. Hard Light works for this image, you may like something else.
Step 12 : Lower the Opacity to 50%. Click OK.
The image looks like this.
The Layers Palette looks like this.
Step 13 : Go to Filter>Blur>Radial Blur.
Step 14 : In the Radial Blur dialogue box set the Amount to 100 and Blur Method to Zoom and Quality to Best. Click OK.
Step 15 : You will see this Progress bar. It might take awhile depending on the power of your machine.
The image looks like this.
Step 16 : Click the Blending Options icon. You might see an hour glass and the progress bar again.
Step 17 : In the Blending Options I am reducing the Opacity to around 85. Click OK.
The image looks like this.
The Layers palette looks like this.
Step 18 : Go to Image>Adjustments>Shadows/Highlights.
Step 19 : The Shadow/Highlights dialogue box opens.
Step 20 : I have increased the Amount of Shadows and Amount of Highlights.
The image looks like this.
Step 21 : Check the Show More Options to see more Options
Step 22 : I am fine tuning the Highlights Amount, the Radius and the Midtone Contrast. Click OK.
The completed the image.
Other Photoshop tutorials are here


