It's easy turn any portrait to look like a manga doll in Photoshop. You just need a good portrait for it.
I will be using this photo. It is a free stock image. You can get it here.
Step 1 : Press CTRL+J twice. The Background layer duplicates into Layer 1 and Layer1 copy.
Step 2 : Click the Background layer.
Step 3 : Press ALT and double click on Background layer. It changes to Layer 0. I did this because a background layer is not editable. Now it is editable.
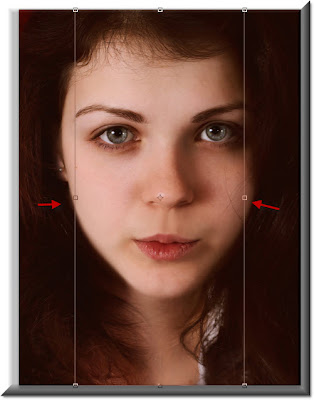
Step 4 : Press CTRL+T. An outline appears around the edges with corner handles (red arrows).
Step 5 : Look in the top panel. You will find the Width (W) and Heigh (H) at 100 %.
Step 6 : Just type in 60 for the Width.
As soon as you type 60 % you will find that an outline has formed like this.
Step 7 : Look in the top panel. Click the Tick mark and the selection goes away.
Step 8 : Now click on Layer 1. You can see also that Layer 0 has been distorted.
Step 9 : Click the Rectangular Marquee Tool.
Step 10 : Draw out a selection in the bottom half of the image from just below the nose. Then press Delete.
If you look at Layer 1, you will be able to see that the lower portion has been deleted. The image that you see on your screen apears unchanged as the lower and upper layers are visible. Press CTRL+D to deselect.
Step11 : Now click on Layer 1 copy which is the topmost layer.
Step 12 : Again click the Rectangular Marquee Tool.
Step 13 : Draw out a selection so that th eyes and a little portion below and above it fall within it.
Step 14 : Press CTRL+SHIFT+I. The selection is inversed. Press delete.
After you press Delete, your image will lok something like this.
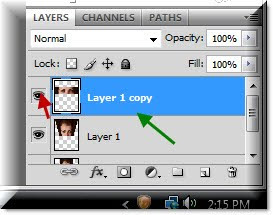
Step 15 : Remember you are on Layer 1 copy. Switch off the eye icon by to make the layer invisible. Next click on Layer 1 just below it.
Step 16 : Press CTRL+T. A selection forms around the layer (green arrow).
Step 17 : Press CTRL+SHIFT+ALT and drag the left bottom corner handle inwards and you will be able to align the layer with the face in the layer below proportionately.
Step 18 : Click the arrow in the top panel to apply the tnsformtion.
Step 19 : Move back to Layer 1 copy. Click on the eye icon to make the layer visible.
Your image should look something like this.
Step 20 : Press CTRL+T. A selection forms around the layer with corner handles (red arrows).
Step 21 : Press CTRL+SHIFT+ALT and drag the left bottom corner inwards till it aligns with the face in the layer below.
Step 22 : Release CTRL+SHIFT+ALT. Now just press ALT and drag the middle handle upwards. and you will be able to get this effect. The eyes look much bigger.
Step 23 : Click the Tick Mark in the top panel to apply the transformation.
Step 24 : Ensure that the Foreground is set to Black and background to White, if it is not press 'x' and then 'd' on your keyboard.
Step 25 : Now click on the Add Layer Mask button at the bottom of the Laayers pallete and a layer Mask forms next to the layer thumbnail on Layer 1 copy which is the topmost layer.
Step 25 : Click the Brush Tool.
Step 26 : Click where the arrow points to in the top panel to reveal the Brushes. Drag the Hardness slider to 0. You can set an appropriate size. Since I am using a high resolution image I have set the Master Diameter at 250. A short cut to increase the Brush is to press ] (right bracket key next to the letter P). To decrease it press [ (left bracket key).
Step 27 : With the Brush Tool brush away on the foreground and the dividing line of the layer disappears and the forehead below is revealed. Similarly brush away at the sides. I have not yet brushed the lower part where a thin line shows the separation between Layer 1 copy and the Layer below.
I have now brushed away near the nose and the dividing line disappears.
This is how the Layer mask looks after the brushing. The black portion is the part brushed away to reveal the layer underneath.
Step 28 : You are on Layer 1 copy, which is the topmost layer. Press Shift and click on Layer 0. All the layers are highlighted.
Step 29 : Press CTRL+E. All the layers compress into one.
Step 30 : Go to Filter>Liquify.
Step 31 : In the Liquify dialogue box, look at the left panel and click the Freeze Mask.
Step 32 : It works like a brush. Paint with it to cover areas that you do not want to be affected by the Liquify Tool.
Step 33 : In the left panel, now click on the Forward Warp Tool.
Step 34 : Make the cursor large by pressing the ] (right bracket key).
Step 35 : Drag with the Forward Warp tool to make the eyes seem larger and rounder. Click OK after you are satisfied.
This is how my image looks after applying the Liquify Tool.
Step 36 : Again open Liquify and with the Freeze Mask mark off areas around the nose, especially the eyes to which the Liquify Tool has already been applied.
Step 37 : With the Forward Warp Tool I have lenghtened the nose. Click OK.
This is how my image looks.
Step 38 : Press CTRL and click the new layer icon in the Layers pallete and a new layer opens under Layer1 copy.
Step 39 : Clcik on the Foreground Color.
Step 40 : Clicking on the Foreground Color opens the Color Picker. Now click on a dark portion of the hair. You will find that as soon as you click the color will be automatically picked in the left panel. The 'new' at the top right will also changes to he color picked. Click OK.
Step 41 : Press ALT+Backspace and the layer is filled with the color chosen.
Step 42 : In the Layers pallete, click on Layer 1 copy and then on the Add Layer Mask.
Step 43 : Click on the Brush Tool. Make it large by pressing ] (right bracket).
Step 44 : Paint with the Brush Tool. Remember to keep your Foreground Color to Black. Paint away the sharp edges. And, that's all. My image is finished. Easy was it not?


