


Cutting out an image from its background is at times a sheer necessity, but many users of photoshop find this difficult. There is an absolute horror of the Pen Tool, while the Quick Select Tool is not found in all versions of photoshop. Photoshop offers the Lasso Tools as selection tools but they are not good for making accurate selections, or are they not? You can make selections also with the Lasso Tools. See how in this tutorial.

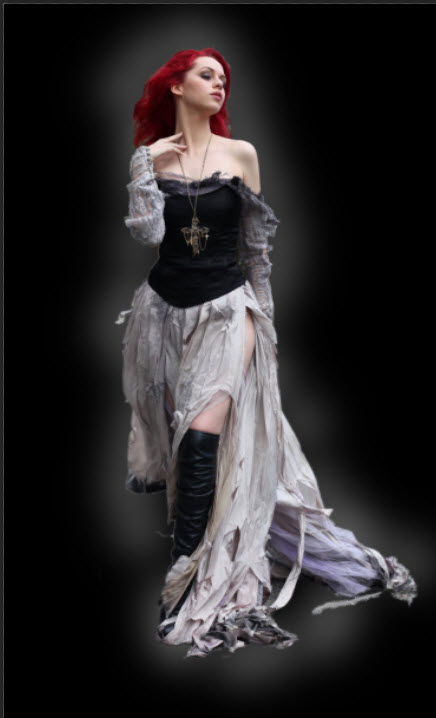
This is an image cut out from its background with the Lasso Tools and pasted on a black background.
The original is below.

I will be using this stock image. You can find it here
It belongs to faestock

Step 1 : These are the three Lasso Tools in Photoshop.


Step 2 : The icons at the top give the methods to use the Lasso Tools. Note that I have set a feather of 10 pixels. The feather will depend on the resolution of the image. The higher the resolution the higher the feather and the lower the resolution the lower the feather.

Step 3 : I have made a loose selection around the image with the Lasso Tool. It is not at all an accurate selection. Also note that though the upper half of the image has a good contrast with the green foliage, the lower half lacks contrast. The lower half presents a problem.

Step 4 : Press CTRL+J. The selection is copied and pasted on Layer1.

Step 5 : Press CTRL and click the New Layer icon.

Step 6 : A new Layer 2 forms below Layer 1.

Step 7 : The Foreground/Background colors should be set to the default Black and White.

Step 8 : Press CTRL+BACKSPACE to fill with the Background Color which is White. Layer 2 fills with White.

The image looks like this.

Step 9 : Click on Layer 1 and CTRL+CLICK the layer thumbnail.

Step 10 : A selection of marching ants appear.

Step 11 : Press CTRL+ to zoom into the image.

Step 12 : Click the Magnetic Lasso.

Step 13 : In the top panel click on the Subtract from selection icon.

Step 14 : Click in the white area. Click and drag with the Magnetic Lasso to select. Press delete to delete the last point if you go wrong. Press Esc to begin again.

Step 15 : Click and drag and then click back on the first point.

Step 16 : A portion has now been selected accurately. This is how it is done. First I have made a loose selection with the Lasso Tool then subtracted from the selection with the Magnetic Lasso.

Step 17 : Press the Space Bar to scroll down or move in the image while being fully zoomed in.

Step 18 : Click with the Magnetic Lasso on the white portion and click and drag another portion before returning to the first point.

Another portion has been selected accurately. This is how the selection is being modified. Work with small portions and your selection will be quite accurate.

Step 19 : Once the entire selection is in place press CTRL+0 to zoom out.

Step 20 : Press CTRL+J to copy and paste the selection on Layer 3.

Step 21 : Press CTRL+New Layer icon.

Step 22 : A new Layer 4 forms below Layer 3.

The Foreground/Background colors are set to the default Black/White.

Step 23 : Press ALT+BACKSPACE to fill with the Foreground Color which is Black. Layer 4 is filled with Black.

The image now looks like this.

Step 24 : Click the New Layer icon. A new Layer 5 forms above Layer 4.

Step 25 : Click the Brush Tool.

Step 26 : To make the Brush large press ] (right square bracket) and to make it small [ (left square bracket). To make it hard press SHIFT+] and to make it soft SHIFT+[. These are the shortcut keys.

Step 26 : I have set the Brush Size at 700 px and Hardness to 0.

Step 27 : Click the small bent arrow to switch the Foreground Color to White or press x on the keyboard.

Step 28 : Lower the Opacity of the Brush in the top panel to 30%.

Step 29 : Click around the edges of figure with the Brush.

Step 30 : Lower the Opacity of the Layer 5 to 55%.
The finished image.
Other photoshop tutorials are here


