Let me show you how to make Glowing Lines with Photoshop. It requires the Pen Tool. If you think that's too difficult, don't worry I will show you how to handle it. You will need a few layers and Brush Tool. I will explain everything in detail so that you don't have any difficulty.
Step 1 : I have opened this free stock image for adding the glowing lines.
Step 2 : Click the New Layer button on the Layers pallete and a new Layer 1 forms over the Background Layer which is the photo.
Step 3 : Click the Pen Tool.
Step 4 : First change the Foreground Color to white by clicking on small bent arrow (red arrow). In the top panel click on Paths. It is the icon the green arrow points to. Now you are set.
Step 5 : Click once with the Pen Tool. A tiny dot will appear.
Step 6 : Click a second point. Do not let go of the left mouse button. A line will connect the first and second points. Now drag and the line will bend. The more you drag the more the line will bend.
Step 7 : Click a third point. A line joins the second and third points. Again without letting go of the left mouse button begin dragging till the line bends.
Step 8 : Draw a fourth point and drag with left mouse button pressed to make the line bend again. Your line may go outside the photo. It does not matter.
Step 9 : Press ALT and with the Pen Tool you wil be able to manipulate the line by clicking on the points and dragging.
Step 10 : Click on the Brush Tool


And, there are your glow lines. I don't think that was difficult. Try it out.
Other Photoshop tutorials are here.
Step 11 : Look on the top panel. Click the square icon the arrow points to. The Brushes dialogue box opens. Click on Shape Dynamics. Click on a soft brush like Brush 65 or 100. The size of you Brush will depend on your photo. If it is a high resolution one, you need to pick a larger brush.
Step 12 : The Shape dynamic dialogue box opens when you click on the Shape Dynamics. Change the settings from the dropdowns as I have down.Step 13 : To close the Brushes dialogue box click on the small double arrow at the top.
Step 14 : Click on the Pen Tool.
Step 15 : Right click the line that you have drawn with the Pen Tool. Click on Stroke Path.
Step 16 : This dialogue box appears. By default it is set to Brush. Otherwise change it from the dropdown. Check Simulate Pressure.
Make sure your Foreground Color is set to White. It can be changed by clicking on the small, bent two-headed arrow above it.
Step 17 : Click Ok in the Stroke Path.
Step 18 : Click on the Paths pallete. It is different from the Layers pallete. As soon as you click it opens. You will find the Workpath at the top. Click anywhere below the Workpath.Step 19 : As soon as you click, you have your first glow line.
Step 20 : Click directly on the Workpath.
Step 21 : Press CTRL+ALT click on the first Path and drag down. If you want to drag down proportionately press CTRL+SHIFT+ALT and drag down. A second Path forms.
Step 22 : Right click the second Path and click on Stroke Subpath.
Step 23 : This dialogue box opens. Check Simulate Pressure if it is not checked and click OK.
Step 24 : Go to the Paths pallete and click below the Workpath.
You now have a second glow line. That is how you create the glowlines.
Step 25 : Click directly on the Workpath again.
Step 26 : Press CTRL+ALT, click on the second Path and drag down as earlier to form a third Path.
Step 27 : Right Click the third path and this dialogoe box opens. Click on Stroke Subpath.
Step 28 : Go to the Paths pallete. click anywhere below the Workpath.
And, now you have three Glow Lines. The Glow has to be added.
Step 29 : Click back on the Layer pallete. Click the Add Layer Styles button and from the popup menu click on Outer Glow.
Step 30 : In the Outer Glow dialogue box click on the Set Glow Color. You can do that by clicking on the small yellow box the arrow points to. The default color of the Glow is Yellow.
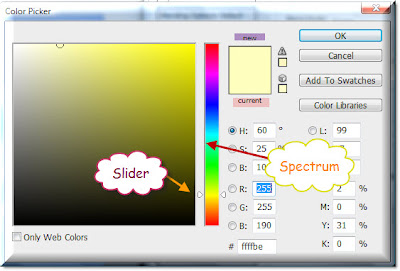
Step 31 : As soon as ou click the Color Picker opens. The column of color in the middle is called Spectrum. There are a pair of sliders which you can drag up or down to change the color. Note that the 'current' at the top is shown as Yellow as also 'new'.
Step 32 : I have dragged the slider up to Purple. You can also directly click on a Color in the Spectrum to select. I have then clicked on a shade of Purple. The numerical value is given at the bottom # 'ca28e2'. Click OK.
Step 33 : Change the Blend Mode to Normal.
Step 34 : Now change the Size to 10 pixel and range to 50 %. Click OK.
The Glow has been added.
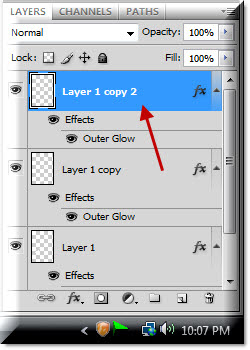
Step 35 : In the Layer pallete press CTRL+J. Layer 1 duplicates to Layer 1 copy.
Step 36 : Double click on Outer Glow.
Step 37 : The Layer Styles dialogue box opens again. Click on the Color to change it.
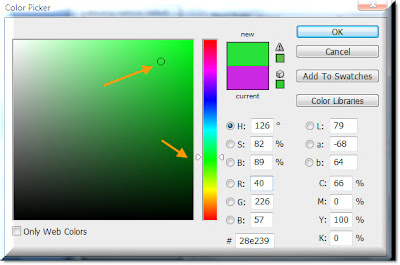
Step 38 : The Color Picker opens. I have clicked on a shade of Green. It numerical value is # 28e239. Click Ok. Click OK in the Layer Styles dialgoe box as well.
Step 39 : Press CTRL+T. A selection forms.
Step 40 : Hover your cursor near the top right corner and a small two headed arrow will appear. You can rotate the selection with this. Press Enter to apply the transformation.

Step 41 : Now press CTRL+J. Layer 1 copy duplicates into Layer 1 copy 2. Double click the Outer Glow under Layer 1 copy 2 or the new layer that you just did.
Step 42 : Click the Color in the Layer Styles. The Color Picker comes up again. I have clicked on a dark shade of blue. Click Ok in the Color Picker and in the Layer Styles.
Step 43 : Press CTRL+T. A selection forms.
Step 44 : Go to Edit>Transform>Flip Vertical.Step 45 : The selection flips.
Step 46 : Press CTRL+T. Drag the middle handle at the top downwards.
Step 47 : Place you cursor within the selection and you can move it anywhere. Press Enter. 
And, there are your glow lines. I don't think that was difficult. Try it out.
Other Photoshop tutorials are here.


