I will be using two free stock images.
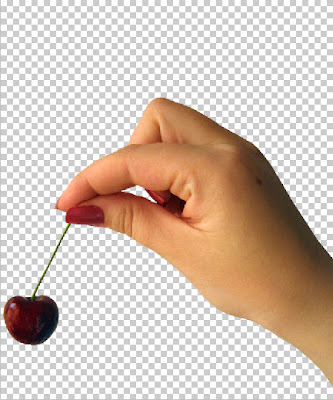
You will find this free stock image
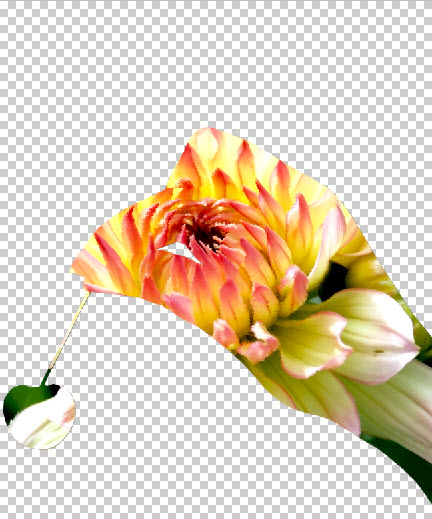
hereAnd this. It belongs to
UrsulaYou can use any image.
Step 1 : Click the magic Wand Tool.
Step 2 : Click on the white portion. A selection of marching ants appears.
Step 3 : Since the entire background is White it is easy to select. The portion between the fingers which the arrow points to is not selected. Press SHIFT+click with the Magic Wand to select it. Now all the white area has been selected.
Step 4 : Press CTRL+SHIFT+I to inverse the selection. Now only the hand is selected.
Step 5 : Press CTRL+J. The selection will cut and paste the selection on a new layer1.
Step 6 : Drag the hand to the flower image with the Move Tool.
This is the Move Tool.
Step 7 : The hand has been moved to the flower image. The image of the hand is of lower resolution compared to the flower, therefore it is smaller.
This is how the Layers palette looks. The hand is on Layer 1 and the flower on the background layer.
Step 8 : Press CTRL+T. A selection forms around the hand.
Step 9 : Press SHIFT+ALT and drag the top right or any of the corners to resize and place it where you want to. By keeping SHIFT+ALT pressed you ensure that the image remains proportional during resizing.
When you hover the cursor over any of the corners a small bent arrow appears with which you can rotate the
selection. Press ENTER after you are satisfied. The selection goes away.
Step 10 : There are two layers now -- Layer1 and Background. Layer 1 is highlighted. Press CTRL+J. Layer 1 duplicates into Layer 2. Now click off the eye icon of Layer1. Click off the eye icon on the Background layer also.
The image looks like this after switching off the eye icon on Layer 1 and Background layers.
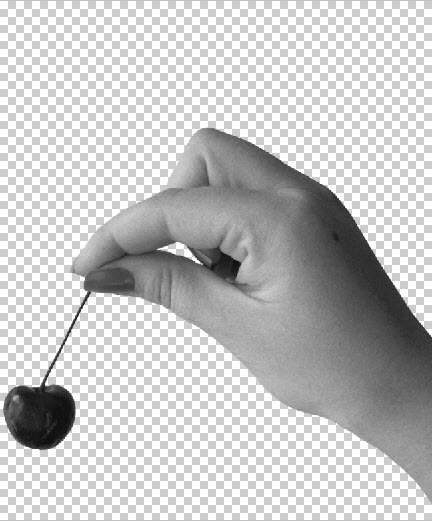
Step 11 : Press CTRL+SHIFT+U. This will desaturate the image in Layer 2.
Step 12 : Press CTRL+L. This will bring up the Levels dialogue box.
Step 13 : Drag the White slider at right inwards below the black graph, the Black slider inwards towards the left and the Grey slider in the middle to the right to increase the blacks and whites in the image. Click OK when satisfied.
The image looks like this after applying Levels.
Step 14 : Go to File>Save As
Step 15 : Save the file as a PSD. Give the PSD a name. I have named it hand. Click Save.
Step 16 : This dialogue box pops up. Click OK.
Step 17 : With Layer 2 highlighted, click on the eye icon on Layer 1.
Step 18 : Drag Layer 2 to the Trash Can at the bottom of the Layers palette. We no longer need it.
This is how the Layers palette looks like after deleting Layer2.
Step 19 : Turn on the eye icon on Background Layer. Press ALT and double click the layer. It will turn into Layer 0.
Step 20 : Press ALT and drag Layer 0 up to the top. It will duplicate into Layer 0 copy. Click off the eye icon on Layer 0.
Step 21 : Go to Filter>Distort>Displace.
Step 22 : The Displace dialogue box opens.
Step 23 : Increase the Horizontal and Vertical scale to 25. Nothing hard and fast about it though. The higher the number the greater the effect will be. Click OK.
Step 24 : As soon as you click OK. Photoshop opens where you saved the PSD file. If it does not navigate to the folder where you saved it manually. The hand PSD can be seen. Click it.
Step 25 : The flower image is distorted, but you may not be noticing it.
Step 26 : CTRL+CLICK the layer thumbnail on Layer 1.
As soon as you CTRL+CLICK, the selection of the hand appears.
Step 27 : Click the Layer Mask button and a layer mask forms next to the thumbnail on Layer 0 copy.
The image looks like this.
Step 28 : Change the Blend Mode to Overlay. You can try Soft Light or the other Blend Modes.
Step 29 : Drop the Opacity of the layer to between 60% and 70% depending on your image. I have dropped the Opacity to 39%. It will depend on your image.
Step 30 : Click on the Layer thumbnail on Layer 0 copy.
Step 31 : Go to Filter>Blur> Gaussian Blur.
Step 32 : The Gaussian Blur dialogue box opens. I have set the Radius at 2 and clicked OK.
This is how my image looks.
Step 33 : Click on Layer 1 which contains the hand.
Step 34 : Press CTRL+L to bring up the Levels dialogue box. Increase the contrast by dragging the Black slider and White slider inwards slightly. Drag the Grey slider slightly to the right. Click OK.
Step 35 : Click back on Layer 0 and switch on the eye icon.
Step 36 : Click on the New layer icon. A new Layer 2 forms above Layer 0.
Step 37 : The Foreground/Background Color should be set to Black/White. If it is not, press x and d on the keyboard to restore the default.
Step 38 : Press CTRL+BACKSPACE. This will fill Layer 2 with the Background Color which in this case is White.
This is how the image looks.
Step 39 : Click the Erazer tool.
Step 40 : In the top panel click where the arrow points to reveal the Brush presets. Set the Hardness to 0. Set a large size.
Step 41 : I have set a large size for the Brush. To increase the size of the Brush press ] (right bracket) and to decrease it [ (left bracket).
Step 42 : Click a few times with the Erazer (Brush). I have got this effect.
Step 43 : Click on Layer 0.
Step 44 : Go to Filter>Blur>Gaussian Blur.
Step 45 : I have set Radius of the Gaussian Blur at 4 pixels. Nothing hard and fast about it.
Step 46 : Press CTRL+T. A selection forms around the image. Press SHIFT+ALT. Drag the right bottom corner handle down till you are satisfied with the effect. Press ENTER.
The finished Displacement Map.
Other photoshop tutorials are
here


