You must have got used to using a White Layer Mask. This is a tutorial on using a Black Layer Mask and when it can be used. The White Layer Mask reveals and the Black Layer Mask hides to reveal or hide parts of an image. It is useful for blending images seamlessly. You can do it in any version of Photoshop. I am using Photoshop CS4.
Step 1 : These are two free stock images that I have opened in Photoshop. I will blend the two images using a Black Layer Mask.
Step 2 : Click the Move Tool. Keeping SHIFT pressed I am moving the image with the stairs onto the other.
Step 3 : The image with the stairs lands exactly in the middle of the image of the model. Now press CTRL+T. You will find corner handles appear around the image. Keep SHIFT+ALT pressed drag up a corner handle.
Step 4 : I have dragged up the right top corner handle till it entirely covers the image of the model.
Step 5 : Click the Tick Mark in the top panel or press ENTER.
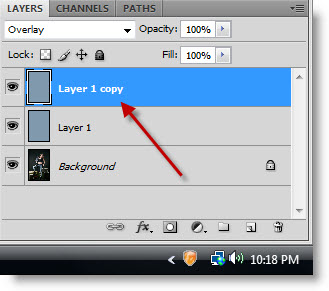
Step 6 : Look in the Layer palette. The Background contains the image of the model and Layer 1 that of the stairs.
Step 7 : Go to Layer>Layer Mask>Hide All.
Step 8 : As soon as you click the Layer Mask, the Background Layer becomes visible and Layer 1 invisible.
Step 9 : Click the Brush Tool.
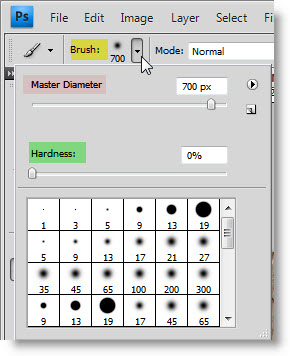
Step 10 : Click the Brush in the top panel and set the Hardness in the drop down panel to 0. You can set the diameter of the Brush by using the [ (left bracket) and ] (right bracket) keys. [ bracket is to decrease the size of the Brush and ] is to increase the size. You will have to switch between large and small brush tips as you paint. This is the easiest way to increase or decrease the size.
Step 11 : I am using a fairly large Brush. As I paint Layer 1 becomes visible.
Step 12 : Make sure that the Foreground Color is set to White and Background to Black before you begin painting. You can use the 'x' key to switch between Foreground and Background colors. If you reveal a portion you did not wish to, press 'x' which will switch the Foreground Color to White and paint out the mistake. Press 'x' again to switch it back to White and carry on painting.
Step 13 : I have finished painting with the Brush.
Step 14 : Click the New Layer icon and a new Layer 2 forms above Layer 1.
Step 15 : Click the Gradient Tool and then click on the top panel to bring up the Gradient editor.
Step 16 : The Gradient Editor comes up. I have some extra Gradients, but I will use a Gradient that is found in Photoshop.
Step 17 : I have clicked on the Blue, Red, Yellow Preset. You will find it in your version of Photoshop. You can also try other Gradients, but will get a different effect naturally. You can download free Gradients
here.
I have downloaded quite a few for my work. You can too. They are free. You will only need to register. Registration is free. Click OK in the Gradient Editor.
Step 18 : I have drawn diagonally with the Gradient Tool from the right top corner to the bottom left. You may drag the Gradient in any direction to get another effect.
Step 19 : This is effect you get.
Step 20 : Now drag short distances with the Gradient Tool. You will have to drag quite a number of times. Each time you drag the gradient changes. Keep dragging till you are satisfied.
Step 21 : Change the Blend Mode to Overlay.
Step 22 : This is the effect I have got.
Step 23 : Lower the Opacity of the Layer 2 to 45.
This is how the image looks after lowering the Opacity.
Step 24 : Click the New Layer icon and a New Layer 3 forms.
Step 25 : Click the Pen Tool. In the top panel click the icon the red arrow points to. Do not worry if you have not used the Pen Tool earlier. You will be able to follow.
Step 26 : Click the first point with the Pen Tool.
Step 27 : Click a second point. The first and second points are immediately connected by a straight line.
Step 28 : Without letting go of the mouse button begin dragging the second point. The line between the first and second curves. Two handles emerge. Begin dragging the lower handle.
Step 29 : Press ALT+Click at the point shown. This removes the second handle.
Step 30 : Click a third point as shown. A straight line immediately connects the second and third points.
Step 31 : Without letting go of the mouse button drag the third point. The straight line between the second and third points begins to bend. Keep dragging till the third point curves sufficiently.
Step 32 : Press ALT+Click the third point. The handle goes away.
Step 33 : Click a fourth point and continue to drag till the line begins to bend as shown.
Step 34 : Click the Brush Tool.
Step 35 : Now click the small square icon in the top panel at right. Clicking it will bring up the Brushes palette.
Step 36 : I am clicking on Brush 74.
Step 37 : Click on Brush Tip Shape. Shape Dynamics, Scattering should be checked. Uncheck the others.
Step 38 : Click on the Paths palette. It's different from the Layers palette.
Step 39 : Right click the Work Path thumbnail and from the drop down which opens click on Stroke Path.
Step 40 : Click anywhere beneath the Work Path to make the work path go away from the image.
Step 41 : This is how the image looks. The Foreground Color was set to Black, that is why the brushwork shows up in Black.
Step 42 : Click back on the layers palette.
Step 43 : CTRL+CLICK the layer thumbnail on Layer 3.
Step 44 : A selection of marching ants cover the brushwork.
Step 45 : Click the Gradient Tool. The Gradient Editor shows the last Gradient used.
Step 46 : Drag again and again with the Gradient Tool over the brushwork. Draw short lines with the Gradient Tool. Do it around five times.
Step 47 : Press CTRL+D to deselect. This is how the image looks.
Step 48 : Change the Blend Mode to Pin light.
Step 49 : I have lowered the Opacity of Layer 3 to 70%.
This is how the image looks.
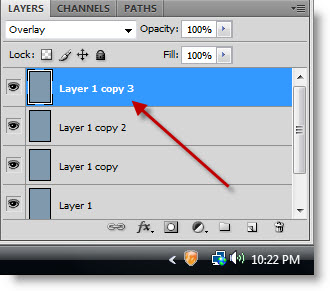
Step 50: Press CTRL+J. Layer 3 duplicates into Layer 3 copy.
Step 51 : Click back on Layer3.
Step 52 : Go to Filter>Blur>Radial Blur. After applying once press CTRL+F to reapply the filter three or four times.
Step 53 : Click the Move Tool.
Step 54 : With the Move Tool, move the layer up.
The finished image. I have shown you a number of tools and how to use them. Use the tools to create your own composition, following the same steps.
Other photoshop tutorials are
here


 looks better after Step 10 or earlier or this. It depends totally on you. The trick is to duplicate the Fill Layer (the layer filled with color) till you get the effect you want.