Let's create a frame for three photos. I will demonstrate some new methods here. For example I will show you how to make a simple frame from a Shape found in Photoshop. I will show you how to 'Place' photos. You are aware of the 'Open' command to open a photo in Photoshop. The 'Place' command is a bit different and has a number of advantages. You don't need to be very skilled to attempt this. What is needed is patience. The stress on this tutorial is patience. If you go wrong, check where you went wrong and continue.
Step 1 : Open a New White Layer.
Step 2 : Open an image and drag it onto the White Layer.
Step 3 : Resize it onto the White Layer.
Step 4 : Press CTL+J to duplicate Layer1 on which the girl's image is on. The layer duplicates into Layer 1 copy.
Step 5 : Press SHIFT and drag the duplicate image to the left. when you keep SHIF pressed, it will allow you to drag the duplicate in a straight line.
Step 6 : Press CTRL+R. This will bring up the Ruler. You can see it around the edges.
Step 7 : Press CTRL+T. Go to the top of the White Layer and you will be able to pull down a Guide. Pull the Guide down to the middle handle of the image on the right.
Step 8 : Grab the Rectangular Marquee Tool.
Step 9 : Draw a selection right in the middle of the image on the right covering the Guide.
Step 10 : Press DELETE and then CTRL+D to remove the selection.
Step 11 : Go to View>Clear Guides to make the Guide go away.
Step 12 : CTL+CLICK the layer thumbnail on Layer1 copy, then press SHIFT and CTRL+CLICK on Layer1.
As soon as you complete the above steps you will find that a selection surrounds the image on the left and the two portions of the image on the right.
Step 13 : Go the bottom of the Layers palette and click on the Create New Adjustment Layer button. From the pop up click on Solid Color.
Step 14 : The 'Pick A Solid Color' dialogue box pops up. Just click OK.
This is how your image looks.
This is how the Layers palette looks like. The Fill layer is on the top.
Step 15 : Click the Layer mask. You will find that a tiny border appears around the Layer Mask.
Step 16 : Press CTRL+I to invert the Layer Mask.
And, this is how the image looks.
Step 17 : Double click where the arrow points to.
Step 18 : This brings up the Pick a Solid Color dialogue box. You can change the color on the box at the left by moving the tiny white sliders at the bottom of the column of colors in the middle. The column of color is called the Spectrum. You can then pick a shade from the box at the left. What I have done is clicked on the Pink dress of the girl with the cursor. It automatically selects the color. Click OK.
The background of the image changes to the Pink shade I have chosen. I have clicked on the dress of the girl with the cursor to choose the color like I said.
Step 19 : Click the Add New Layer button and a new Layer 2 forms.
Step 20 : Use the Rectangular Marquee Tool to draw a selection around the image as shown.
Step 21 : Click the Eyedropper Tool.
Step 22 : Click on the Pink Background with the Eyedropper Tool. The Foreground Color changes to the color picked.
Step 23 : Press ALT+BACKSPACE to fill with the chosen color. The Fill hides the images. Press CTRL+D to deselect.
Step 24 : Click on the Add Layer Style button. From the pop up click on Inner Glow.
Step 25 : When the Inner Glow dialogue box opens, click on the Yellow Color. This brings up the Color Picker. Type in 000000 where the arrow points to at the bottom of the Color Picker. Six zeros stand for Black. Click OK in the Color Picker.
Step 26 : In the Inner Glow dialogue box change the Blend Mode to Normal.
Step 27 : After changing the Blend Mode to Normal, reduce the Opacity to 50%.
Step 28 : A border is visible.
Step 29 : Lower the Fill to zero in Layer2.
Lowering the Fill to zero makes the images visible. The border is also visible.
Step 30 : Make a new Layer. It is Layer 3.
Step 32 : Press 'D' on your keyboard. This changes the Foreground Color to Black.
Step 33 : Go to Edit>Stroke.
Step 34 : The Stroke dialogue box opens. I have set a 5 pixel Width. I am using high resolution photos. If you are using low resolution photos you can set it at less. Click OK.
Step 35 : Lower the Fill of Layer 3 to 40%.
Step 36 : Press CTRL+D to deselect. And, this is how your image looks.
Step 37 : Access the Custom Shape Tool. You can see where it is found on the left panel.
Step 38 : In the top panel click the icon the arrow points to.
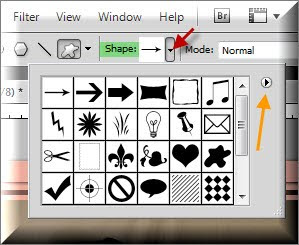
Step 39 : In the top panel click where the Red arrow points to bring up the Shapes. Next click where the Orange arrow points to bring up other Shapes.
Step 40 : Clicking on the tiny arrow brings up the other Shapes. Click on Ornaments.
Step 41 : This dialogue box pops up. Click OK.
Step 42 : I have clicked on one of the Shapes.
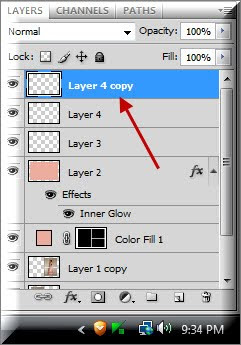
Step 43 : Click the New layer icon and a new Layer 4 forms.
Step 44 : Click and drag to draw out the ornament on top of the border.
Step 45 : Press CTRL+J and Layer 4 duplicates into Layer 4 copy.
Step 46 : Use the Move Tool to move the duplicated shape to the right. If you keep SHIFT pressed you will be able to drag it in a straight line to the right.
Step 47 : Press CTRL+E. Layer 4 copy merges with Layer4.
Step 48 : Press CTRL+J. This duplicates Layer 4 into Layer 4 copy.
Step 49 : Use the Move Tool to move the duplicated shape to the right.
Step 50 : Press CTRL+E again. Layer 4 copy again merges with Layer 4.
Step 51 : Press CTRL+J. Layer 4 duplicates into Layer 4 copy.
Step 52 : Use Th Move Tool to move the duplicated layer to the right. Note that part of the layer overshoots at the right.
Step 53 : Click the Rectangular Marquee Tool.
Step 54 : Draw out a selection to snip off the extra part of the shape. Press Delete. Press CTRL+D to deselect.
Step 55 : Press CTRL+E. Layer 4 copy merges into Layer 4.
Step 56 : Press CTRL+J. Layer 4 again duplicates into Layer 4 copy.
Step 57 : Press CTRL+T. Right click the shape and click on Flip Vertical.
Step 58 : Press SHIFT. Use the Move Tool to drag the shape border to the bottom. Press Enter to apply the transformation.
Step 59 : Press CTRL+J. Layer 4 copy duplicates into Layer 4 copy 2.
Step 60 : Press CTRL+T. Right click the shapes at the bottom and click on Rotate 90 degree CW.
Step 61 : The duplicate shapes is now vertical. Press SHIFT and drag it to the left.
Step 62 : Use the Rectangular Marquee to make a selection around the overlapping portion of he shapes. Press Delete. Press CTRL+D to deselect.
Step 63 : Press CTRL+J. Layer 4 copy 2 to duplicates into Layer 4 copy 3.
Step 64 : Right click the border at the left. From the pop up click on Flip Horizontal.
Step 65 : Click the Move Tool. Press SHIFT and drag the shape border from the left to the right.
Step 66 : Now press CTRL+E twice. What you are doing is merging the layers into Layer 4.
Step 67 : Now click on Layer 1 copy. This is layer where we cut the image in half in Step 9 and 10.
Step 68 : Use the Rectangular Marquee Tool to draw selection precisely around the top half of the image as shown.
Step 69 : Go to File>Place.
Step 70 : As soon as I click on Place, Photoshop opens a folder of images on my computer. Click on any photo.
Step 71 : The photo has been 'placed' in the selection. All you need to do now is to use the Move Tool to drag the corners to fit into the selection.
Step 72 : The image has been placed in the selection. Press Enter to apply the transformation.
Step 73 : I have drawn a selection around the bottom image at right with the Rectangular Marquee.
Step 74 : Go to File>Place
Step 75 : Again a file is opened from which I have clicked on a photo to be placed.
Step 76 : The photo has been placed in the selection.
Step 77 : The photo has been placed in the selection by dragging the corner handles till it fits onto the selection. Press Enter to apply the transformation.
This is the finished image. Try it out.
Other Photoshop tutorials are here


