


The Paste Into in Photoshop allows you to paste an image in a predetermined selection. For predetermined selections you can use Shapes found in Photoshop. I will show you how to paste into custom shapes and where and how many there are in Photoshop depending on the version you have. I will also show you a bit of Blending Options and the Lighting Effects Filter.
 This is the effect I will create. Just follow along. You can use your own images or the free stock ones I am using.
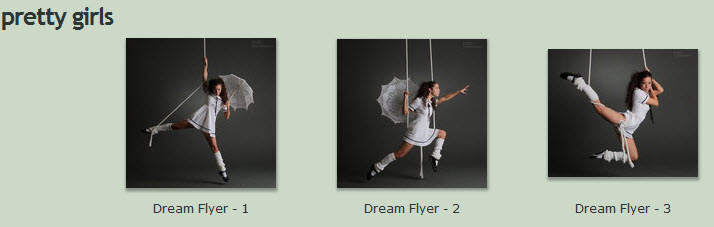 I will be using these free stock images for this tutorial. You will find them here
They belong to


 Step 31 : I have opened the third image. Press CTRL+A (Select All), then CTRL+C (Copy)
 Step 32 : Return to the White document.
 Step 33 : Go to Edit>Paste Special>Paste Into.
 Step 34 : The third image is pasted into the third selection. Again the image size is very large. Press CTRL+T.
 In the top panel make sure that Show Transform Selection is ticked.
 Step 35 : Press SHIFT+ALT and drag the top left corner handle up and down to resize.
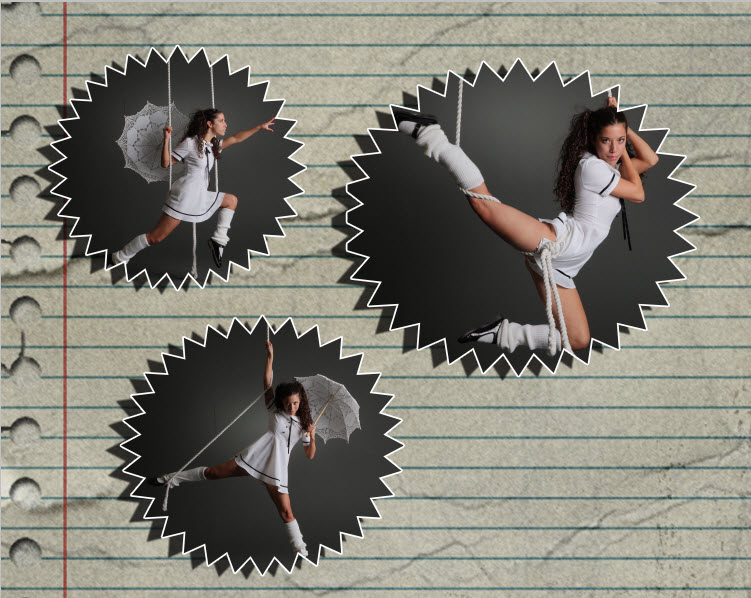
 Step 36 : Press ENTER. The selection goes away. The image looks like this so far.
 The Layers palette looks like this. Each of the Shapes are on a layer of their own. Layer 3 is highlighted, which means it is selected or the one you are on.
 Step 37 : Press SHIFT and click on Layer 1. All three layers are highlighted or selected.
 Step 38 : Press CTRL+E. All three layers merge into Layer 3. You will not find any change in the image.
 Press v on the keyboard which is the shortcut for the Move Tool. Place the cursor on the image and you will be able to move around the three images at one because now they are on a single layer.
 Download this free Texture from here
It belongs to zeke-ulrich
 Step 39 : I have opened this Texture in Photoshop. Press CTRL+A (Select All) and Pres CTRL+C (copy).
 Step 40 : Click on the image we are working on.
 Step 41 : The Texture is pasted on the image. Bu it is too small.
 The Texture is on the topmost layer (Layer4).
 Step 42 : Drag Layer 4 below Layer 3.
 Step 43 : Press CTRL+T. A selection forms.
 Step 44 : Press SHIFT+ALT and drag a corner handle outwards to resize the Texture. The Texture should fill the background. Press ENTER or CTRL+H to make the selection go away.
 Step 45 : Click back on Layer 3.
 Step 46 : Double click on the right edge of Layer 3 to open the Blending Options. You also click on the fx icon and click on Blending Options from the pop up.
 Step 47 : The Blending Options dialgue box opens.
 Step 48 : Click on Stroke.
 Step 49 : Click on the Color and the Select Stroke Color dialogue box opens. You can change the color of the Stroke here as its name implies.
 Step 50 : At the bottom type in ffffff (6fs) This changes the color of the Stroke to White.
Click OK in the Select Stroke Color.
 Step 51 : Increase the Size of the Stroke depending on your image. I have increased it to 7. Change the Blend Mode to Inside.
 Step 52 : Click on Drop Shadow in Blending Options.
 Step 53 : With the Blending Options open, place the cursor on the image. The drop shadow will move along with the cursor. Therefore you are free to position the drop shadow as you wish.
 Step 54 : Since the light in the images are coming from below and the right I am moving the Drop Shadow to the left.
 Step 55 : Reduce the Opacity to taste. I have reduced it to 30.
 The image looks like this.
 Step 56 : Click on Layer 4.
 Step 57 : Go to Filter>Render>Lighting Effects
 Step 58 : The Lighting Effects dialogue box opens.
 Step 59 : Change the Style from Default to Flashlight.
 Step 60 : The Flashlight preview looks like this. Look at the left panel.
 Step 61 : Drag a point on the circle to make it bigger or smaller. I have made it bigger. I am now clicking OK in the Lighting Effects.
 The finished image.
Other photoshop tutorials are here.
They belong to
mjranum-stock
Step 1 : I have opened a large new white document. You can choose your own size for use with your own images if you want.
Step 2 : Click the Custom Shape Tool. You can see where it is to be found.

Step 3 : You will find the Custom Shapes in the top panel.
These are the default Custom Shapes in Photoshop. There are more hidden away.
You will find the others if you click the small arrow at the side. The list of other default shapes opens.
You can click any of the Custom Shapes in your version of Photoshop. I have clicked on Banners and Awards.
This dialogue box opens. Click OK.
The Banners and Awards shapes open.
(After finishing your work you should always reset the Shapes palette to the default by clicking on Reset Shapes. Otherwise, the one you last used will become the default.) But to continue.
Step 4 : I have clicked on the Seal Shape to select it.
Step 5 : Click on the Paths icon in the top panel, otherwise your selection will be filled with Black. We only want the selection and not one filled with Black.
Step 6 : Draw a selection. The size is up to you.

Step 7 : By default the Layers palette is open in Photoshop. Click on the Paths palette.
Step 8 : You will find the Work Path in the Paths palette.
Step 9 : Right click on the work Path. Click on Make Selection.
Step 10 : This dialogue box opens. By default A Feather Radius of 0 is set. Leave it at the default as we do not want a soft edge. Click OK.
Step 11 : A selection forms.
Step 12 : Now open the first image. Click CTRL+A (Select ALL) and CTRL+C (Copy).
Step 13 : Return to the white document.
Step 14 : Go to Edit>Paste Special>Paste Into (in case of CS5). In other versions it is Edit>Paste Into.

Step 15 : The image is pasted into the selection. Since the image is large only a small portion is visible in the selection. Press CTRL+T. A selection appears. You can now see the size of the image pasted in. It is pretty large.
Step 16 : Press SHIFT+ALT. Drag a corner handle and drag down and up to resize, till the image appears inside the selection.
Step 17 : Press Enter. The selection goes away.
Step 18 : Return to the Layers palette by clicking on it. Layer 1 contains the first shape.
Step 19 : With the Shape Tool draw another selection. I have drawn this selection a bit bigger. You can decide your own size.
Step 20 : Click on the Paths palette. Right click the Work Path. Click on Make selection.
Step 21 : This dialogue box opens. Click OK.
Step 22 : The second selection can now be seen.
Step 23 : I have opened the second image. Press CTRL+A (Select All), then CTRL+C (Copy) as before. A selection forms.
Step 24 : Click back on the white document.
Step 25 : Go to Edit>Paste Special>Paste Into (in case of CS5).
Step 26 : The image is pasted into the selection. Press CTRL+T. A selection forms. As earlier the image is large.
Step 27 : press SHIFT+ALT. Drag the top left corner and drag down and up diagonally to resize till the image can be seen inside the selection. Press ENTER after you are satisfied.
This is how the image looks now.
Step 28 : Draw another selection with the Custom Shape Tool.
Step 29 : Click on the Paths palette. Right click the Work Path. Click on Make Selection.
Step 30 : The Make Selection dialogue box opens again. Click OK.
The third Selection forms.

It belongs to zeke-ulrich
Click OK in the Select Stroke Color.
Other photoshop tutorials are here.


