


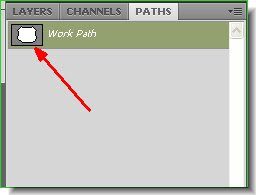
Step 22 : As soon as you click you will find the Workpath in the Paths pallette.
 Step 23 : Now click on the Horizontal Type Tool from the flyout.
 Step 24 : 'A' points to the size of the points. You will find a drop down menu. You need not click on a size from that. Just enter a value in the box like 25, 75 105 whatever you please and whatever is necessary to set the size of the font. Then click on 'B'. There are three alignments for the Text -- Left, Central and Right. I usually click on the central alignment. But it depends. 'C' is the to set the Color of the text. By default it is Black.
 Step 25 : On the left you will find the Fonts from the dropdown menu. Photoshop has its own fonts, but can always add to them by going to Dafonts.com. You will find a vast array of free fonts to choose from to make your Text even more exciting. If you do not know how to install fonts after downloading them please see here. You will also find links to other webseites from where you can download free fonts. To get back. Choose a font from the dropdown menu.
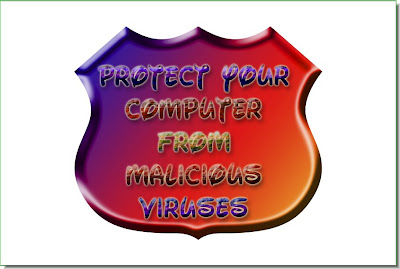
 Step 26 : Type out your text. I have typed out mine. The cursor will change when you click inside the Shield Shape since a Path surrounds it. You are clicking inside the Path.
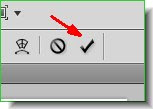 Step 27 : Click the Tick mark in the top right panel to apply the transformation.
This is how the Layers pallette looks like. The Text is on the topmost layer.

Step 28 : Click the Move Tool. Step 29 : Press ALT and resize the Text so that it is within the Shield shape.

Step 30 : You will again have to clcik the Tick Mark as the Text has been resized. Everytime you edit the text you will have to click the Tick mark. Remember this.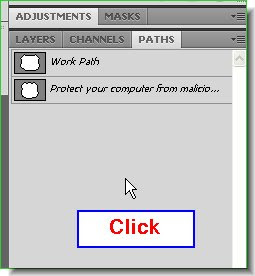
Step 31 : Go back to the Paths pallette and click anywhwere where the white arrow points to. This will remove the Path from the Shield.

Step 32 : Now click on Styles to reveal the pallete. You can see where it is found. If you cannot see it go to Windows in the top panel and you will find Styles from the dropdown menu. Click it.
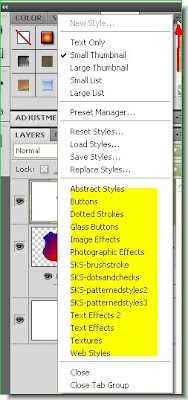
Step 33 : Click the small black arrow where the red arrow points to. Click it. It will reveal more Styles. There are few extra Styles that I have installed. But I will not be using them, but the ones that are found in PS.

Step 34 : I have clicked on a particular Style.
This is the effect I have got. You will get it too. You can also choose any other Styles if you wish.

Step 35 : Look under Text in the layers pallette. You will find the effects listed. For example the Layer Style includes Bevel and Gradient and Gradient Overlay. You can delete or add to the effects.
Step 36 : Click on the effects and a drop down menu will appear where you can find the other Layer Styles. I have clicked on Drop Shadow.

Step 37 : The Layer Style dialogue box opens. Drop Shadow is checked. I have set the Distance at 8, Spread at 7 and Size at 13 and lastly reduced the Opacity to 50%. Do not click ok. Now click on Outer Glow exactly where the arrow points to. The pallete will change to Outer Glow i.e. the Outer Glow controls will be revealed.
Step 38 : Clicking on Outer Glow reveals its controls. I have left it at the default Yellow for the glow. I have set the Spread at 0 and Size at 6. Now click Ok.
This is the effect I have got. This is not finished though. I wll post the next part of the tutorial shortly. Save you work as a psd file so that you can continue with this tutorial.
The third and concluding part of the tutorial is here.


