


Step 3 : Draw out a selection carefully with the Lasso Tool. If you cannot do it at once, do it a second or a third time, till you have a good selection.

Step 4 : As soon as you complete the selection with the Lasso Tool, a column of 'marching ants' enclosing the selection shows up.

Step 5 : Press CTRL+J. This will cut and paste the selection to a New Layer. Look in the Layers pallette and you will find the selection pasted into Layer1.
 Step 6 : Press CTRL+L and the Levels dialogue box opens.
 Step 7 : Note that there are three sliders. The Black at the left if dragged to the right darkens the image. The White slider at the right is for brightening the image. The more you drag it to the left the brighter the image will be. The Gray slider in the middle increases or decreases the highlights depending on whether you pull it to the right or the left. For this image I have only dragged the White slider all the way left to the edge of the black graph. Let us see what it does.
 Step 8 : This is what it does.


Step 11 : Press CTRL+J. This will duplicate Layer 1 to Layer 1 copy.

Step 12 : Click on the Blur Tool from the panel at the left. It is a little used tool.

Step 13 : In the top panel you can change the Brush size of the Blur Tool. It works just like the Brush Tool. Set the strenght to between 10% to 20% depending on how high the resolution of your image is. I am using a low resolution image. I have set the Strength to 20%. The Brush should be soft. To make the brush soft press Shift+[ (left bracket) key a number of times. Step 14 : With the Blur Tool, blur the edges of the selection.
 Step 15 : Change the Blend Mode to Linear Dodge.
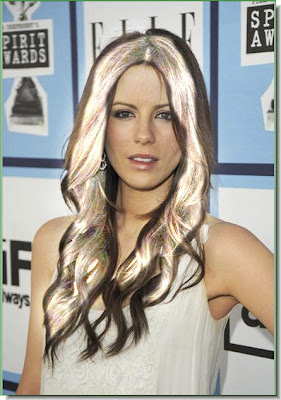 Step 16 : This is how the image looks.
 Step 17 : Click back on Layer 1 keeping the Shift key pressed. This will select both the layers.
 Step 18: Now press CTRL+E. This will merge both the layers into one. This process, however, will not work in PS7. You will have to switch of the eye icons of the layers you do not want to merge, then go to Layer>Merge Down to do this.
 Step 19 : Lower the Opacity of the layer. I have reduced it to 25 %. It will depend on your image.
 This is how the image looks.
 Step 20 : The same image with the Opacity reduced to 17%. Lower the Opacity till you achieve the right effect. And, there is your 'shining hair'.


