


Let us use a Photoshop plugin named Contact Sheet to create a collage and then turned it into a ball or sphere with a reflection. For those using Photoshop CS 4, the plugin has not been included by Adobe. But it is available for download free. You can download it from
The details of installing it are given with it. It is not difficult.

Step 1 : Go to File>Automate>Contact Sheet II.

Step 2 : This dialogue box comes up. At the top click Browse to give a path to a folder where pictures to be used are on your computer. Next under ' Document ' change the units to inches. Put the Width and Height at 6. Uncheck 'Flatten All Layers'. Under 'Thumbnail', uncheck 'Use Auto Spacing'. Put the Columns and Rows to 6 and Vertical and Horizontal at '0 in'. Uncheck 'Rotate for Best Fit' as also 'Use filename as caption'. After you have done this the square the red arrow points should look like as shown. Click OK.

Step 3 : After clicking OK Photoshop takes over. It fits all the photos on the White Layer. There are spaces between the images ofcourse.

Step 4 : Click the Move Tool. Check the Auto Select. (Remember to uncheck it after the tutorial).

Step 5 : Use the Move Tool to move the images into place so that the gaps are closed.

Step 6 : Should you run short of images for covering the white layer press ALT, click on a photo and drag. A copy of the photo can then be moved to wherever you want it. Press Enter lastly.

Step 7 : Look at the Layer pallete. You will find that each image that you have used is on a separate layer.

Step 8 : Go to Layer>Flatten Image.

Step 9 : After Flattening you have only the Background layer in the Layer pallete.

Step 10 : Click the Elliptical Marquee Tool.

Step 11 : Press SHIFT. Drag with the Elliptical marquee from the top left to right bottom. A perfect circular selection forms.

Step 12 : Press CTRL+J. The Background layer duplicates into Layer1. Click off the eye icon of the Background Layer.

Step 13 : Use the Move Tool to move the image into the centre. This is how the sphere looks.

Step 14 : Go to Filter>Distort>Spherize.

Step 15 : The Spherize dialogue box appears. The Amount should be set to 100%. Click OK.

Step 16 : This is how the image looks after applying Spherize.

Step 17 : CTRL+Click the layer thumbnail of Layer1.

Step 18 : A circular selection appears around the sphere.

Step 19 : Click the New Layer icon at the bottom of the Layer pallete and a new Layer2 forms.

Step 20 : Click on the Foreground Color. The Color Picker comes up. Click on a light grey shade and click OK in Color Picker.

Step 21 : The Foreground Color changes to the color picked.

Step 22 : Press ALT+BACKSPACE. The selection fills with the color picked.

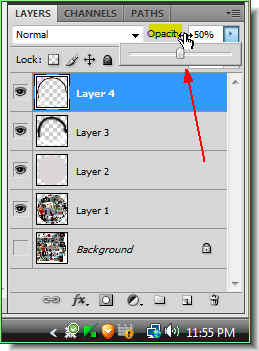
Step 23 : Lower the Opacity of Layer 2 to 25% by dragging the slider.
.

Step 24 : This is how the image looks like. Note that the selection is still in place.

Step 25 : Click the New Layer icon at the bottom of the Layer pallete and a new Layer 3 forms.

Step 26 : Press x and then d on the keyboard. The Foreground returns to Black and Background to White.

Step 27 : Click the Brush Tool.

Step 28 : Click where the arrow points in the top panel. The Brushes dialogue box appears. Set the Hardness at 0% and Master diameter suitably large. I have set it at 700 pixel.

Step 29 : Paint with the Brush around the top and sides of the sphere with Black. You don't have to be too careful.

Step 30 : Press x on the keyboard. The Foreground Color changes to White.

Step 31 : Now use the Brush Tool to paint with White at the bottom of the sphere as shown.

Step 32 : Drop the Opacity of Layer 3 to 50%.

Step 33 : This is how the sphere looks.

Step 34 : Click on the new layer icon. A new Layer 4 forms.

Step 35 : Click on the Brush Tool. Click in the top panel. Lower the Master Diameter to 250.

Step 36 : Press x on the keyboard and Foreground Color changes to Black.

Step 37 : With the Brush paint around the sides and top of the spehere. Note that the Brush stroke is narrower.

Step 38 : Press x on the keyboard. The Foreground Color changes to White.

Step 39 : Paint along the bottom of the sphere with the White.

Step 40 : Drop the Opacity of Layer 4 to 50%.

Step 41 : This is how the image looks.

Step 42 : Click on the New Layer icon. A new Layer 5 forms.

Step 43 : Click on the Brush Tool. Increase the Brush size till it is quite large. I have set it at 700.

Step 44 : The Foreground Color is still White. Check it. Click once with Brush in the middle.

Step 45 : Drop the Opacity of Layer 5 to 90%.

Step 46 : Click the New layer icon. A new layer 6 forms.

Step 47 : Click on the Brush Tool. Reduce the Master Diameter to 200.

Step 48 : Click twice with the Brush. Then click beside it just once as shown.

Step 49 : Press CTRL+D to deselect. Press CTRL+T. A selection forms around the two dots. Hover the cursor on a corner. A small bent double headed arrow appears. Use it to rotate the selection as shown.

Step 50 : Right click in the middle of the selection. From the pop up menu click Warp.

Step 51 : The Warp grid lines appear.

Step 52 : Drag the top corner handles up.

Step 53 : Drag the bottom handles inwards. Press ENTER.

Step 54 : Drop the Opacity of Layer 6 to 80%.

Step 55 : This is how the image looks.

Step 56 : Note that Layer 6 is highlighted. This means it is the layer we are on. Now CTRL+CLICK on Layer 2.

Step 57 : The selection appears around the sphere again.

Step 58 : Click the new layer icon. A new layer 7 forms.

Step 59 : Press x on the keyboard. The Foreground Color changes to Black.

Step 60 : Click the Gradient Tool.

Step 61 : Make sure Linear Gradient (which the arrow points to) is turned on. It is on by default. If not click it.

Step 62 : The Gradient Editor (arrow) should look like this. Click the Gradient Editor.

Step 63 : The Gradient Editor appears. Click the first Preset the small white hand points to. Click OK.

Step 64 : Drag with the Gradient Tool from the middle to the edge as shown.

Step 65 : This is how the image looks with the Gradient applied. ress CTRL+D to deselect.

Step 66 : Drop the Opacity of layer 7 to 15%.

Step 67 : Click on Layer 2. Drag the Opacity of the layer to 0%.

Step 68 : This is how the image looks.

Step 69 : Click on the topmost layer which is Layer7.

Step 70 : Press SHIFT and click on Layer2. All the Layers are highlighted.
Step 71 : All the Layer have compressed into Layer7. It is just above layer1.

Step 72 : I have now opened this photo in Photoshop. You can download it here. It belongs to Barefootliam Stock

Step 73 : Drag the image of the table onto the sphere.

Step 74 : The table image has landed on the sphere.

Step 75 : Look in the layers pallete. The table image is on the top layer.

Step 76 : Drag the layer below Layer1.

Step 77 : Press CTRL+T. A selection forms. You cannot see the table because it is behind the Sphere. Pressing CTRL+T makes a selection visible. Press SHIFT+ALT and drag one of the corner handles till the table fits below the sphere. Press ENTER to apply the transformation.

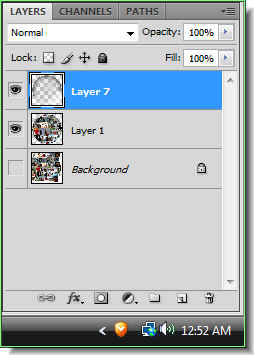
Step 78 : Click on Layer 7. It is highlighted. Press SHIFT and click on Layer 1.

Step 79 : Press CTRL+E. Both layer are combined into Layer7.

Step 80 : Press CTRL+T. A selection appears. Press SHIFT+ALT and drag a corner handle till it becomes smaller and fits onto the tabletop. Press ENTER.

Step 81 : Go to Edit>Transform>Flip Horizontal.

Step 82 : I flipped the image as the direction of the light was not matching.

Step 83 : Press CTRL+J. Layer 7 duplicates into Layer 7 copy.

Step 84 : Click on the Move Tool.

Step 85 : Drag the duplicate sphere below the other so that they are just touching.

Step 86 : Go to Edit>Transform>Flip Vertical.

Step 87 : The lower sphere flips vertically.

Step 88 : Click the Add Layer Mask button. A Layer Mask forms next to the layer thumbnail on Layer 7 copy.

Step 89 : Click on the Rectangular Marquee.

Step 90 : Use the Rectanglar Marquee to draw a selection like this. You can reposition the selection with the MoveTool.

Step 91 : Click on the Gradient Tool.

Step 92 : Keeping SHIF pressed drag the Gradient Tool upward from below the selection to the edge of the selection on top.

Step 93 : This is how the bottom sphere looks after applying the Gradient. Press CTRL+D to deselect.

Step 94 : Make sure the Foreground Color is set to Black.

Step 95 : Click on the Brush Tool.

Step 96 : Paint with the Brush. It will wipe away the sphere as you paint.

Step 97 : I have wiped away almost half of the bottom sphere.

Step 98 : Reduce the Opacity of the Layer 7 to 45%.

And, here is the completed ball or sphere with a reflection. I have tried to be as detailed as possible so it is easy to follow. Try it out.
Other photoshop tutorials are here


