


You can add dramatic lighting to your images in a few steps in Photoshop. You can turn an image shot outdoors to make it seem like it was taken in a studio. You need not be an expert to try it.
For demonstrating dramatic lighting we will be using the image below:


Step 1 : After opening the image in Photoshop, click on the Crop Tool.

Step 2 : This is how I will crop the image. I have dragged out a selection with the Crop Tool. I am clicking enter to apply the Crop.

The photo has been cropped. The purpose of the crop was to get rid of the excess background.

Step 3 : Zooming into the image reeals that the skin is blotchy in portions. To fix that I am going to use the Spot Healing Brush Tool.

Step 4 : Click on the Spot Healing Brush Tool.

Step 5 : I have just clicked and dragged over the area I want to heal.

You can see how the Spot Healing Brush has removed the blemishes on the forehead.

Step 6 : I have also cleaned up her cheeks and nose.

Step 7 : Press CTRL+J to duplicate the Background Layer to Layer1.

Step 8 : Go to Filter>Blur>Surface Blur.

Step 9 : The Surface Blur dilogue box comes up. I have set the Radius at 5 and Threshold at 10 and clicked OK.

This is how the image looks after applying Surface Blur. The Surface Blur blurs some of the details of the eyes and lips. We have to fix that.
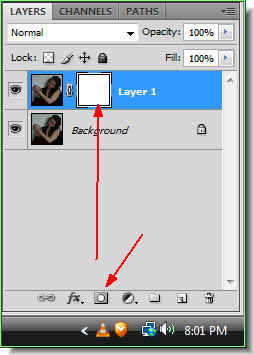
Step 10 : Click on the layer mask and a layer mask forms beside the layer thumbnail on Layer1.

Step 11 : Make sure that the Foregorund Color is set to Black and Background to White. Click the Brush Tool.

 Step 13 : With the Brush click on the eyes and the lips. Brush the hair as well.
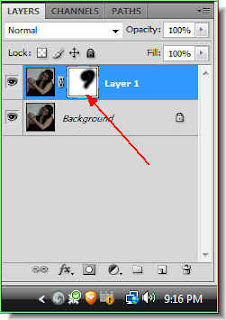
This is how the Layer Mask looks like after you finish the Brush work.
Step 14 : Press CTRL+E. The two layers merge into the Background layer.
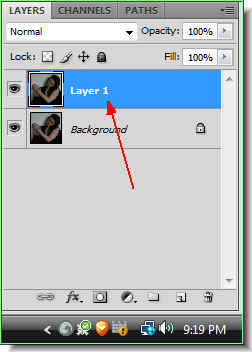
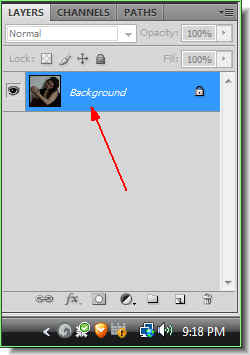
Step 15 : Duplicate the Background Layer by pressing CTRL+J


 This is how the image looks after applying the Gaussian Blur.

 Step 19 : This is how the image looks. It looks dark.

 Step 21 : Clck the New Layer icon. A new Layer 1 forms above the Background.


 Step 24 : Paint with a large soft brush on the Background.


 Step 27 : Press CTRL+L. The Levels dialogue box comes up.


 Step 29 : Click on the Adjust Layers button on the Layers pallette. Click on Brightness/Contrast.

 Step 31 : Click the Brush Tool.


 Step 36 : Paint on the eyes and lips and the face. It brightens.


 Step 43 : Change the Blend Mode to Soft Light.


Step 12 : Click in the top panel to reveal the Brush dialogue. Set the Hardness at 0 and Master diameter to something quite large. I have chosen a Brush Size of 500 pixel.


This is how the Layer Mask looks like after you finish the Brush work.

Step 14 : Press CTRL+E. The two layers merge into the Background layer.

Step 15 : Duplicate the Background Layer by pressing CTRL+J

Step 16 : Go to Filter>Blur>Gaussian Blur.

Step 17 : The Gaussian Blur dialogue box comes up. Set it between 7 and 10 pixels depending on your image. Set it on the higher side if you are using a low resolution image and on the lower side if you are using a high resolution image. I have set it at 8 pixel. Click OK.


Step 18 : Change the Blend Mode in the Layer pallete to Overlay.


Step 20 : Press CTRL+E. The two layers merge into the Background Layer.


Step 22 : Make sure that the Foreground Color is Black.

Step 23 : Click the Brush Tool.


Step 25 : I have painted out the Background with Black.

This is how Layer 1 looks after painting with Black.

Step 26 : Press CTRL+E. The two layers merge into the Backround.


Step 28 : Drag the White slider at the right to the bottom of the graph as shown. Click OK.

This is how the image looks.


Step 30 : I have dragged the Brightness slider to 20 and Contrast slider to 25. There is nothing hard and fast about this. If your image is bright, you might need to adjust the Contrast slider more and the Brightness slider less.


Step 32 : Paint along the edges of the arms and face. The Foreground Color should be set to Black.

This is how the Layer Mask looks after painting with the Brush.

Step 33 : Click on the Background Layer.

Step 34 : Click on the Dodge Tool.

Step 35 : In the top panel change the Range to Shadows.


Step 37 : Click on the Burn Tool.

Step 38 : Change the Range to Highlights in the top panel. Note that the Exposure has been set to 30%.

Step 39 : Brush the arms with the Burn Tool. This is the effect I have got.

Step 40 : Click the new layer icon. A new layer 1 forms above the Background Layer.

Step 41 : The Foreground Color is Black. Click the Gradient Tool.

Step 42 : Drag from the left bottom corner to the top right corner with the Gradient Tool.


The completed image.
Other Photoshop tutorials are here


