


You can enrich the tones of bland looking photographs with a couple of Adjustment Layers. It also allows for a great deal of flexibility. This will show you how it is done with Hue/Saturation and Color Balance Adjustment Layers. The process will work with all images and can be done in any version of Photoshop. You must not follow this tutorial verbatim. You should just follow the process only as each image is different.

This is a free stock image which you can download from here
It belongs to GABOGRAFICO

This is the effect I will achieve.

Step 1 : Click the Add New Fill or Adjustment Layer button.

Step 2 : Click on Hue/Saturation.

Step 3 : The Hue/Saturation Adjustment Layer opens.

Step 4 : Check Colorize.

The image looks like this with the default setting.

Step 5 : Drag the Hue slider between the Red and Orange with the Hue slider.

The image looks like this.

Step 6 : Change the Blend Mode to Soft Light.

You will immediately notice that the tones becomes richer.

Press ALT and click on the eye icon in the Background Layer to see the before and after effect.
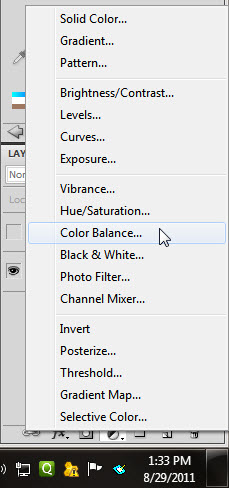
Step 7 : Now click on the Color Balance Adjustment Layer by clicking the Add New Fill or Adjustment Layer button.

Step 8 : The Color Balance Adjustment Layer opens. By default Midtones is selected, but first click on Highlights.

Step 9 : I have dragged the yan and Yellow sliders to +25 and Magenta to +10. again let me stress that these values are not absolute. You will have to try them yourself. Try increasing by increments of +25 or lower at +10. See the effect then increase or decease the value. It will depend on your liking.

The image looks like this.

Step 10 : In the Shadows I have dragged +25 for the Cyan and the Yellow and +20 for Magenta.

The image looks like this.

Step 11 : In the Midtones I have set -25 for the Red, -10 for Magenta and +15 for Yellow.

The tones in the image look much more warmer now.

Step 12 : Now click back on the Hue/Saturation Layer and slide the Hue slider till you find the correct tone.

Step 13 : I have also moved the Saturation and Lightness sliders to +20 and +10 respectively.

The image looks like this.

Step 14 : I have reduced the Opacity of the Hue/Saturation layer to 90%.

This is my final image. The power of Adjustment lies in being able to adjust them in any point in time. Just follow the guidelines I have provided, but set your own values and should be able to have a lot of fun.
Other tutorials are here
If you have a photoshop question or wish to request for a tutorial please email me at pradip.chowdhury@gmail.com


