


This method can be used with any image to create some startling yet subtle color effects in Photoshop. What I will be using are commonplace -- Adjustment Layers, Hue/Saturation and Equalize etc. But the overall effect is pleasing. For want of a better name I am calling it Color Shading. I am just showing a method. Just follow the method and tinker with it if you want. Do not assume that the values that I use are final.

This is the effect that I intend to create.

I will be using this free stock image. You will find it here
It belongs to Celoe

Step 1 : Duplicate the Background Layer by pressing CTRL+J. Press CTRL+SHIFT+U to desaturate.

The image is desaturated.

Step 2 : Click the Add Layer Mask button. A Layer Mask forms next to layer thumbnail on Layer 1.

Step 3 : Click the Gradient Tool. The Foreground/Background Colors are set to Black and White which is the default. If it is not press x and then d on the keyboard to restore the default.

Step 4 : Click where shown to open the Gradient Editor.
Click on the Foreground to Transparent Preset.

Step 5 : Click on the Reflected Gradient. By default the Linear Gradient, which is the first one, is checked.

Step 6 : Drag the Gradient Tool diagonally from top to bottom for a part of the way.

The Layer Mask looks like this.

The image looks like this. So far I think this is familiar territory.

Step 7 : Click the New Fill Layer or Adjustment Layer button.

Step 8 : Click on Hue/Saturation.
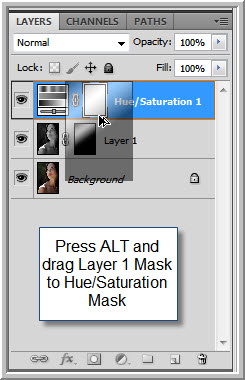
Step 9 : With the Hue/Saturation Layer highlighted drag the Mask from Layer 1 to the Mask of the Hue/Saturation Layer.

Step 10 : This dialogue box opens asking if Photoshop should replace the Layer Mask. Click Yes.

The Mask on Hue/Saturation 1 Layer is now the same as Layer 1 Mask.

Step 11 : Double click the Layer thumbnail.

Step 12 : The Hue/Saturation opens. Check Colorize. The value of the Saturation immediately changes to 25. Enter 45 in the Hue box for a greenish effect.

The image looks like this.

Step 13 : Click on the Background Layer.

Step 14 : Press CTRL+J to duplicate the Background layer.
Click on the Channels Palette.

Step 15 : Click on the Green channel.

The image turns Black and White.

Step 16 : Go to Image>Adjustments>Equalize.

The channels palette looks like this after applying Equalize. Note the RGB channel.

The image looks like this.

Step 17 : Click on the RGB channel. Then click on the Layers palette.

The image looks like this.

Step 18 : Change the Blend Mode to Soft light.

This is the final result.
Other Photoshop tutorials are here
;


