


Hue/Saturation in Photoshop can do wonders when it comes to removing predominant distracting colors and color casts in just a few simple steps. It only affects the targetted color. You need not be an expert to do it and the method will work with most images in any version of photoshop. Do not take the values provided as constant. They will vary from image to image. I am just showing you how to go about it.
 A color cast has been removed from this image.
 This colors in this image have been made more vibrant.

I will be using this free stock photo which you will find here
It belongs to GiardQatar

Step 1 : Click on the New Fill or Adjustment Layer button at the bottom of the Layers palette and click on Hue/Saturation from the pop up menu. It will be better to use a Hue/Saturation Adjustment layer as it is non-destructive instead of Hue/Saturation which will work directly on the image and make it difficult to undo in case you do not like it. The Hue/Saturation adjustment layer also has a layer mask, which helps to adjust the color.

Step 2 : Hue/Saturation has a number of channels besides the Master channel. It also has the Hue, Saturation and Lightness sliders. The Hue slider as its name suggests is to change the Hue or Color. We will not be using it here. The second is the Saturation which affects how deep or light a color is. Lastly there is Lightness. This slider complements the Saturation slider.

Step 3 : Since from the image you can make out that the reds are very prominent and need to be lessened, let us select the Reds. We will only be using the Saturation slider.

Step 4 : I have decreased the Saturation in the Reds to -35. You should use a value that suits your image which will not be difficult since I am showing how to go about it. Decrease the slider till you are satisfied with the effect.

The Reds in the image have been reduced. Other colors have not been affected. The image looks more natural now. The Yellows also need a bit of fixing as you can see.

Step 5 : I have selected the Yellows and reduced the Saturation to -85. Again, you should use a value that you are satisfied with.

The yellows have been reduced. If you lower the saturation too much the color you are trying to fix will become gray. So be careful. This simple tweak with the Hue/Saturation Adjustment Layer has made the colors more tolerable.

The Hue/Saturation Adjustment Layer comes with a Layer Mask. How is this an advantage?

Step 6 : With the Foreground/Background Colors set to the default Black/White, click on the Brush Tool or just press b on the keyboard.

Step 7 : In the Brush controls in the top panel, click on a Soft Round Brush or the first one. Set the Hardness slider to 0. Leave the Size slider alone. Use [ (left square bracket) to decrease the size of the Brush and ] (right square bracket) to increase it.

Step 8 : In the top panel lower the Opacity to 25%and Flow to around 60%. Why have I done this? When I paint the change will be in small amounts instead of all at once if I set both to 100%.

Step 9 : Zoom into the image and paint with a small brush. You will need to make a number of passes over the eye. For the lips go over it just twice or thrice, no more.

Look at the Layer Mask. The faint specks of gray that you see are the places where you painted. If you had painted with 100% opacity and Flow the specks would have looked black.

The finished image. Here the Reds and Yellows needed fixing. Use the same method to fix other colors.
 I have opened this free stock image. You will find it here
It belongs to SliceStudio
 Step 1 : Make a Hue/Saturation as earlier.
 Step 2 : I have increased the Reds to +25.
 Step 3 : I have decreased the Yellows to -45.
 Step 4 : I have left the Greens untouched.
 Step 5 : The Cyans have been increased to +35.
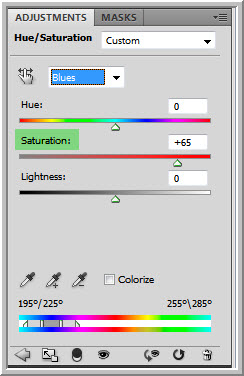 Step 6 : The Blues have been increased to +65.
 Step 7 : I have increased the Magentas to +45.
 The finished image looks more vibrant.
As I said do not go by the values here, but by the method shown and you will be able to work wonders.
Other photoshop tutorials are here
It belongs to SliceStudio
As I said do not go by the values here, but by the method shown and you will be able to work wonders.
Other photoshop tutorials are here


