


Blending two images images with a Layer Mask seamlessly is easy enough. What if a Texture is used? It is quite possible to do so. But what will you get? A remarkable photoshop effect. This is very easy to o and can be done in any version of Photoshop. I will be using two stock images. It will work with any image and Texture. http://www.deviantart.com/ is a very good source of free stock photos and Textures as well as other resources one requires in Photoshop. You have to be a registered member to download. Registration is free.

This is the effect I will be creating.

I will be using this stock image. It is from deviantart. You will find it here
It belongs to kedralynn

I will also be using this tree bark Texture. You will find it here
It belongs to ftourini

Step 1 : Open the Photo in photoshop. There is only the Background layer in the Layers panel.

Step 2 : Drag the lock on the Background layer to the Trash Can.

Step 3 : The Background Layer becomes Layer 0 after you unlock it by dragging the lock to the trash can. Press CTRL and click the Add New Layer button. A new Layer 1 form below Layer 0.

The Foreground and Background colors should be set to the default Black/White. If it is not, press x and then d on the keyboard to restore the default.

Step 4 : Press CTRL+BACKSPACE to fill Layer 1 with the Background color which is white.

Step 5 : Click on Layer 0. Click on the Layer Mask button. A Layer Mask forms on Layer 0.

The Foreground/Background colors are already set to Black/White.

Step 6 : Click the Gradient Tool. Click in the top panel to open the Gradient Editor.

Step 7 : Click the Foreground to Background preset.

Step 8 : By default Linear Gradient is selected. If it is not, click on it.
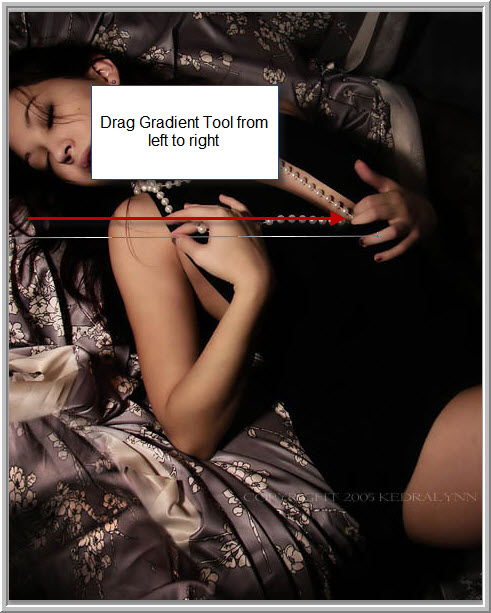
Step 9 : Drag the Gradient Tool from left to right keeping SHIFT pressed for three fourths across the image.

The image looks like this.

Step 10 : CTRL+CLICK the layer Mask. When a Layer Mask is selected a tiny border forms around it.

Instantly a selection appears on the left.

Step 11 : Press CTRL+SHIFT+I to invert the selection to the right of the image.

Step 12 : Open the tree bark texture. Press CTRL+A (Select all), then CTRL+C (copy). A selection forms around the image.

Step 13 : Go to the other image and press CTRL+SHIFT+ALT+V to Paste Into the selection.
The image looks like this.

Step 14 : Click on the Brush Tool or just press b on the keyboard.

Step 15 : Click in the top panel to open the Brush controls and set the Hardness to 0. You do not require to set the Size from here. Use [ (left square bracket) to decrease the size of the Brush and ] (right square bracket to increase it.

Step 16 : In the top panel reduce the Opacity to 50% and the Flow to 75%. (Remember to reset both to 100% after finishing this tutorial otherwise you will have problems later in using the Brush).

Step 17 : Click on the Layer Mask on Layer 2 to ensure that it is selected.
The Foreground/ Background colors remain set to Black/White.

Step 18 : Using a small Brush paint over the face till the tree bark textures fades. I will do the same for the arm.

Step 19 : I have gone over the arm as well as her neck and face with the Brush. That is all.
Other Photoshop tutorials are here


