


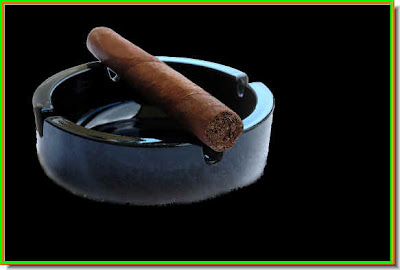
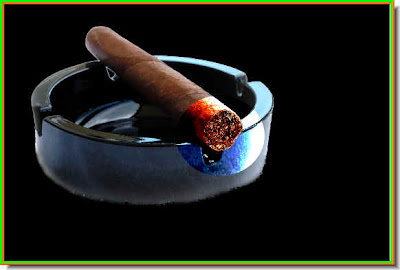
Step 1 : I have opened this photo in Photoshop. You can see that the cigar is not lit.
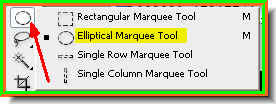
Step 2 : Click the Marquee Tool and select the Elliptical Marquee Tool.
Step 3 : Draw a selection. You do not have to be very accurate.

Step 4 : Press CTRL+J and the circular selection will be copied and pasted to a new layer i.e. Layer 1.
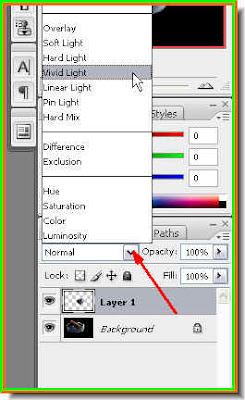
Step 5 : Change the Blend Mode of the Layer to Vivid Light.
This is how the cigar looks.
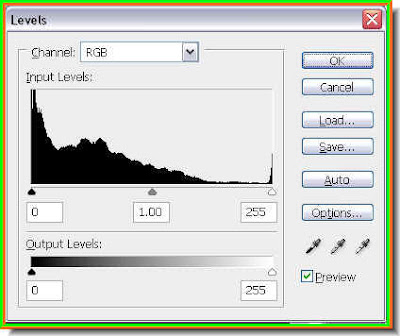
Step 6 : Press CTRL+L to bring up the Levels dialogue box.
Step 7 : Drag the White slider from the extreme right to somewhere in the middle.
This is how the cigar looks. Step 8 : Change the Blend Mode to Linear Light. At least that is what is suitable here.
This is how the cigar looks.

Step 9 : Click the Add Layer Mask button and a Layer Mask forms besides the layer thumbnail on Layer 1.

Step 10 : Click the Brush Tool to select it. You can see how the Brush Tip looks like on the top panel. Here is a trick. Keeping SHIFT pressed click the [ (left bracket key). This will make the Brush tip softer. Click the ] (right)bracket key while keeping the SHIFT pressed will make it harder.
I have clicked the [ (left) bracket key keeping SHIFT pressed. This has softened the brush tip. Compare the tip with the illustration above and you can see the difference for yourself.
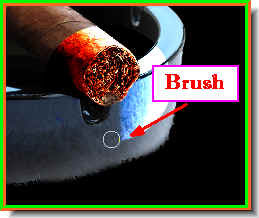
Step 11 : I am using brush to wipe away the discoloration that took place when I changed the Blend Mode after the cigar tip was cut and pasted to a new layer in Steps 3 & 4.
Step 12 : I have completed the brushwork on the ashtray.
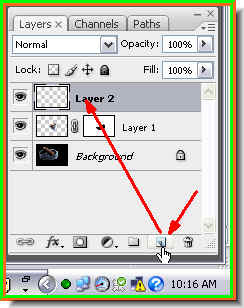
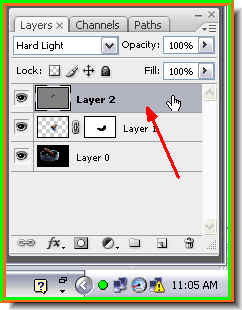
Step 13 : Now click the New Layer icon and a new layer i.e. Layer 2 forms.
Step 14 : Press SHIFT+F5 and the Fill dialogue box comes up. From the dropdown change the Use to 50% Gray. Click ok.

Look in the Layers pallette. You will find the layer filled with 50% Gray.

This is how the image looks.
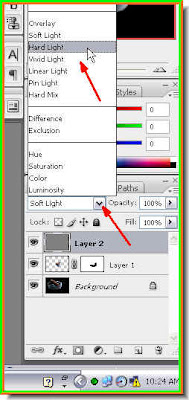
Step 15 : Change the Blend Mode of Layer 2 to Hard Light.
This is how the image looks.
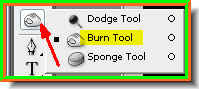
Step 16 : Click the Burn Tool to select it.
Step 17 : Look in the top panel. The Exposure should be set at 50 %
Step 18 : With the Burn Tool, paint to make the cigarette end before the glowing end look darker.
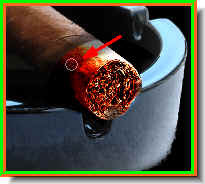
Step 19 : This is how the cigar now looks.

Step 20 : Now click on the Background layer.

Step 21 : This dialogue box pops up. Click ok.

The Background layer has changed to Layer o. This step was necessary as a Background layer cannot be edited.
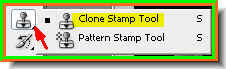
Step 22 : Click the Clone Stamp Tool to select it.
Step 23 : Alt+Click to clone. I am cloning the black and adding to the glowing end of the cigar to make it look more realistic.

Step 24 : You can clone from anywhere.

The cigar tip now looks it is lit. Now to create the smoke.
Step 25 : Click on the topmost layer i.e. Layer 2.
Step 26 : Click on the New Layer button and a new layer i.e. Layer 3 forms above Layer 2.

Step 27 : Click the Elliptical Marquee Tool.

Step 28 : Set the Feather in the top panel at 30 pixels.
Step 29 : Draw an elliptical selection with the eliptical Marquee Tool.

Step 30 : Make sure the Foreground is set to Black and Background to White. If it is not press 'x' then 'd' on the keyboard to set it to the default colors.

Step 31 : Press CTRL+BACKSPACE to fill the selection with the background color which is white.

Step 32 : Press CTRL+D to deselect.
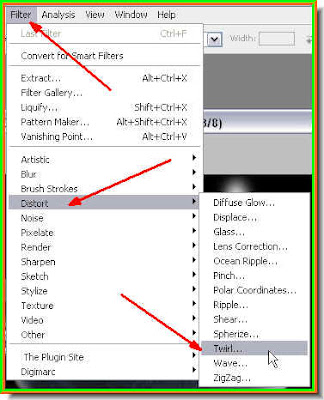
Step 33 : Go to Filter>Distort>Twirl.
Step 34 : The Twirl dialogue box opens. I have set the Angle at 50 degrees. Click ok.

This is effect you get. The smoke 'bends'.

Step 35 : Press CTRL+F. This will bend the 'smoke' even further.

Step 36 : Press CTRL+F another two times. The 'smoke' bends even further.
Step 37 : Click the Move Tool.
Step 38 : Use the cursor or Move Tool to reposition the 'smoke'.

Step 39 : Press CTRL+J. This will duplicate Layer 3. Layer 3 copy forms above Layer 3.

Step 40 : Use the Move Tool to reposition the second column of 'smoke'.
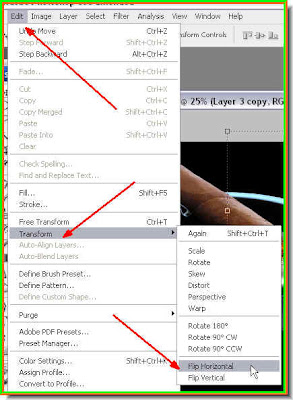
Step 41 : Go to Edit>Transform>Flip Horizontal.
The 'smoke' flips horizontally.

Step 42 : Now use the cursor to drag the selection around the 'smoke' so that it elongates.
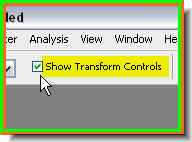
If the selection is not visible, it is because 'Show Transform Controls' is not checked. Check it if it is not. It is called 'Bounding Box' in PS 7 and is found in the same place.
Step 43 : Now click the tick mark in the top panel to apply the transformation.

Step 44 : Press CTRL+J. This will duplicate Layer 3 copy. A New Layer 3 copy 2 forms.
Step 45 : Again reposition the new 'smoke' layer with the cursor.
Step 46 : Pres CTRL+F. This will bend the 'smoke' layer.

Step 47 : Now press CTRL+F twice. there is nothing hard and fast about it. You might press it a number of times to distort the 'smoke' to your satisfaction.
 Step 48 : Press Shift and click on Layer 3. This will highlight all three 'smoke' layers.
Step 49 : Press CTRL+E. This will compress the 3 'smoke' layers into one.

Step 50 : Go to Filter>Blur>Gaussian Blur.

Step 51 : The Gaussian dilaogue box appears. I have given a Radius of 21.4 pixels. You can increase or decrease the blur by dragging the slider to the right or the left.
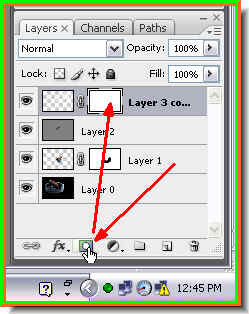
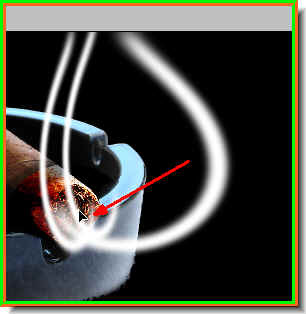
Step 52 : Now click on the Add Layer Mask button and a layer mask forms next to the layer thumbnail on Layer 3 which is the smoke layer.

Step 53 : Click the Brush Tool to select it.

Step 54 : Brush away some of the smoke to make the burning cigar stub more visible.

And there is the cigar now lit complete with smoke. That is all.


