


Step 1 : Open a new white layer.
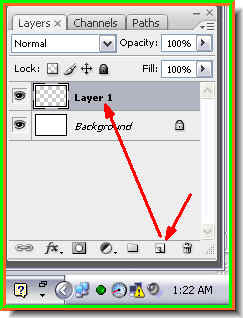
Step 2 : Click the Add New Layer button and a new layer -- Layer 1 forms over the Backgound layer.
Step 3 : Click the Lasso Tool to select it.
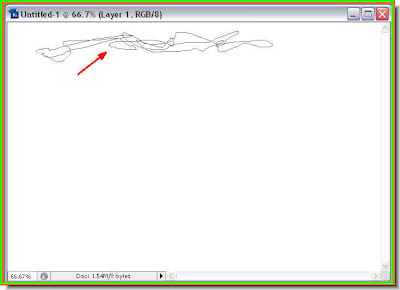
Step 4 : Keeping the left mouse button pressed begin 'scribbling' a frame as shown.
Step 5 : Scribble all around the layer like a frame. You do not have to very particular.

Step 6 : As soon as you come back to the first point a selection of 'marching ants' forms.
Step 7 : Make sure your Foreground is set to Black and Background to White. If it is not, press 'x' and then 'd' on the keyboard to set it to the default.
Step 8 : Press ALT+BACKSPACE to fill the selection with the Foreground color i.e. Black.

Step 9 : In the Layers pallette click off the eye icon of the white Background layer.

This makes the background appear transparent.

Step 10 : I have opened this photo in Photoshop for framing.
Step 11 : Press SHIFT and drag the photo to the other one.

Step 12 : Keeping SHIFT pressed while dragging will make it land in the middle of the other photo.

Step 13 : Make sure that Show Transform Controls (Bounding box in PS 7) is checked in the top panel.

Step 14 : Press SHIFT+ALT and drag the top right corner upwards. It will resize the photo proportionately.
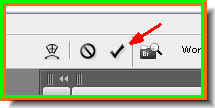
Step 15 : Click the Tick mark in the top panel at right to apply the transformation.
Step 16 : Press ALT. Place your cursor between Layer 2 and Layer 1. You will see a small circle form. Just click. It will form a Clipping Mask.

Step 17 : And there she is inside the frame.

Step 18 : You can reposition the photo inside the frame by dragging with the cursor.
Step 19 : Open a new white layer.
Step 20 : Drag the white layer onto the photo.

Step 21 : The white layer covers the photo completely. If it does not press ALT+SHIFT and drag a corner handle till it covers up the other photo.

Step 22 : Go to Layer>Arrange>Send To Back.

Step 23 : The white layer is now behind the image. Step 24 : Now click on Layer 1.
Step 25 : Click the Add a New Layer Style Button.

Step 26 : From the popup click on Blending Options.
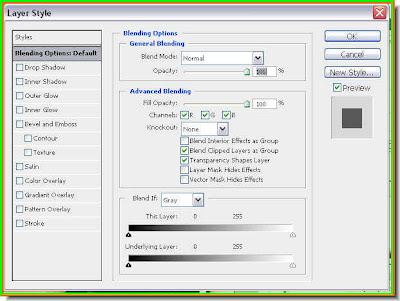
Step 27 : The Layer Style/Blending Options dialogue box opens. Step 28 : In the left pane of the Layer Style dialogue box click on Drop Shadow where shown by the red arrow.
Step 29 : In the Drop Shadow control panel in middle drag the Distance, Size and Spread in that order suitably. You will be able to see the effect on your image. Lastly reduce the Opacity to 50 %. Do not click ok.

Step 30 : In the panel at the right of Layer Styles click on Stroke where shown by the white arrow.
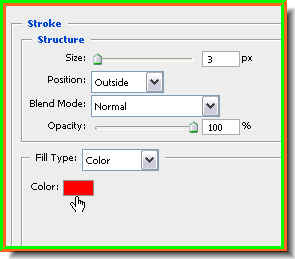
Step 31 : In the Stroke controls click on the red color box to bring up the Color Picker.
Step 32 : In the Color Picker click on the white as shown by the arrow.

Step 33 : In the Stroke controls in the middle put the size at 5 instead of the default 3. Now click ok in the Layer Styles.

Step 34 : This is how the image looks.
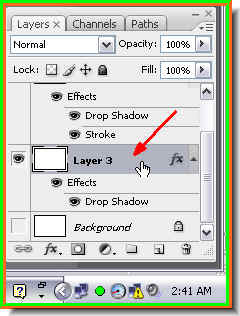
Step 35 : Click on Layer 3.
Step 36 : Select the Gradient Tool.

Step 37 : Click on the top panel where the white arrow points to.

Step 38 : The Gradient Editor opens. You can see the different presets on top. I am clicking on one of the presets to select it.

Step 39 : Change the Gradient Type to Noise.
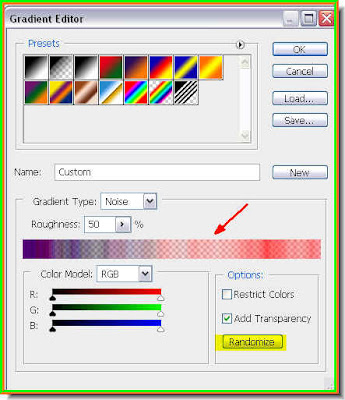
Step 40 : Check the Add Transparency check box.
Step 41 : Drag the Gradient Tool diagonally for a short distance in the middle of the image.

And here is the finished frame. Not much trouble was it?


