


Photoshop CS 5
 has a brand new feature called Puppet Warp. You can warp both text and images with it. I will demonstrate how to use the Puppet Warp feature on text. It is easy to do.

Step 1 : Open a Blank White document.

Step 2 : Click the Text Tool.


Step 3 : Click in the top panel where the little white arrow points to reveal the Fonts available in Photoshop CS5. There are quite a lot of new ones.

Step 4 : I am clicking on Arial to choose the Font.

Step 5 : I have typed in 30 as the Font Size. You can set any size you want.

Step 6 : Draw out a Text Box with the Text Tool.

Step 7 : This is the Text I have typed.

Step 8 : Click the Tick mark in the top panel at right.

Step 9 : This is how the image looks.

Step 10 : Click the Move Tool.

Step 11 : Keeping SHIFT pressed drag the text down.

Step 12 : This is how the Layers palette looks like.

Step 13 : Right click the Text Layer. From the pop-up click on Convert to Smart Object.

Step 14 : This is how the Layers palette looks after conversion of the text to a Smart Object.

Step 15 : Go to Edit>Puppet Warp .
.

Step 16 : In the top panel the Mode is set to Normal, the Density to Normal and Show Mesh is ticked.

Step 17 : If Show Mesh is checked the text looks like this.
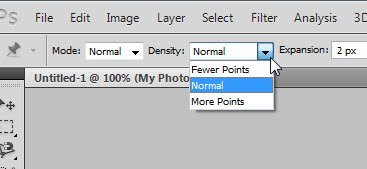
Step 18 : Look at the Density drop down. There are three options. Leave it at the default Normal.

Step 19 : Uncheck the Show Mesh.

Step 20 : Click with the cursor. Each time you click a Pin appears. I have clicked the letter M with 5 Pins.

Step 21 : Press SHIFT and drag the top Pin up as shown.

Step 22 : Release SHIFT and drag the other leg of the Pin up.

Step 23 : Now drag the right leg of the letter down,

Step 24 : I have now placed Pins on the letter y.

Step 25 : I have dragged the Pins as shown.

Step 26 : I have placed two Pins on the letter P.

Step 27 : I have dragged up the top Pin of the letter P. Note that the Pins on ' My' have greyed out.

Step 28 : I have placed Pins on the letter 'h' and dragged the top and bottom Pins up and down. This is how you go about it.

Step 29 : I have arrived at the last letter and dragged the Pins up and down. Now press ENTER.

Step 30 : This is how the Text looks.

Step 31 : Go to Window>Styles.

Step 32 : The Styles dialogue box opens.

Step 33 : Click the tiny Black arrow the White arrow points to.

Step 34 : When you click the tiny Black arrow the other Presets are revealed. I am clicking on KS Styles. It is new.

Step 35 : As soon as you click on KS Styles this dialogue box opens. Click OK.

Step 36 : These are the KS Styles.

Step 37 : I am clicking on Neon Ice. It is the name of the Style.

Step 38 : As soon as I click the Neon Ice Styles, this is how my image looks. You can use any of the Styles and Presets.

Step 39 : After use you should always Reset Styles, otherwise the last used one becomes the default.

Step 40 : Click the small double headed arrow to make the Styles dialogue box go away.

Step 41 : I am opening a free stock image from the My Pictures folder on my computer.

Step 42 : Press CTRL+A (Select All), then CTRL+V (Copy).

Step 43 : I have gone over to the image with Text and pressed CTRL+C (Copy). The image is very large and has covered my Text entirely.

Step 44 : I have pressed CTRL+T. Then pressed SHIFT+ALT and dragged the left top corner handle down and up several times to resize the image. Press ENTER to apply the transformation.

Step 45 : I will be using good old Magnetic Lasso to cut out the image from its background.
In fact, I should have done so earlier before moving the image to the Text layer.

Step 46 : Just click a point with the Magnetic Lasso and drag all around the figure. If you place a point wrong press DELETE to remove the last point and continue.

Step 47 : The image is now selected.

Step 48 : Press CTRL+SHIFT+I to inverse the selection.

Step 49 : Press DELETE. Press CTRL+D to deselect. The Background has been removed.

Step 50 : This is how the Layers palette looks. The image of the girl is on Layer 1.

Step 51 : Drag Layer 1 to just before the Background Layer.

Step 52 : Layer 1 is now just over the Background Layer.

And here is my finished Text Puppet Warp. I will post a tutorial using the Puppet Warp on an image.
Other Photoshop tutoials arre here


