


I have been looking at techniques at selecting skin in Photoshop. Most processes are complicated. I have a way in which it can be done without much fuss. Here only the skin area will be selected without affecting the rest of the image.You need not be an expert to do it. You can also do it in any version of Photoshop. So let's begin.

Step 1 : I have opened this free stock image. You can download it here. It belongs to AngieStock. Any image will do. This is a high resolution image. High resolution images are better to work with. But any image should do. My purpose is first to isolate the skin area in the image. Before I do that there is one simple step to be done.

Step 2 : Press CTRL+J. The Background Layer will duplicate into Layer1. We will be working on this image.

Step 3 : Go to Select>Color Range.

Step 4 : The Color Range dialogue box opens. Note there are three eyedroppers. The second is marked with a + (plus) sign and last with a - (minus) sign.

Step 5 : I have clicked on the hand with the cursor. The preview immediately changes in the Color Range dialogue box.

Step 6 : Click the Eyedropper with the plus sign.

Step 7 : As soon as I click with the Eyedropper with the plus sign on the shoulder, it lightens.

 Step 9 : Click the Eyedropper with the minus sign.

 Step 11 : Note there is a Fuzziness slider at the top. I have increased it to 100 and continued clicking with the Eyedropper with the plus and minus signs, till you have a reasonable selection.
 Step 12 : Click OK in the Color Range dialogue box. You will get a selection of marching ants.

 Step 14 : The Foreground Color should be set to Black and Foreground to White. If it is not press X and then D on your keyboard. To add to the Red Mask paint with Black. To uncover the Mask press X on the keyboard to switch to White as Foreground Color and paint with it.

 Step 16 : The eyes, lips and nose are important. We do not want them to be affected.
 Step 17 : Click the Brush Tool.
 Step 18 : I am painting over the eyes, because I do not want to affect it.
 Step 19 : Paint to revealed areas of skin that have been Masked. Use the [ (left bracket) to make the Brush size small and ] (right bracket) to make it big.
 Step 20 : You can see that parts of her arm were masked. I am painting with White as the Foreground Color to reveal the skin areas.
 Step 21 : I have unmasked the skin areas and painted over with the Red in the background which were not covered.

 Step 23 : Press Q on keyboard. The Red Mask goes away. A selection takes it place.
 Step 24 : Click the Add Layer Mask button. A Layer Mask forms next to the layer thumbnail on Layer1.


 Step 32 : Click the Add New Fill or Adjustment Layer button. Click on Hue/Saturation from the pop-up.
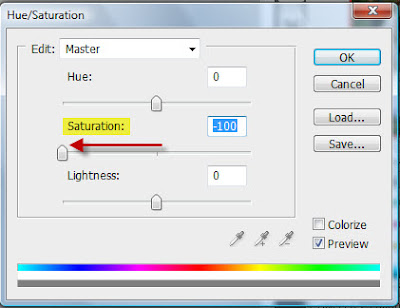
Step 33 : The Hue/Saturation dialogue box opens. Drag the Saturation slider fully to the left.

 Step 35 : First drag the Saturation slider slowly to the right till the color reappears. Then drag the Lightness slider gradually to the right, till you are satisfied. There is no hard and fast rule. Click OK.

Step 36 : This is how my image looks.
 Step 37 : After zooming into the image, I find that some areas which should not have been masked have been masked. This has to be fixed.

 Step 39 : Paint with White set as Foreground Color to remove Masked areas. Then click off the eye icon in Hue/Saturation Layer.

 This is my finished image.
Otherphotoshop tutorials are here
You you have any queries on this tutorial email me at pradip.chowdhury@gmail.com

Step 8 : I have clicked alternately on the skin in the image and with the eyedropper with the plus sign and have selected more White areas.


Step 10 : I have clicked with the eyedropper with the minus sign to darken the background. Some still remain. You will have to alternately click with the Eyedropper with the plus sign and the one with the minus sign to select the skin area.


Step 13 : Press Q on the keyboard. A Red Mask appears.


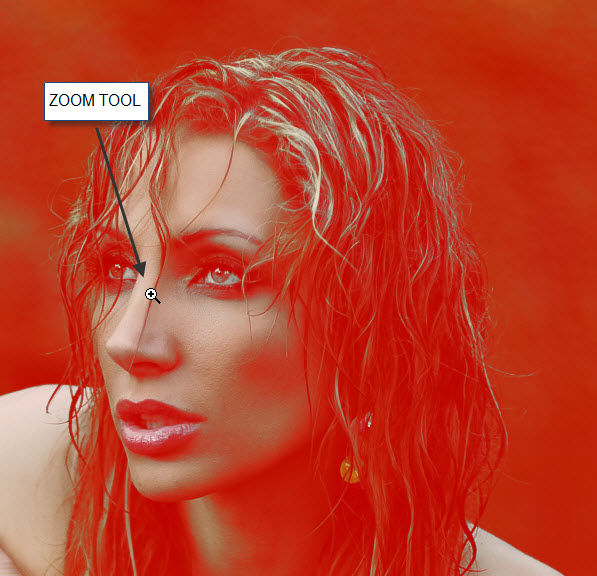
Step 15 : Use the Zoom Tool to zoom into the image to see which portions have been covered by the Mask and which needs to be covered or uncovered.


Step 22 : Some of the hair not been properly masked. I have painted it over with the Foreground Color set to Black.


Step 25 : The selection of marching ants disappear as soon as you click the Layer Mask.

Step 26 : Click the Channels palette which is next to the Layers palette. You will find the Layer1 Mask at the bottom. CTRL+Click the Layer thumbnail.

Step 27 : The Red Mask reappears as also the selection of marching ants.

Step 28 : Click off the eye icon on the Layer1 Mask.

Step 29 : Click on the RGB channel.

Step 30 : Click back on the Layers palette.

Step 31 : This is how the image looks.


Step 33 : The Hue/Saturation dialogue box opens. Drag the Saturation slider fully to the left.

Step 34 : This is how the image looks.


Step 36 : This is how my image looks.


Step 38 : Click on the Channels pallete.


Step 40 : Click back on the layers palette.

Otherphotoshop
You you have any queries on this tutorial email me at pradip.chowdhury@gmail.com


