


Let us make a Triptych in Photoshop. But what is a triptych?
It is defined as 1. A work consisting of three painted or carved panels that are hinged together and 2. A hinged writing tablet consisting of three leaves, used in ancient Rome. You may have seen examples of it. In this tutorial we will create Triptych from a single image.

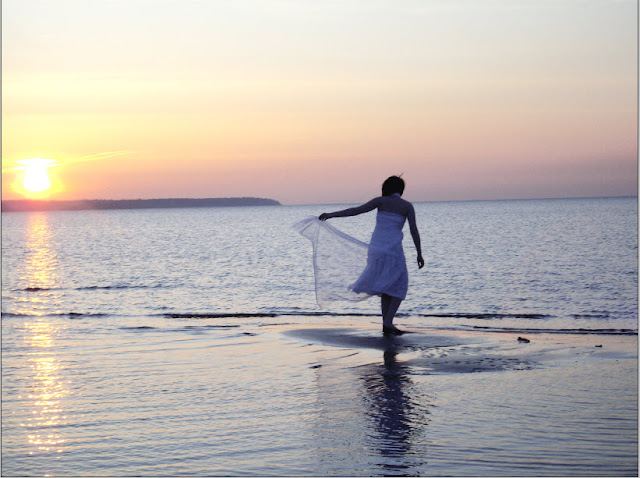
Step 1 : This is the photo I will be using for creating the triptych. You can download it here. It belongs to kristy victoria
Before we begin work on the image some preliminary work has to be done.

Step 2 : Go to File>New.


Step 3 : Set the Preset to International Paper and Size to A4. Click OK.

Step 4 : This is the image you get. We must, however, have to turn the White Layer on its side.

Step 5 : Go to Image>Rotate Canvas.

Step 6 : And the White Layer is rotated.

Step 7 : Go to Image>Duplicate.

Step 8 : This dialogue box opens. Click OK.

Step 9 : The duplicate White Layer opens. Minimize it.

Step 10 : Go to Image>Canvas Size.

Step 11 : The Canvas Size dialogue box opens. We will be changing the Width from 11.693 inches (make sure it is set to inches from the drop-down) and Height of 8.267 inches.

Step 12 : I am reducing the Width to 10.693 and Height to 7.267 i.e. one inch from both Width and height.

Step 13 : As soon as click OK in the Canvas Size dialogue box, this warning appears. Click Proceed.

Step 14 : Again go to Image>Canvas Size.

Step 15 : Now change Width and Height to percentage. Reduce the Width to 30. Click OK.

Step 16 : Again this warning dialogue box opens. Click Proceed.

Step 17 : This is how the White Layer looks like.

Step 18 : Now bring up the minimized image. After opening it press CTRL+A (Select ALL) and CTRL+C (Copy). Minimize the image.

Step 19 : Go back to the White Layer.

Step 20 : Press CTRL+V (Paste). The image will be pasted on the White Layer. Note the entire image does not show.

Step 21 : Press CTRL+T. A selection forms which shows you the position of the rest of the image.

Step 22 : Press SHIFT+ALT and drag the left corner handle up so that the image covers the White Layer.

Step 23 : Reposition with cursor so that the leg can be seen. Keep SHIFT pressed while repositioning. Press ENTER to apply the transformation.

Step 24 : This is how the Layers palette looks like.

Step 25 : Press CTRL+J. Layer 1 duplicates into Layer1 copy.

Step 26 : Click the Move Tool.

Step 27 : Drag the image to the left with SHIFT pressed so that the image of the girl can be seen. If you are using another image drag to make another portion of the image visible.

Step 28 : Press CTRL+J. Look in the Layers Palette. Layer 1 copy has duplicated into Layer 1 copy 2.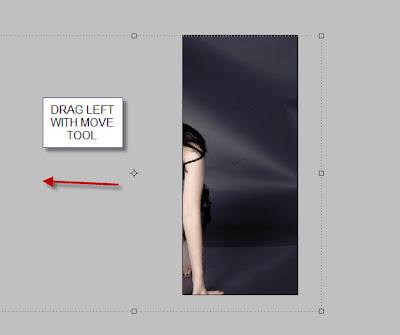

Step 29 : Drag left with Move Tool again to expose another part of the image. Remember to keep SHIFT pressed while dragging to the left.

Step 30 : Press CTRL+A, then CTRL+C.

Step 31 : Bring up the White Layer kept aside and press CTRL+V. A portion of the image is pasted in the middle of the White Layer.

Step 32 : Click off the eye icon on Layer 1 copy 2. Click on Layer 1 copy.

Step 33 : Press CTRL+C.

Step 34 : Bring up the White Layer. Press CTRL+V. The second layer is pasted over the earlier layer.

Step 35 : Click off the eye icon on Layer 1 copy. Click on Layer 1.

Step 36 : Press CTRL+C.

Step 37 : Bring up the White Layer again and press CTRL+V. The layer is again on top. The other two layers are hidden behind it. Press CTRL+D to deselect.

Step 38 : Look at the Layers palette. You will be able to make out which part of the image is on which layer. Layer 3 has the portion of leg at the left, Layer two the middle portion containing the face and Layer 1 the right portion of the image.

Step 39 : Click the Move Tool.

Step 40 : I have pressed SHIFT and used the Move Tool to drag the Layer with the leg to the left. I have left no space in between. However since the leg did not match the proportion of the girl, I pressed CTRL+T. Then dragged the bottom right corner and the top right corner to align the leg in the two layers correctly.

Step 41 : You will have to drag the corners again to fine tune the alignment. Press ENTER each time.

Step 42 : Click on Layer 1.

Step 43 : Now move the third layer with the Move Tool to the right.

Step 44 : Click back on Layer 3.

Step 45 : Click on Rectangular Marquee Tool.

Step 46 : Draw a selection with the Rectangular Marquee as shown. I am leaving out the edges that should not be part of the image at the bottom and top.

Step 47 : Press CTRL+SHIFT+I to invert the selection.

Step 48 : Press DELETE. The offending portions at the bottom and top are deleted. Press CTRL+D to deselect.

Step 49 : Note that you are on Layer 3 which is the left portion of the image.

Step 50 : Click the Move Tool.

Step 51 : After clicking the Move Tool. Keep SHIFT pressed. Use the left arrow key 10 times. (Nothing hard and fast about it though).

Step 52 : Click on Layer 1. It is the right portion of the image.

Step 53 : Press SHIFT. Press the right arrow key ten times. Now all the panels are spaced out evenly.

Step 54 : Click on the Layer Style button.

Step 55 : From the pop-up click on Blending Options.

Step 56 : In the Blending Options click on Drop Shadow. Drag the Distance, Size and Spread to your liking. Do not click OK.

Step 57 : Click on Stroke. Click the red square.

Step 58 : I have clicked on a grayish white in the Select Stroke Color dialogue box that opens. If you want to choose the exact shade you can type in e1dddd in the highlighted box at the bottom.
Click OK in the Select Stroke Color dialogue box.

Step 59 : In the Stroke dialogue box I have dragged Size to 15. There is nothing hard and fast about it.
Now click OK.

Step 60 : The Drop Shadow and Stroke has been given to the panel at the right. The same has to given to the other two panels.

Step 61 : Click on the Effects under Layer 1.

Step 62 : Right click the Effect and from the pop-up click on Copy Layer Style.

Step 63 : Click on Layer 2.

Step 64 : Right click Layer 2. From the pop-up click on Paste Layer Style.

Step 65 : Click on Layer 3.

Step66 : Right click Layer 3 and from the pop-up click on Paste Layer Style.

Step 67 : The triptych is complete.

Step 68 : Click on the Background layer.

Step 69 : Click the Eyedropper Tool.

Step 70 : I have clicked on the hair with the Eyedropper.

Step 71 : Press X on the keyboard. This is to change the Foreground/Background Color. The Foreground Color has already been selected. I have now clicked on a portion of the arm.

Step 72 : This is how the Foreground and Background Colors look after choosing them in the last two steps.

Step 73 : Click the Gradient Tool.

Step 74 : In the top panel click where the arrow points to bring up the Gradient Editor.

Step 75 : Click the first Preset in the top row. Click OK.

Step 76 : Drag up from right bottom to top left corner.

And, here is the finished image.
Here is another free stock image. You can download it here It belongs to Kechake-stock
 The triptych following the same method.

Here is another free stock image. You can download it here It belongs to Kechake-stock

Other photoshop tutorials are here
Thr original tutorial is by Gavin Hoey. His video tutorial is here.
Thr original tutorial is by Gavin Hoey. His video tutorial is here.


