


I had shown how to create a simple background with Brushes and layers. The tutorial is here
To continue from there. You can add a figure to the background.
 This is the effect I will be creating.

Step 1 : This was the background created in the earlier tutorial for which I have given the link above.

Step 2 : I have extracted the figure from the background of a free stock image. You will find the free stock image here
It belongs to
skydancer-stock

Step 3 : Drag and drop it the image of the cutout figure onto the Background with the Move Tool.

Step 4 : Press CTRL+T. Drag out a corner handle to make the figure bigger. Press ENTER.
The selection will disappear.

Step 5 : The figure is on the topmost layer or Layer4.

Step 6 : Drag Layer 4 to just above the Background Layer.

The image looks like this.

Step 7 : Change the Blend Mode to Hard Light.

The image looks like this.

Step 8 : Click on the topmost layer which is now Layer3.

Step 9 : Click the New Layer icon. A new Layer 5 forms on top.

Step 10 : Flip the Foreground Color to White by pressing x on the keyboard.

Step 11 : Click the Brush Tool.

Step 12 : Click in the top panel to open the Brush controls. Set the Hardness to 100% and the Size to around 70.

Step 13 : Bring up more Brush Controls by clicking the Brush Control icon at the right.

Step 14 : Click the Brush Tip Shape. Drag the Spacing slider till the tip separates as shown.
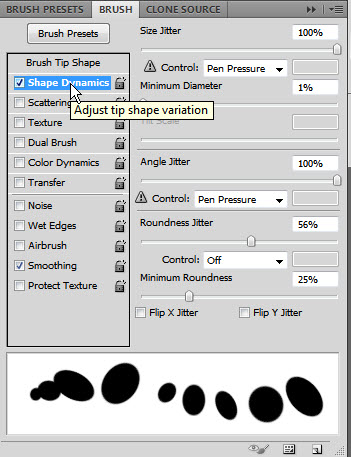
Step 15 : Click on Shape Dynamics. Leave it at the default settings.

Step 16 : Click scattering. make sure Both Axes is checked.

Step 17 : Drag with the Brush as shown.

Step 18 : Click and drag with the Brush on other parts of the image as shown.

Step 19 : Lower the Opacity of Layer5 to 70%.

The image looks like this.

Step 20 : Go to Filter>Distort>Spherize.

Step 21 : The Spherize dialogue box opens. Leave them at the default settings. Click OK.

This is how the image looks.

Step 22 : Go to Filter>Distort>Polar Coordinates.

Step 23 : In Polar Coordinates, check Rectangular to Polar. Click OK.

The finished image. Other photoshop tutorials are here


