


There are a host of Brush sets built into Photoshop for use from making backgrounds to creating special effects.
There are also a huge number of good quality Brushes available on the internet which you can download for free for your own use. You can do this tutorial in version of Photoshop.

I want you to download this free Brush. You will find it here
It belongs to kuschelirmel-stock
You will be able to download it only after registration. Registration is also free. I will show you how to install it in Photoshop.

Step 1 : Go to File>New.

Step 2 : You can use any of the Presets. I am using 'Default Photoshop Size'. If you intend to print it change the resolution to 300. I have not done so. Click OK.

Step 3 : A White document opens.

Step 4 : Press CTRL+I. The background Layer changes from White to Black.

Step 5 : Click the New Layer icon. A new Layer1 forms.

Step 6 : Click the Foreground Color. It brings up the Color Picker. This is the default setting of the Color Picker. The column of color in the middle is called the Spectrum. Notice that is a tiny slider at the bottom of the Spectrum.

Step 7 : Drag the slider up and down to change color.
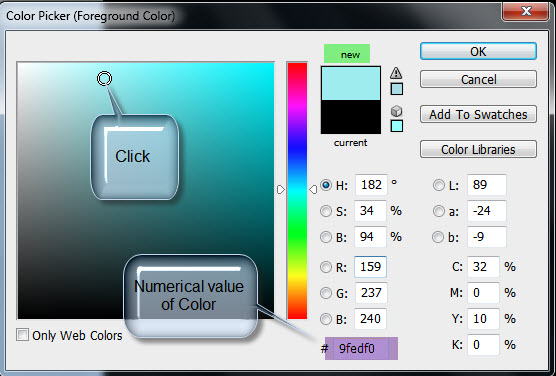
Step 8 : Click on the left panel to choose a shade of the color picked. I have clicked on a shade. As soon as click on a shade the New at the top changes to the color picked. At the bottom in the highlighted box the numerical value of the color appears. If you want to use the exact shade that I have picked type 9fedf0 in the box. Click OK.

Step 9 : The Foreground Color changes to the Color picked.
Now to use the Brush.

Step 10 : In the link I have provided above click the Download File.

Step 11 : Download the file. It is a rar file. You will have to have Winzip installed.
You can use the trial version.

Step 12 : Right click the rar file and click on extract here.

Step 13 : The Brush file (it is known as an abr file) is extracted. Remember where you keep the Brush on your computer because you will have to navigate to it in just a while.

Step 14 : Click where the arrow points to reveal the Brush controls.

Step 15 : Click the tiny Black arrow. A drop-down menu appears. Click on Load Brush.

Step 16 : Navigate to the folder where you downloaded and extracted the file and click to load it into photoshop.

Step 17 : Scroll down and you will find the Twirl Brushes (that is what it is called) in the last two rows at the bottom.

Step 18 : Click the very first Brush. It is called twirl 7.

Step 19 : When you move the Brush over the Black Background, you will find that the size is huge.

Step 20 : Press the [ (left square bracket) to decrease the size of the Brush. When you need to increase it press the ] (right square bracket). Remember this useful shortcut.
I have reduced the size of the Brush and will click just once on the image.

I have clicked just once with the Brush.

Step 21 : Click the New Layer icon. A new Layer 2 forms. Why am I making a new layer? This is to put each brush on a separate layer. Should I not like a particular layer I can just delete it. If you put all your brushwork on a single layer you will not be able to do much about it if something goes wrong.

Step 22 : Click the Foreground Color. The Color Picker comes up again. I have clicked on Green in the Spectrum and then a shade in the left panel. The numerical value of the color is b4f09f. You can type it in straightaway into the highlighted box if you wish to use it. Click OK.

Step 23 : The Foreground Color changes to the color picked.

Step 24 : Click the second Brush.

Step 25 : Click randomly with the Brush. Make it small first by pressing the [ key on the keyboard.

Step 26 : Vary the size of the Brush and click randomly on the image. I have got this effect.

Step 27 : Click the New Layer icon. A new Layer 3 forms.


Step 28 : Click the Foreground Color. The Color picker comes up. I have clicked on a shade of Red. The numerical value is given. Click OK. The Foreground color changes to the color picked.

Step 29 : I have clicked on another Brush. You can see which one.

Step 30 : Click the Brush icon on the right side of Photoshop. In Photoshop7 you will find it on the top panel at the right.

Step 31 : Click the Brush Tip Shape. Drag the Spacing slider at the bottom till the circles separate.

Step 32 : Next click on Shape Dynamics and leave it at the default settings.

Step 33 : Click the Scattering. Make sure that Both Axes is checked. The slider should be midway.

Click the tiny double arrows to collapse the panel.

Step 34 : Make the Brush big and small alternatively and drag to get an effect like this.
You can use any number of Brushes and any number of Colors.
That is all. You can save your work as a psd file, so you can work on it later. Otherwise flatten the image by going to Layers>Flatten image.
Other photoshop tutorials are here.


