


The Oil Paint Filter in Photoshop CS6 is something new. From its name it is not hard to guess that it gives an effect like oil painting to images. This was something which could be done earlier depending on the skill in photoshop. Now it is quite simple.

This is an image with the effect applied.

I will be using this image of a hibiscus that I shot some time ago to demonstrate the Oil Filter.

Duplicate the Background Layer by pressing CTRL+J.

Step 1 : You will find Oil Paint under Filter. Click to access it.

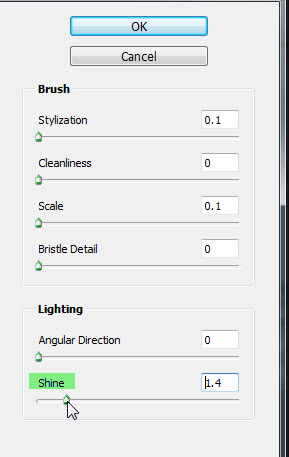
The Oil Filter opens across the canvas. The controls are on the right.

The Controls are on the right. There are sliders under the head of Brush and Lighting. I will explain the sliders one by one.

This is the effect of the settings given above by default.

Step 2 : I have set all the sliders to 0.

The image does not have any effect since all the sliders are at 0.
Step 3 : Under Brush first drag the Shine slider a little way up. This increases the contrast and you will be able to see what the other sliders do.

The image has a certain effect already. It is not necessary to duplicate the values I give. It is just to give an explanation. Once you learn how to use this filter you will be able to give your own values easily.

Step 4 : Drag the Stylization slider a bit.

The image changes subtly. You can see the effect. It might strike you that it is a bit too much possibly.

Step 5 : The Cleanliness slider tones down the effect. Drag it to the maximum and see that the effect of the Stylization slider goes away. The Cleanliness slider must be used with the Stylization slider to moderate the effect.

Step 6 : The Scale slider increases or decreases the stroke of the bristles of a brush.

Note how vivid the brush strokes appear.

Step 7 : The Bristle Detail is increase how much detail goes into a brush stroke. The more you increase the more vivid will be the brush stroke.

Step 8 : Under Lighting the first slider is Angular Direction. This is to fine-tune your brush so that you can paint keeping in mind the light source. You can drag the slider from 0 to 360 degrees depending on the angle of the light on the image.

Step 9 : Dragging the Shine slider to the right will increase the overall effect and to the left it will decrease the overall effect. None of the values that I have given are absolute. It is just to show how the sliders work.

This is the effect I have got after applying the Shine slider after all the other sliders.

Step 10 : These are the settings I have given.

Step 11 : I am now readjusting the Cleanliness, Bristle Detail, Angular Direction and Shine sliders. After dragging the sliders you should see if it is the effect that you want, if not you can moderate it.

Step 12 : When you are done click OK.

Step 13 : As soon as you click OK you can see the progress of Photoshop applying the Oil Paint filter.

And this is the final effect with the settings that I have given.
Other Photoshop tutorials are here


