


Adjustment Layers can boost color and saturation of an ordinary image and make it worth a second glance. There are a number of Adjustment Layers which can be used. We are not looking at dramatic alterations. What is being attempted is make little changes in bits and pieces, which improves the overall effect.To fine tune the adjustment layers there is always Blend If, an advanced form of blending.

Step 1 : I have opened this free stock image which you will find here
It belongs to Lady-Lilith666-Stock
This is the effect I will achieve.

Step 2 : The New Adjustment or Fill Layer button is found at the bottom of the Layers palette.

Step 3 : The Adjustment Layers available are displayed. We will be using some of them.

Step 4 : Click Black & White.

Step 5 : The Black & White 1 Layer forms. Change the Blend Mode to Soft Light.

Step 6 : In the Black & White click the Auto button.

The image looks like this.


Step 7 : Click the Color Balance adjustment and a Color Balance 1 Layer forms above Black & White 1 layer.

Step 8 : The Color Balance is by default set to Midtones.

Step 9 : I have increased the Red to +15, Green to +20 and Yellow to -5 based on the colors of the image. and what I want to boost or decrease. Always study the colors in the image, then decide which you want to boost and which to decrease. Move the sliders in increments of 5 until you are satisfied. The Midtone correction has been made.

The image looks like this. The greens and reds have increased slightly.

A quick way to find the difference is to ALT+CLICK the eye icon in the Background Layer.

Step 10 : I have next clicked the Highlights. I have increased the Reds to +15, Green to +10 and Blue to +10.

The image looks like this. ALT+CLICK the eye icon on the Background Layer to see the difference.

Step 11 : I have lastly clicked on Shadows. I have increased the Green to +20 and Blue to +10.

The image looks like this.

Step 12 : Now double click the Color Balance 1 Layer where the small white hand points to.

Step 13 : Double clicking will bring up the Blending Options. The Blend If is at the bottom. Note the 'This Layer' and the Black and White sliders at each end.

Step 14 : Drag the Black slider to a little before the figure of 66 which increases as you move the Black slider to the right.

Step 15 : Press ALT and click on the Black slider. It splits into two halves. Move the split halves back and forth to reduce any harsh tones that may creep in. Click OK in Blending Options.


Step 16 : Next click the Curves Adjustment. The Curve 1 Layer forms.

This is the default setting of the Curves.

Step 17 : Click in the middle of the diagonal and on the top and bottom as shown.

Step 18 : Nudge the top point slightly up and the one at the bottom down to form a 'S' curve.

Step 19 : Now click on the Red channel.

Step 20 : Drag the top point up slightly to increase the Reds. If you drag down it will increase the Greens. Pull the bottom down slightly.

Step 21 : Select the Green channel. Drag the diagonal at the top down to increase the Reds and up to increase the Greens

Step 22 : Lastly I have selected the Blue channel and dragged up the midpoint which is the highlights.

The image looks like this.

Step 23 : Double click the Curve 1 layer to bring up the Blending Options.

Step 24 : Drag the Black slider up and then ALT+CLICK to split it. Press OK in Blending Options.

The image looks like this. ALT+CLICK the eye icon on the Background layer to see the before and after.
But is it not a pity that no detail can be made out in the front of the dress. Also her eyes are in shadow.

Step 25 : Press CTRL+SHIFT+ALT+E. A composite Layer 1 forms at the top.

Step 26 : Press the New layer icon. A new Layer 2 forms.

Step 27 : Press x on the keyboard to change the Foreground Color to White. Click the Brush Tool.

Step 28 : Click in the top panel to open the Brush Controls and set the Hardness to 0. To increase the Size f
the Brush press ] (right square bracket) and [ (left square bracket) to decrease it.
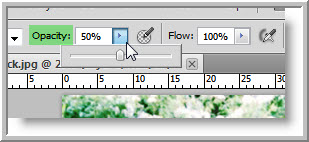
Step 29 : In the top panel lower the Opacity to 50%.

Step 30 : Click twice with a large Brush on the face.

Step 31 : Change the Blend Mode of Layer 2 to Soft Light.

The image looks like this. The shadows around the eyes have disappeared.

Step 32 : Click the New Layer icon. A new Layer 3 forms.

Step 33 : Click twice with the Brush on the front of her dress.

Step 34 : Change the Blend Mode of Layer 3 to Soft Light.

Step 35 : Click a few times more with the Brush till details of the dress are visible.

The finished image.
Other photoshop tutorials are here


